
Cryo-EM offers a way to get near atomic-resolution structures of biological molecules, perfect for imaging proteins and DNA. But how can you ensure you get impressive and informative cryo-EM images? The key is good cryo-EM sample prep.
All structures solved using cryo-EM started with an intact specimen in an aqueous solution.
But what makes a sample suitable for cryo-EM? What requirements does it impose upon them? And what do you rely on for quality control?
Whether you’re about to embark on an ambitious project involving cryo-EM or just looking to expand your knowledge of the field, we’ve got you covered.
Choose a free resource to help you move forward
DOWNLOAD
Culture Contaminants Reference Card
POSTER
Immunofluorescence Troubleshooting Guide
Stick with me as I present 5 essential considerations for cryo-EM sample prep to maximize your results.
Cryo-EM: A Very Brief Recap
Cryo-EM is electron microscopy performed on samples maintained at cryogenic temperatures (< 150 °C). For this article, we are focusing on cryo transmission electron microscopy (TEM). Cryo-EM takes advantage of two powerful techniques. Single particle analysis and formation of amorphous ice. Together, they increase the resolution limit of cryo-EM beyond that of conventional TEM.
Thus it allows the structure of biological samples such as proteins, viruses, and organelles, to be solved at near-atomic resolution.
And finally, for these samples to be visualized under an electron microscope, they must first be applied to a sample grid. The grid is a flat surface that enables samples to be placed into the microscope. We’ll discuss grids in more detail later on.
You can read up on the history of cryo-EM, to understand the developments that lead to this powerful technique.
How Do You Prepare Samples for Cryo-EM?
Before getting down to the nitty-gritty of sample preparation, let’s look at the entire cryo-EM sample prep workflow (Figure 1).
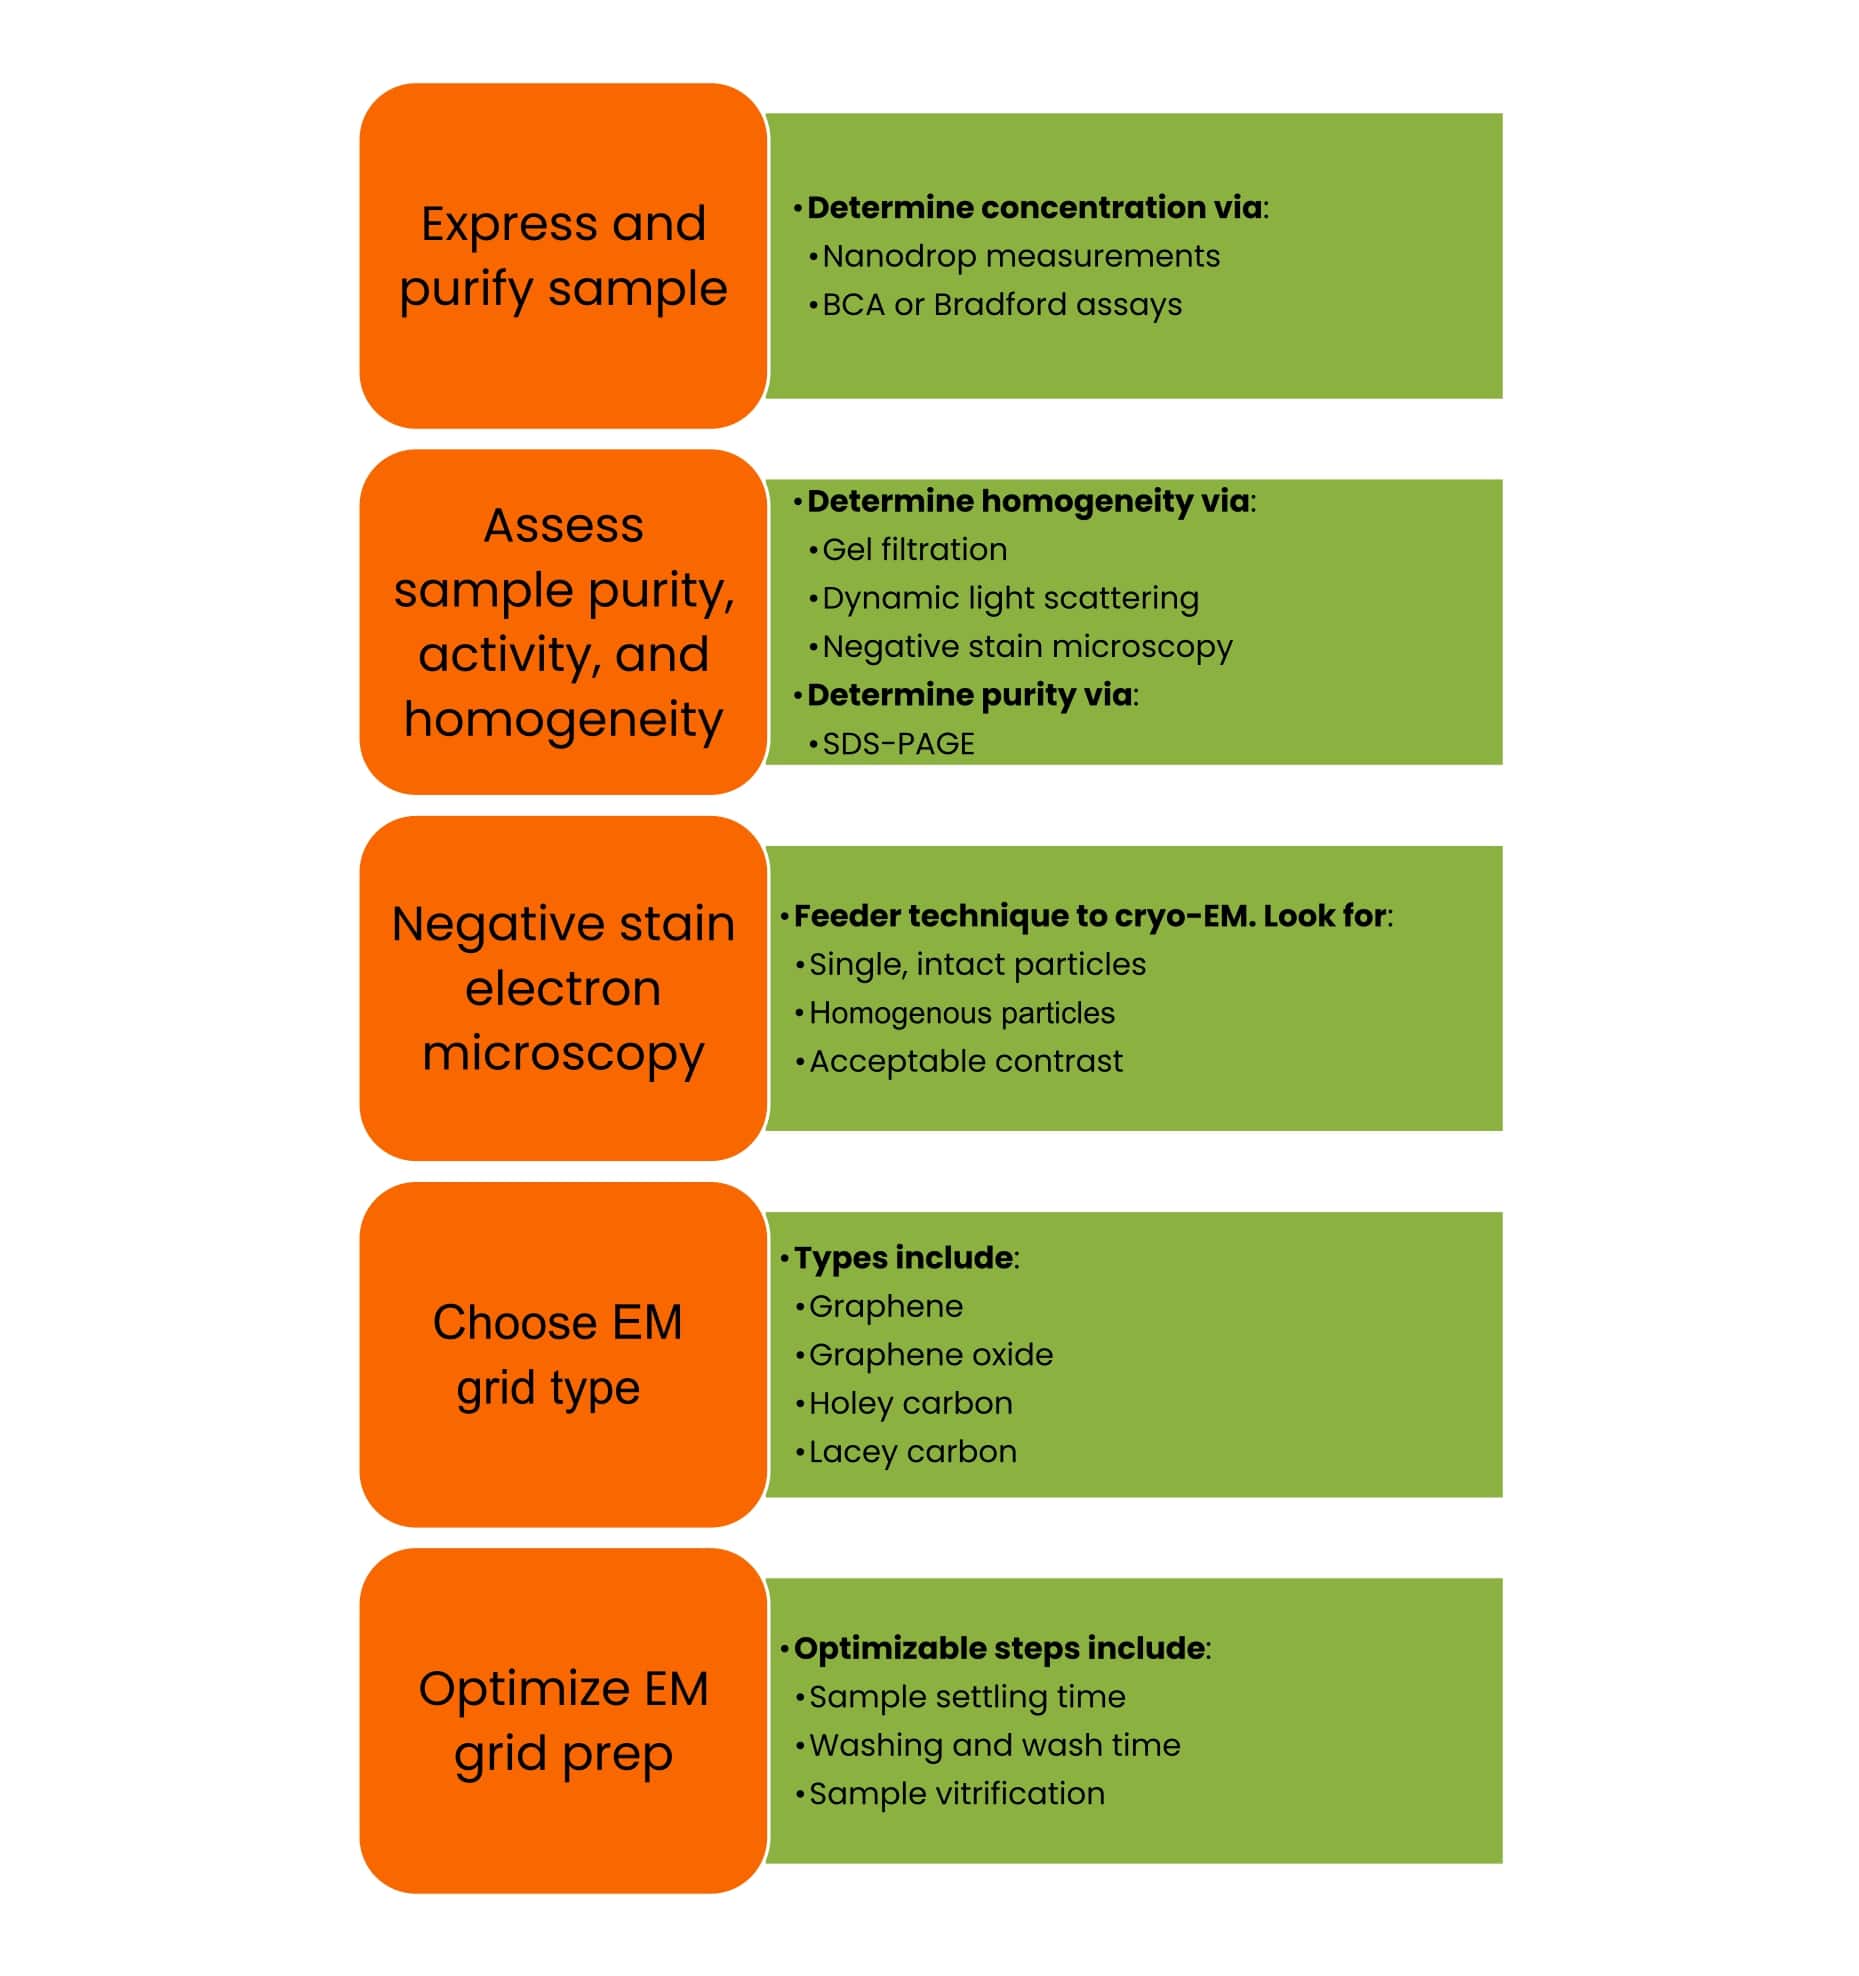
Figure 1 gives you an overview of the whole sample preparation process, how they are roughly categorized, and the optimizable parameters within each category.
We’ll take the five categories as displayed and discuss them in more detail, albeit in a slightly different order.
5 Cryo-EM Sample Prep Tips
1. Check Yourself with Negative Stain Electron Microscopy
Negative stain electron microscopy is your ultimate quality control method. [1]
There’s an array of conventional laboratory techniques that probe the quality of your samples, and I’ll come to those.
But.
Negative stain microscopy allows you to actually see your sample. See your sample in all its glory or ugliness without going through the rigmarole and expense of full-blown cryo-EM.
Think of it as a feeder technique that plays gatekeeper to cryo-EM microscopes.
Can’t make out individual sample molecules on your negative stain micrographs? Okay, back to the drawing board because your cryo-EM sample preparation needs tweaking.
What is Negative Stain Electron Microscopy?
It’s another type of TEM. A key feature of TEM is that the amount of electrons transmitted by a sample is inversely proportional to the atomic number of the atoms that comprise it.
The non-wordy version is that lighter elements (e.g., carbon and oxygen) transmit electrons better than heavy ones such as osmium and uranium.
Negative stain electron microscopy takes this to the extreme.
Usually, everything that isn’t your sample is smothered in a stain containing heavy atoms. These absorb the incident electrons from the microscope beam. Your sample, meanwhile, transmits the electrons, allowing them to be seen by the detector.
Think of it like cookie dough after you’ve cut cookies out of it. The leftover dough is the negative stain, and the star-shaped holes in it are your sample molecules.
Negative stains used include:
- Uranyl acetate;
- Uranyl formate;
- Osmium tetroxide;
- Phosphotungstic acid.
And why is it a gatekeeper to cryo-EM?
Simple. The microscopes it uses are relatively commonplace and relatively cheap. For example, the Thermo Scientific™ Talos™ L120C TEM is suitable. If your institute has a microscopy suite, there’s probably a microscope adequate for negative stain microscopy.
But don’t get too excited—the resolution limit of negative staining is about 20 Å, and you’ll be lucky to get down to that.
That’s why it’s a feeder technique.
Two final points when performing negative stain microscopy:
- Try several negative stains.
- The sample considerations for cryo-EM grid preparation apply.
Regarding point 1, they can work by reacting with your sample, usually adding across carbon-carbon double bonds in unsaturated lipids. In this manner, they must be used judiciously.
Where there are no such moieties in your sample to react with, the stains may work passively by making the area between sample molecules opaque to the incident electrons.
Also, some stains can mineralize with your sample buffer. For example, uranyl acetate reacts with sodium phosphate to produce crystalline uranyl phosphate. These look like giant Rorschach inkblots on your micrographs.
Regarding point 2, I’ll discuss grid preparation in due course.
2. Sample Purity
Nowhere to hide here, I’m afraid. You’re going to need a pure sample. And I mean really pure, like > 99%.
You probably know the drill. Affinity chromatography. Size-exclusion-chromatography. SDS-PAGE. Again and again.
There’s not much I can help you with here because your workflow is intimately connected to your sample.
Before you jeer and call me a cop-out, let me point you to some unmissable resources!
Start here with the Bitesize Bio guide to measuring protein purity and quality.
If things get tricky, you might want to branch out and try ion-exchange chromatography. There are also plenty of affinity tags you can try to extract your sample from its gunky matrix.
If your sample is a protein, Bitesize Bio has an excellent e-book on protein expression and another one on assaying protein purity and quality.
3. The Importance of Concentration, Homogeneity, and Activity
Useful facts go at the top. So here you go:
Concentration
Given the grid dimensions (see later), a few hundred µL of a homogenous and active sample with a concentration between 10 nM and 10 µM (ish) should be plenty. Allow me to elaborate.
Cryo-EM analyzes single particles. And if you squint and try to remember Avogadro’s constant, it might not come to you. You probably can remember, however, that it’s a large number.
That’s great news for you and me because it means there are trillions of molecules, even in the tiniest of droplets.
So you don’t need a ridiculously high sample concentration. Especially when compared to X-ray crystallography, in which your sample has to be supersaturated to induce crystallization. Nor do you need a large sample volume, either.
Remember, in cryo-EM, you are analyzing single particles. And to construct an electron density map that you can model a structure into, you’ll need to pick ~ 10,000-100,000 particles for single particle analysis. [2]
So your sample molecules must be sufficiently dense to appear abundant yet distinguishable on each micrograph.
Homogeneity
Homogeneity is a different beast. In cryo-EM, every molecule of your sample has to adopt an identical or nearly identical conformation.
Why? Because all of the 1000s of nominated molecules on your micrograph should ideally encode identical structural information. This enables you to build a strong ‘signal’ that you can extract from the background. Remember, electron micrographs are low contrast.
But homogeneity is not easy to achieve because biomolecules are usually flexible.
Once again, the actual steps to produce a homogenous sample depends entirely on your sample.
We’ve got excellent tips for improving bacterial protein expression if you intend to image a protein. If you work on a membrane protein, all of the information in that link applies. But, you’ll also need to remove as much excess detergent/solubilizing agent as possible.
What about viruses? It’s a fair question, given that cryo-EM is especially suited to large molecules. You can read some helpful strategies in the literature. [3]
To check the homogeneity of your sample, try:
- Size-exclusion chromatography (AKA gel filtration);
- Dynamic Light Scattering (DLS);
- Negative Stain Electron Microscopy.
You’ll become peerless at preparing excellent samples with enough time and ingenuity.
Activity
Why bother to study a biomolecule that’s not active? Why bother imaging a biological specimen that’s denatured?
You could say that without activity, there’s no biology. So invest some effort into demonstrating the activity of your sample, not least because its active form will probably give you the fewest headaches during purification.
Ultimately, you know what assay is most appropriate. If not, hit the literature for your protein in question.
4. Choose the Right Grid
Now we’re getting to the meat of things.
Grids in cryo-EM are essentially little ~ 3-mm supports that enable you to administer your sample to the microscope. [4]
In the ideal scenario, they present a single-molecule thick film of your sample to the electron beam.
The grids are typically made of copper or gold. Each grid is divided into a mesh of squares into which your sample falls.
There are many types of grid and proprietary technologies. The correct grid choice can be fundamental to the success of your cryo-EM experiments.
I won’t go through them all, but the main cryo-EM grid types are:
- Graphene;
- Graphene oxide;
- Holey carbon;
- Lacey carbon.
A combination of trial-and-error and prior knowledge should enable you to nominate a type of grid to start you off.
Hydrophobicity and Cryo-EM Grid Choice
Hydrophobicity is a critical factor. Non-holey and non-lacey grids adsorb your sample directly to a solid surface. If this surface is graphene or some other carbon allotrope, it will attract hydrophobic proteins strongly, which can lead to overcrowding on the grid.
Holey and lacey grids can avoid this because they consist of perforated films that hold your sample in place by surface tension. Eliminating the continuous solid support also produces less noise because the solid supports scatter electrons that contribute to the noise.
My best advice to you is to hit the literature. See what grids people use for samples that resemble yours, then start with them!
5. Optimize Your Grid Preparation
Okay. So we’re aware of what grids are available, but appropriately preparing the grids is equally essential.
A typical cryo-electron microscopy grid preparation protocol might go:
- Centrifuge sample to remove aggregates.
- Meanwhile, glow discharge cryo-EM grids.
- Apply 3-5 µL of sample to the grid.
- Allow (say) 3-30 secs for the sample to settle.
- Blot away excess liquid.
- Apply 3-5 µL of water to the grid to wash the sample.
- Blot excess water away.
- Vitrify the sample.
- Insert into the microscope and visualize.
This workflow is very basic, but it illustrates several parameters that you can optimize. There are robots such as the Vitrobot that make the process semi-automatic. More on that in a moment.
Note that grid preparation for negative stain electron microscopy is manual and minus any vitrification step. So, it’s a great way to get your technique nailed down.
The sample volume, the time allowed for the sample to settle onto the grid, and the number and length of washing steps may all be optimized. You might not even need a wash step.
The key challenges you are likely to face are:
- Reliably preparing grids that have an appropriate sample thickness.
- Grid over/under crowding.
- Vitrifying your sample efficaciously.
There are blotting-free methods that increase reliability, but they are a bit specialist. [5]
And glow discharging is simply the process by which the hydrophobicity of the grids is reduced using ionized gas. Air is typically used and produces a negative charge on the grid. [6] Other gas mixtures can be used to introduce a positive charge. Fret not, however, as glow dischargers are commonplace.
Vitrification in More Detail
Vitrification. We’ve mentioned it several times. But what is it, how do you do it, and what can go wrong?
It’s the process of cooling your samples to cryogenic temperatures so rapidly that ice crystals cannot form. It is fundamental to protecting biological samples in cryo-EM.
The process of vitrifying a sample is called plunge freezing. It involves dipping your sample on an EM grid into (usually) liquid ethane. The grid, or grids, must then be administered to the microscope without ever warming up or coming into contact with air.
This is because moisture in the air would immediately start to freeze on top of your sample and ruin it.
Fortunately, the fiddly nature of plunge freezing and the demand for an automated system has led to the development of the Vitrobot mentioned already.
Learn From My Mistakes
Let me do something not often done in science and share one of my failures. See Figure 2 below. It’s a negative stain micrograph for a membrane protein, which I totally failed to view.
With enough time, I would have tried all the ideas presented here. But I ran out of time.
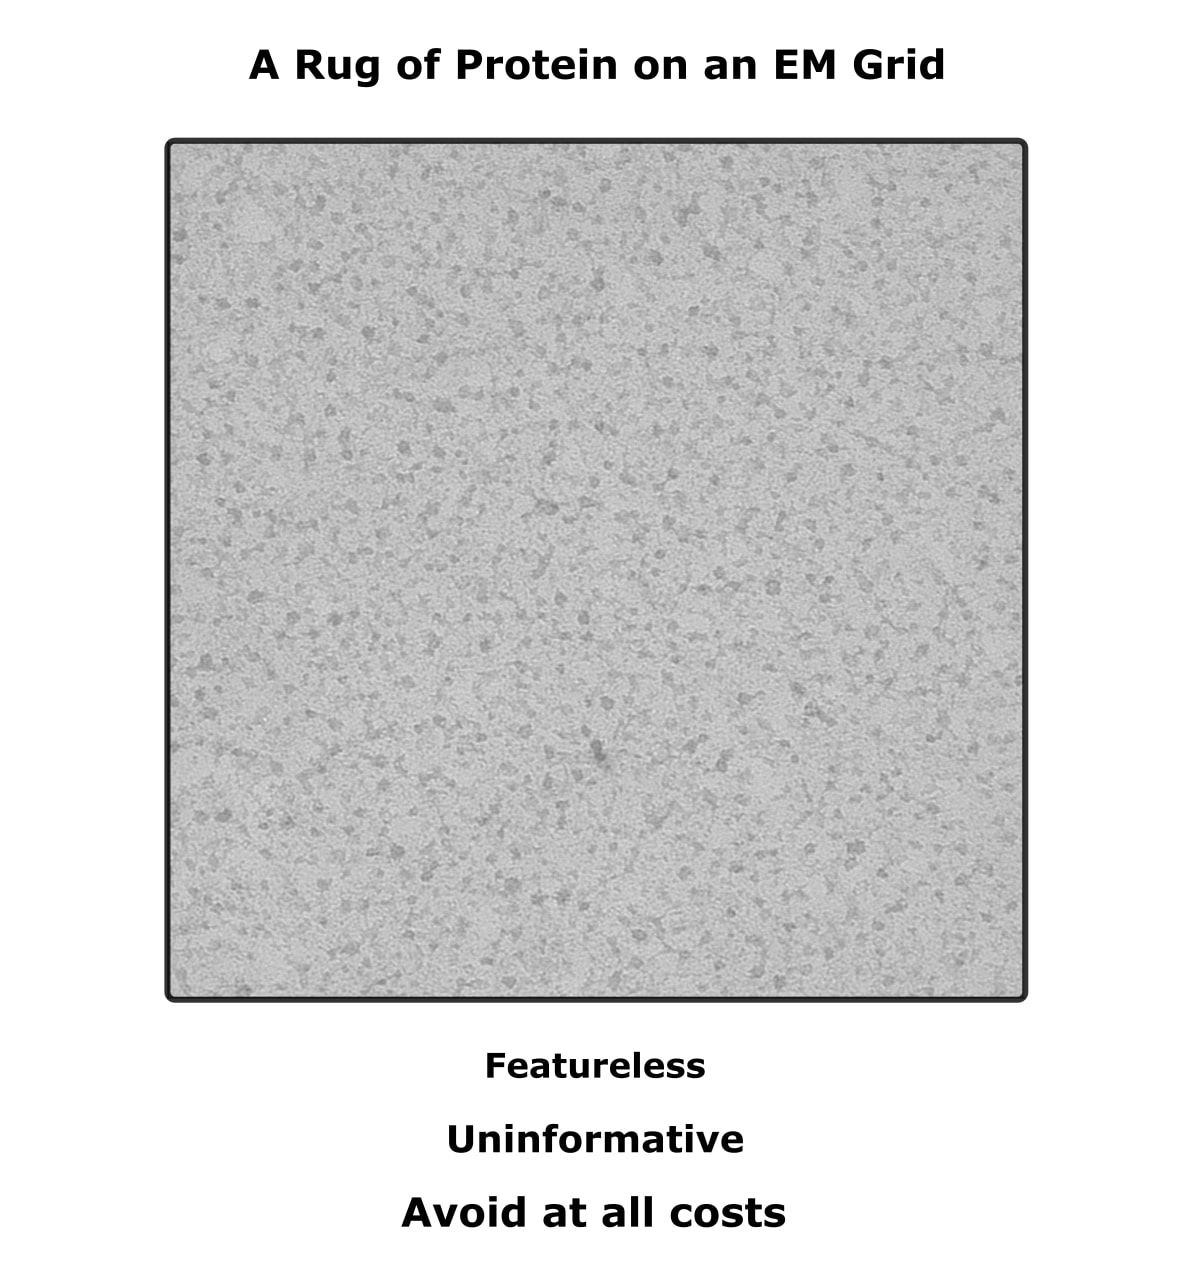
I present it because an example of how your grids should not look. The fact that it’s not uniformly grey or black means that there’s protein there. That’s what all that white-noise-looking stuff is.
But it is entirely featureless. No individual particles are visible. That’s because there’s too much sample sticking to the grid. I tried diluting the sample 1000-fold, and that didn’t work. Next on my list would have been to switch to holey carbon grids, but as I say, I ran out of time.
Remember that sample optimization is a process.
Additional Considerations for Cryo-EM Sample Prep
Here’s a treat for readers that made it this far—some bonus tips.
Bonus Tip 1: Spin-Concentration Can Harm Samples
We’ve already mentioned that, unlike X-ray crystallography, cryo-EM doesn’t require absurdly high sample concentrations.
So here’s a little tip. If you already perform gel filtration as part of your sample purification procedure and get a nice Gaussian peak on your chromatogram, try this:
Take the fraction that corresponds to the apex of the peak and apply it directly to your sample grids without any additional workup. This eliminates sample harm, saves you time, and might just be the sweet spot you’re looking for.
If the grids are too crowded, you can prepare dilutions. If the grids look empty, then you know sample concentration is unavoidable.
Bonus Tip 2: Get the Right Help Early On
If you work at a university or an interdisciplinary institute, users of your microscopy suite likely fall into two categories:
- Materials scientists.
- Biological scientists.
This is a sweeping statement and, of course, not universally true. However, materials scientists usually analyze nanomaterials and kindred objects that consist of robust chemical components. Their expertise in grid preparation might not apply to biological specimens.
I fell into this trap and wasted a lot of time.
If you’re lucky, there is someone who has performed microscopy on biological samples. Alternatively, try to seek support from someone who has a broad range of experience with different types of specimens.
Settle Down
And that’s about the extent of my knowledge of cryo-EM sample prep. Well, the knowledge that’s worth sharing anyway! And I’ll let you be the judges of that.
If you’ve found all of this helpful, let me know in the comments section below! Same if you want me to add or amend any information. We’re learning all the time!
References
- Ohi M, Li Y, Cheng Y, and Walz T (2004) Negative Staining and Image Classification – Powerful Tools in Modern Electron Microscopy. Biol Proced Online 6:23–34
- Dillard RS, Hampton CM, and Strauss JD et al. (2018) Biological Applications at the Cutting Edge of Cryo-Electron Microscopy. Microsc Microanal 24:40619
- James K, Cooney B, and Agopsowicz K et al. (2016) Novel High-throughput Approach for Purification of Infectious Virions. Sci Rep 6:36826
- Thompson RF et al. (2016) An introduction to sample preparation and imaging by cryo-electron microscopy for structural biology. Methods 100:3–15
- Stefan A et al. (2017) Blotting-free and lossless cryo-electron microscopy grid preparation from nanoliter-sized protein samples and single-cell extracts. J Struct Biol 197:220–26
- Sgro G and Costa T (2018) Cryo-EM grid preparation of membrane protein samples for single particle analysis. Front Mol Biosci 5:2296
You made it to the end—nice work! If you’re the kind of scientist who likes figuring things out without wasting half a day on trial and error, you’ll love our newsletter. Get 3 quick reads a week, packed with hard-won lab wisdom. Join FREE here.


