SDS-PAGE (sodium dodecyl sulfate-polyacrylamide gel electrophoresis) is commonly used in the lab for the separation of proteins based on their molecular weight. It’s one of those techniques that is commonly used but not frequently fully understood. So let’s try and fix that by explaining just how SDS-PAGE works.
Making the Protein Migration Rate Proportional to Molecular Weight
The first thing to know about how SDS-PAGE works is that it separates proteins according to their molecular weight, based on their differential rates of migration through a sieving matrix (a gel) under the influence of an applied electrical field.
The movement of any charged species through an electric field is determined by its net charge, its molecular radius, and the magnitude of the applied field. But the problem with natively folded proteins is that neither their net charge nor their molecular radius is molecular weight dependent.
Instead, their net charge is determined by amino acid composition, i.e. the sum of the positive and negative amino acids in the protein and molecular radius by the protein’s tertiary structure.
So in their native state, different proteins with the same molecular weight would migrate at different speeds in an electrical field depending on their charge and 3D shape.
To separate proteins in an electrical field based on their molecular weight only, we need to destroy the tertiary structure by reducing the protein to a linear molecule, and somehow mask the intrinsic net charge of the protein. That’s where SDS comes in.
The Role of SDS (et al.) in How SDS-PAGE Works
SDS is a detergent that is present in the SDS-PAGE sample buffer where, along with a bit of boiling, and a reducing agent (normally DTT or beta-ME to break down protein–protein disulfide bonds), it disrupts the tertiary structure of proteins. This brings the folded proteins down to linear molecules.
SDS also coats the protein with a uniform negative charge, which masks the intrinsic charges on the R-groups. SDS binds fairly uniformly to the linear proteins (around 1.4g SDS/ 1g protein), meaning that the charge of the protein is now approximately proportional to its molecular weight.
SDS is also present in the gel to make sure that once the proteins are linearized and their charges masked, they stay that way throughout the run.
The dominant factor in determining an SDS-coated protein’s mobility is its molecular radius. SDS-coated proteins have been shown to be linear molecules, 18 Angstroms wide and with length proportional to their molecular weight, so the molecular radius (and hence their mobility in the gel) is determined by the molecular weight of the protein.
Since the SDS-coated proteins have the same charge-to-mass ratio, there will be no differential migration based on charge.
The Gel Matrix
In an applied electrical field, the SDS-treated proteins will now move toward the positive anode at different rates depending on their molecular weight. These different mobilities will be exaggerated due to the high-friction environment of a gel matrix.
As the name suggests, the gel matrix used for SDS-PAGE is polyacrylamide, which is a good choice because it is chemically inert and, crucially, can easily be made up at a variety of concentrations to produce different pore sizes giving a variety of separating conditions that can be changed depending on your needs.
You can learn more about the mechanism of acrylamide polymerization here.
Lining Them Up at the Starting Line: The Discontinuous Buffer System and the Stacking Gel
The Discontinuous Buffer System Explained
To conduct the current from the cathode (negative) to the anode (positive) through the gel, a buffer is obviously needed. Most use the discontinuous Laemmli buffer system. “Discontinuous” simply means that the buffer in the gel and the tank are different.
Typically, the system is set up with a stacking gel at pH 6.8, buffered by Tris-HCl, a running gel buffered to pH 8.8 by Tris-HCl, and an electrode buffer at pH 8.3 (Figure 1). The stacking gel has a low concentration of acrylamide as we don’t want the proteins to separate here, while the running gel has a higher concentration that is capable of retarding the movement of the proteins.
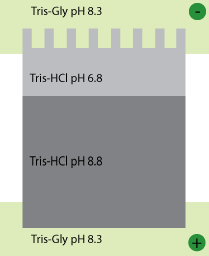
So what’s with all of those different pHs?
Well, glycine can exist in three different charge states: positive, neutral, or negative, depending on the pH.
This is shown in the diagram below. Control of the charge state of the glycine by the different buffers is the key to the whole stacking gel thing.
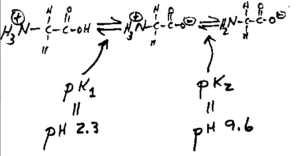
Figure 2. The three charge states of glycine.
How the Stacking Gel Works in SDS-PAGE
So here’s how the stacking gel works. When the power is turned on, the negatively charged glycine ions in the pH 8.3 electrode buffer are forced to enter the stacking gel, where the pH is 6.8. In this environment, glycine switches predominantly to the zwitterionic (neutrally charged) state. This loss of charge causes the glycine ions to move very slowly in the electric field.
The Cl– ions (from Tris-HCl) on the other hand, move much more quickly in the electric field and they form an ion front that migrates ahead of the glycine.
The separation of Cl– from the Tris counter-ion (which is now moving towards the anode) creates a narrow zone with a steep voltage gradient that pulls the glycine ions along behind it, resulting in two narrowly separated fronts of migrating ions; the highly mobile Cl– front, followed by the slower, mostly neutral glycine front.
All of the proteins in the gel sample have an electrophoretic mobility that is intermediate between the extreme of the mobility of the glycine and Cl–, so when the two fronts sweep through the sample well, the proteins are concentrated into the narrow zone between the Cl– and glycine fronts.
And They’re Off!
This procession carries on until it hits the running gel, where the pH switches to 8.8. At this pH the glycine molecules are mostly negatively charged and can migrate much faster than the proteins. So the glycine front accelerates past the proteins, leaving them in the dust.
The result is that the proteins are dumped in a very narrow band at the interface of the stacking and running gels and since the running gel has an increased acrylamide concentration, which slows the movement of the proteins according to their size, the separation begins.
What Was All of That About?
If you are still wondering why the stacking gel is needed, think of what would happen if you didn’t use one.
Gel wells are around 1 cm deep, and you generally need to substantially fill them to get enough protein onto the gel. So in the absence of a stacking gel, your sample would sit on top of the running gel, as a band of up to 1cm deep.
Rather than being lined up together and hitting the running gel together, this would mean that the proteins in your sample would all enter the running gel at different times, resulting in very smeared bands.
So the stacking gel ensures that all of the proteins arrive at the running gel at the same time so proteins of the same molecular weight will migrate as tight bands.
The Final Step of How SDS-PAGE Works: Separation
Once the proteins are in the running gel, they separate because higher molecular weight proteins move more slowly through the porous acrylamide gel than lower molecular weight proteins. The size of the pores in the gel can be altered depending on the size of the proteins you want to separate by changing the acrylamide concentration. Typical values are shown in Table 1 below.
Acrylamide (%) | Mw Range (KDa) |
7 | 50–500 |
10 | 20–300 |
12 | 10–200 |
15 | 3–100 |
For a broader separation range, or for proteins that are hard to separate, a gradient gel, which has layers of increasing acrylamide concentration, can be used.
I think that’s about it for how SDS-PAGE works. If you have any questions, corrections or anything further to add, please do get involved in the comments section!
Are you sick of leaky gels and wonky wells? Download our free SDS-PAGE gel recipe and casting protocol cheat sheet. It works—at any percent.
Originally published on September 18, 2008. Revised and updated August 2021.

