
What if I told you that your sample could propagate itself?
Now, I hope that you stopped believing in Santa a long time ago (I’m deeply sorry if that’s news to you), and I’m sure that your years in science have jaded you to promises of magic and mysticism.
But I’d be only half lying.
If your research involves crystallizing a protein, and you’re lucky enough to have grown just one crystal of it already, you can use it to produce an infinite number of bigger and better crystals!
Choose a free resource to help you move forward
CHEAT SHEET
SDS-PAGE Protocol Cheat Sheet
CHEAT SHEET
Western Blot Cheat Sheet
The process of doing this is called protein crystallization seeding (or just seeding). [1] In this article, I’ll walk you through five different seeding techniques that you can mix and match to grow some giant crystals.
Alright, maybe not that big. But still pretty cool!
Why We Need Protein Crystals: A Quick Reminder
Experimental protein structures are essential to understanding the biology and, often enough, the pathology of organisms. And most protein structures are solved using X-ray crystallography, which requires high-quality single crystals of the target proteins.
Generating protein crystals is usually extremely difficult for a variety of reasons, however. And, inevitably, the goalposts continually move as the “low-hanging fruit” is picked.
If we ignore the other difficulties and focus on size, protein crystals are generally tiny, and small crystals diffract X-rays less strongly than large ones. Tiny crystals are also less able to withstand the high-energy X-ray doses used in an X-ray diffraction experiment and deteriorate before a complete diffraction pattern is collected.
Weak X-ray diffraction and X-ray damage can cause significant data pathologies and tarnish the diffraction pattern to the extent that it’s impossible to solve the protein structure.
That’s where the creative and cost-effective crystallization techniques and the general trend towards miniaturization in protein crystallography comes in.
The Basics of Generating a Protein Crystal
Generating a protein crystal can be split into two steps:
- Crystal nucleation.
- Crystal growth.
Crystal nucleation is the spontaneous condensation of matter (the protein molecules) out of the solution state into the solid state. This may occur on some heterogeneous substrate, such as a solid particle or a manufacturing defect in the crystallization plate.
Crystal growth is the slow accretion of solution-state molecules onto the nascent crystal. This will occur for as long as the mother liquor is supersaturated with protein solutes.
Nucleation to form a crystal is the problematic step because most of the time, it’s thermodynamically more favorable for protein molecules to just clump together as an amorphous precipitate.
This is where seeding comes in.
The General Principle of a Protein Crystallization Seeding Experiment
Seeding allows us to bypass the nucleation step (so long as we have just one starting crystal) and go straight to crystal growth.
We can start with the tiny crystals that are useless in X-ray diffraction experiments and administer them to new crystallization drops.
At the same time, we can change the composition of the drops until hitting that sweet spot of the optimal number of seeds administered into a condition that produces large single crystals.
Broadly speaking, there are two types of seeding:
- Microseeding—smashing crystals into tiny pieces to use as seeds.
- Macroseeding—taking an entire crystal “as is” and making it even larger still.
Crystal nucleation occurs at a higher protein concentration than is required for crystal growth (Figure 1). And because we are bypassing the nucleation step by administering seeds (nuclei), we can use lower protein concentrations in our protein crystallization seeding experiments.
Using a lower protein concentration allows you to get more experiments from your precious protein sample. It also helps avoid the formation of additional nuclei, which would compete with your seeds for solution-state protein and result in smaller crystals overall.
You’ll need to figure out what concentration works best yourself, but try ~50–80% of the concentration you used to set up your initial crystallization experiments.
And before we get going, “mother liquor” refers to the solution that remains after it has produced some crystals.

Note that a “precipitant” in a protein crystallization experiment refers to any chemical that competes with the protein molecules for solvation by water. Their purpose is to slowly bring the protein molecules beyond their solubility limit.
Sometimes this leads to the formation of crystal nuclei, but most often, it results in amorphous protein precipitate—hence the name!
Right then, let’s get into it.
Microseeding Methods
We’ll start with microseeding because it’s generally easier to perform than macroseeding.
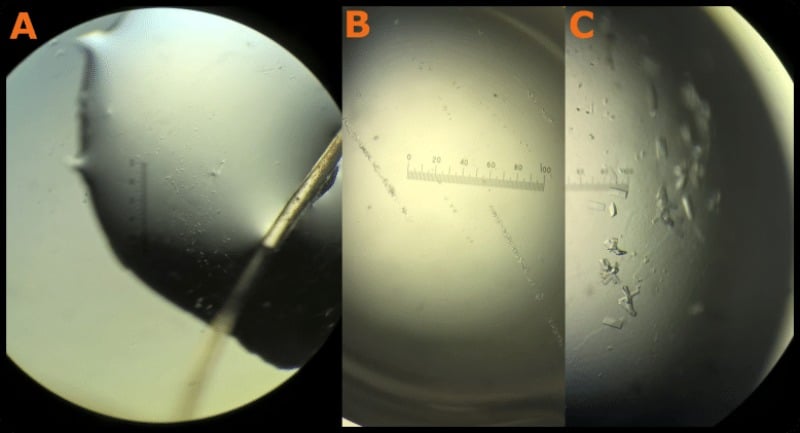
1. Streak Seeding
Streak seeding involves quickly wiping a fiber through the already-grown crystals and then dragging that fiber through new drops containing fresh crystallization solution. If possible, it’s best to use the same batch of protein that grew your original crystals to set up seeding experiments. Rinse and repeat for as many different conditions and replicates as you can be bothered with.
The fiber will collect tiny microseeds as it passes through the “donor” crystals. These microseeds get deposited into the freshly prepared crystallization solution and serve as nuclei, from which new crystals may grow.
In a successful experiment, you get a neat line of large “daughter” crystals growing from where you streaked the fiber. Check out Figure 2 to see what I mean. Remember that crystal size isn’t always an indicator of crystal quality. Ultimately, X-ray diffraction from a crystal will tell you how “good” it is.
Horse hairs and cat whiskers work great as fibers (just don’t pluck them off your beloved pet!) I’ve used beard hair, and it worked fine. You can buy fibers as well. No need to do anything special to the fibers before using them, just make sure they’re clean!
Streak protein crystallization seeding can be very hit-and-miss because wiping a hair through some crystals isn’t empirical. So be sure to try plenty of replicates and conditions. Even if the daughter crystals are tiny and stuck together, you can still use them as donor crystals for more seeding experiments.
An Example Protocol
a. Prepare 10 mL of a solution that matches the condition that afforded your original batch of crystals.
b. Prepare four equivalent solutions. Vary the pH of each of them in increments of 0.2, going above and below the solution prepared in step a). If your original crystals grew at pH 7.6, you should now have five 10-mL solutions at pH 7.2, 7.4, 7.6, 7.8, and 8.0.
c. Mix 2 µL of fresh protein sample with 2 µL of each solution prepared above. Incubate these against an appropriately sized protein crystallization reservoir (usually 500 µL if using a 24-well plate, and 80 µL if using a 48-well plate). Allow the drops to equilibrate against the reservoir for ~5 hours.
d. Identify suitable donor crystals to use as seeds. Open up the drop containing the donors and place a glass coverslip over the top of it to prevent evaporation.
e. Unseal the experiments prepared in step c) and place to one side.
f. Uncover the donor crystals and wipe the fiber through them. Then immediately wipe the fiber through one of the drops prepared in step c). Repeat the process until you have seeded into all of the drops.
g. Reseal the drops you streak seeded into. Incubate them at the desired temperature and inspect them periodically for crystal growth.
2. Seed Beads
The seed bead approach involves smashing up your donor crystals using a bead. Vortexing the crystals in their mother liquor in the presence of the bead produces a suspension of tiny microseeds.
This suspension is called a “seed stock.” You can dilute and titrate your seed stock into as many new experiments as you desire, so have a think and get creative.
Because you can dilute your seed stock by a known factor, you have some control over the number of seeds you are administering to your new drops. It’s generally assumed that fewer seeds are better because the solution-state protein that they accrete is split between fewer seeds, resulting in a smaller number of larger crystals.
Seed Bead™ Kits can be purchased from Hampton Research. There are a few choices of bead composition, and all come with a simple protocol to prepare the seed stock.
An Example Protocol
a. Generate a seed stock as per the manufacturer’s protocol, and prepare serial dilutions if desired.
b. Prepare any solutions necessary to screen for optimal crystal growth conditions (e.g., pH) as outlined already.
c. Mix your protein sample, crystallization solution, and seed stock together at a ratio of 2:1.5:0.5 µL respectively. (This ratio can be another variable if you wish.) Repeat for all seed stock dilutions, and incubate the drops against appropriately sized reservoirs. Inspect periodically for crystal growth.
Pro tip! Keep your seed stock on ice, and try not to warm it up with your fingers. The microseeds it contains may dissolve if the solution warms up. It’s not uncommon for seeding experiments to produce no new crystals. This is likely to be due to the seeds dissolving once they are administered into new drops.
3. Microseed Matrix Screening
This approach combines the seed bead approach with matrix screening.
Matrix screening is just the posh name for mixing purified protein samples with the commercial crystallization screens that all protein crystallographers use to search for those all-important initial crystallization conditions.
In effect, we are searching for conditions conducive to crystal growth (from the seeds) that didn’t produce crystals during our initial crystallization experiments.
Because the commercial screens and various protein crystallization paraphernalia are designed for experiments on the nanoliter scale, we can screen thousands of conditions that may support crystal growth from seed nuclei in just a few hours!
An Example Protocol
a. Prepare a seed stock using a seed bead as already outlined. Then, prepare some serial dilutions of the seed stock.
b. Program your Mosquito Liquid Dispensing unit to mix 200 nL of the reservoir with 50 nL of seed stock and 150 nL of freshly purified protein. Inevitably, you will use the 96-well MRC plate format, so 80-µL reservoirs are appropriate.
c. Prepare experiments using all the commercial crystallization screens you have available for all seed stock dilutions. Seal and incubate at your desired temperature.
d. Screen periodically for new crystallization conditions. If any of these confer a significant improvement to the size and appearance of your crystals, use them for downstream experiments.
Macroseeding Methods
These methods aren’t for the faint of heart since you have to disturb crystals that might be big enough already. It all depends on whether you’re up for a gamble.
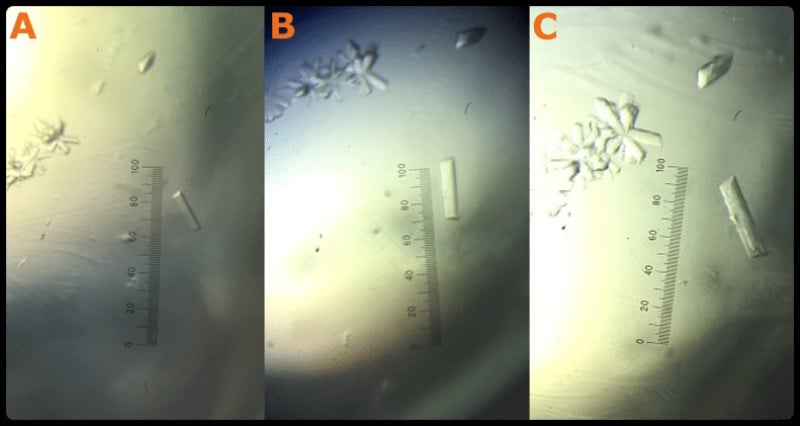
4. Macroseeding In Situ
Here we don’t have to mess around smashing up our crystals. Instead, we just identify crystals that look like good macroseed candidates and enlarge them where they sit. Check out Figure 3 to see what I mean.
An Example Protocol
a. Identify a good candidate macroseed crystal (single, straight-edged, and reasonably sized).
b. Mix together your purified protein sample with a crystallization solution that’s identical to the one from which the candidate crystal grew.
c. If the candidate crystal is in a drop that’s <1 µl, simply add 1–2 µL of the mixture prepared in step b) into the drop. If the candidate crystal is in a drop that’s >1 µL, carefully remove the mother liquor 0.5 µL at a time, then add the mixture prepared in step b) on top.
d. Reseal the experiment and inspect periodically for crystal enlargement. It will take a day or so for the experiment to re-equilibrate. So don’t expect growth immediately. The reason experiments are allowed to equilibrate for a few hours before seeds are administered is to avoid seeds dissolving once they are administered into new drops.
Pro tip! If you can, pick a drop that contains just a small number of relatively large crystals rather than a shower of smaller crystals. This should result in the largest final crystals.
5. Macroseeding Ex Situ
This is essentially the same as above, but you have to get your hands dirty (or should that be steady), wash the candidate crystal, and move it into a new drop containing fresh protein.
Washing and transferring the candidate crystal introduces the possibility of damaging it, so be careful. Maybe practice using some lysozyme because it’s cheap to buy and crystallizes really easily. Alternatively, offer to do it for someone else first. (You didn’t get that idea from me!)
An Example Protocol
a. Prepare crystallization solutions as already outlined and mix with fresh protein sample. Include any test conditions you wish to screen. Seal and equilibrate against an appropriately-sized reservoir for ~5 hours.
b. Identify a good candidate crystal.
c. Carefully fish and transfer the crystal to the reservoir, then immediately transfer it into the freshly prepared crystallization drop.
d. Repeat until you have crystals in all your new crystallization drops. Seal them and incubate them at your desired temperature. Inspect periodically for crystal enlargement.
Pros and Cons of These 5 Crystal Seeding Methods
Let’s have a quick recap and go through the pros and cons of the five protein crystallization seeding methods discussed (Table 1).
Table 1. Protein crystallization seeding methods pros and cons.
Seeding Method | Empirical | High throughput | Simplicity | Notes |
Streak seeding | No | No | **** | Non-empirical |
Seed beads | Yes | No | *** | The microseeds may dissolve |
Microseed matrix screening | Yes | Yes | ** | Programing your crystallization robot may be a cerebral exercise |
Macroseeding in situ | No | No | ***** | Can do repeated rounds of seeding |
Macroseeding ex situ | No | No | ** | You have to manipulate crystals |
A Note on Hanging and Sitting Drops
Protein crystallization seeding experiments can be set up in sitting drop and hanging drop formats. Usually, 96- and 48-well formats use sitting drops. Here, the experimental drops sit adjacent to the reservoir.
The 24-well format usually uses hanging drops. Here, the experimental drop is pipetted onto a siliconized glass cover slide. The cover slide is then turned upside down, and the drop hangs above the reservoir like a chandelier and is sealed using vacuum grease.
For reasons largely unknown, hanging drops can offer significant increases in crystal size compared with equivalent experiments set up in the sitting drop format. Be sure to try both when you are trying out protein crystallization seeding!
At The End of It All
These protein crystallization seeding methods are fiddly and require patience, planning, and good hand–eye coordination to perform. If I told you the optimal movement-by-movement process, this article would be manifold longer. Besides, you’ll figure out what works for you.
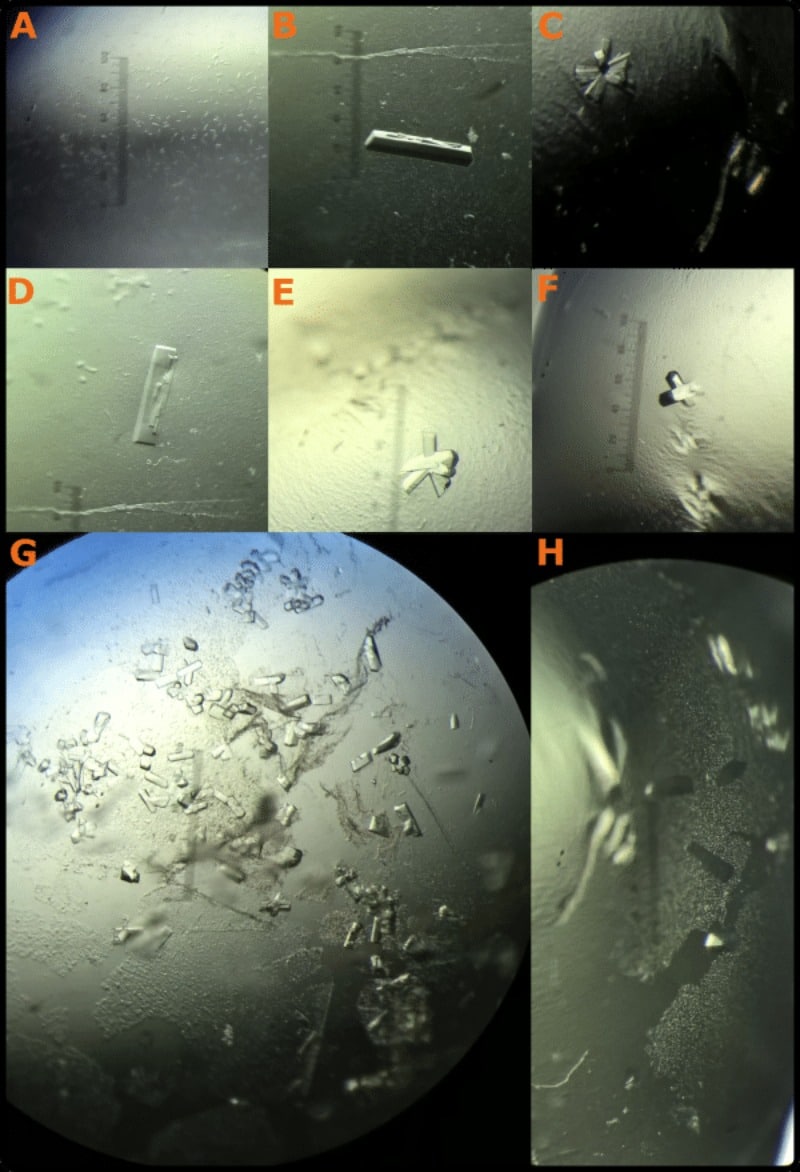
Take your time, accept you’ll make clumsy errors at first, and you’ll soon master this fiddly art. Check out Figure 4 for an example of the kind of results you can expect with enough persistence.
Also, be creative. All of these protein crystallization seeding methods can be mixed and matched to produce excellent results. Just not on your first attempt.
Similarly, they can be matched with any number of other variables you wish to try. Volume is your friend here.
Did you enjoy this article? Have you got any protein crystallization seeding tips to share? Leave them in the comments section if so.
Reference
- Bergfors T (2003) Seeds to crystals. J Struct Biol 142:66–76
You made it to the end—nice work! If you’re the kind of scientist who likes figuring things out without wasting half a day on trial and error, you’ll love our newsletter. Get 3 quick reads a week, packed with hard-won lab wisdom. Join FREE here.


 8")


