
SDS-PAGE (which stands for sodium dodecyl sulfate-polyacrylamide gel electrophoresis) is the technique that unites life scientists. We all perform it during our research to separate protein analytes and, therefore, we all need a good SDS-PAGE gel recipe.
There are some great articles on Bitesize Bio that tell you how SDS-PAGE works and what the components of Laemmli buffer do. There’s also one that explains whether to use a constant current or voltage when running your SDS-PAGE gels and a practical guide to running a perfect homemade SDS-PAGE gel.
But what about an SDS-PAGE gel recipe for casting your own gels?
Well, rely on that dog-eared, illegible (and possibly incorrect) sheet that’s taped to your lab wall no longer, as we’ve got you covered with a simple recipe to prepare SDS-PAGE gels at any percentage you desire.
Choose a free resource to help you move forward
CHEAT SHEET
SDS-PAGE Protocol Cheat Sheet
EBOOK
Free Guide to Protein Expression
We’ll also take a quick look at the chemistry of SDS-PAGE gel ingredients and end with a handy troubleshooting guide for when things go awry.
Your SDS-PAGE Gel Recipe
For those not in the know, SDS-PAGE gels are prepared at specific acrylamide percentages to resolve analytes of given molecular weights.
And when we say “acrylamide”, we use it to mean a 30% w/w (that means weight by weight) solution of acrylamide and bis-acrylamide at a ratio of (usually) 37.5:1.
And with that out of the way, check out Table 1 for your SDS-PAGE gel recipe table for 4 x 0.75-mm thick gels.
Table 1. An SDS-PAGE gel recipe.
Component | Amount for X % resolving gel | Amount for stacking gel |
Acrylamide, 30% | (0.5 x X) mL | 1.98 mL |
Tris, 0.5 M, pH 6.8 | 0 mL | 3.78 mL |
Tris, 1.5 M, pH 8.8 | 3.75 mL | 0 mL |
SDS, 10% w/v | 150 µL | 150 µL |
H2O
| 11.02 – (0.5 x X) mL | 9 mL |
TEMED | 7.5 µL | 15 µL |
APS, 10% w/v | 75 µL | 75 µL |
Total volume mL | 15 mL | 15 mL |
Note that w/v means weight by volume. | ||
If you want to prepare 4 x 1.00-mm thick gels, multiply everything in the SDS-PAGE recipe by 1.5.
If you want to prepare 4 x 1.50-mm thick gels, multiply everything in the SDS-PAGE recipe by 2.0.
Pro tip! If you struggle to see where to load your samples once your gel is in the gel tank, add ~0.003% w/v bromophenol blue to your stacking gel to tint it blue.
Help! I Don’t Know What Percentage Gels to Prepare
The final percentage of acrylamide determines what molecular weight analytes your gels will be capable of resolving.
And unless you’ve got a lot of experience running SDS-PAGE gels, you may have no idea what percentage gel is appropriate for your target analyte(s). Use Table 2 to guide you. [2]
Table 2. Summary of what protein sizes SDS-PAGE gels can resolve when prepared at 8–20% acrylamide.
Size of protein (kDa) | % acrylamide in resolving gel |
4–40 | 20 |
12–45 | 15 |
10–70 | 12.5 |
15–100 | 10 |
25-200 | 8 |
The fact that acrylamide is available in most labs as the 30% solution mentioned already means that the maximum percentage gel we can prepare is ~22% (preparing the gels with no water).
For separating analytes with extremely high or low molecular weights, you may want to use powdered acrylamide and bis-acrylamide.
Doing so allows you to customize the ratio of the two components and cast gels that have the appropriate resolving power. We won’t go any deeper into this save to say that you can buy powdered acrylamide and bis-acrylamide separately or pre-mixed.
In most scenarios, however, 8–20% gels will be appropriate.
SDS-PAGE Gel Casting Protocol
Leaky wells, wonky gels. You now have an SDS-PAGE gel recipe containing all the ingredients and their necessary proportions, but how do you cast gels reliably?
Here’s a simple 10-step gel casting protocol that will never let you down.
10 Simple Steps for Casting the Perfect SDS-PAGE Gel
- Gather all your casting equipment and two suitably sized receptacles, such as two 50-mL beakers, for preparing the resolving and stacking gels. Label these with something sensible, like “R” and “S”, so you don’t mix them up.
- Wipe your glass sandwich plates with an industrial methylated spirit (IMS) or ethanol solution to clean them. Assemble the casting equipment such that the thin glass plate is at the front, the thick glass plate with ridges is at the back, and the ridges form a narrow gap between the two plates. This is where you will pour the gel mixture in.
- Pour out all the ingredients for both gels, except the 10% APS and TEMED, into their respective receptacles. The APS and TEMED are left out at this stage because polymerization begins the moment they are added! Seal the receptacle that contains the stacking gel ingredients to prevent evaporation.
- Add the 10% APS and then the TEMED to the resolving gel ingredients and mix gently. Pour the mixture immediately into the glass sandwich plates, leaving approximately ~2.5 cm between the meniscus and the top of the front plate to accommodate the resolving gel and sample comb. If you’re unsure about how much space to leave, insert the comb into an empty set of plates and draw a line!
- Add isopropanol (it’s immiscible with the gel ingredients) on top of the unpolymerized resolving gel. Allow 30–45 minutes for the gel to polymerize. You can check if the gel has polymerized by gently tilting the casting equipment. If the gel hasn’t polymerized, the top of the resolving gel will stay parallel to the ground.
- Pour away the isopropanol and wick any excess away using tissue paper. Wash with distilled water to remove any residual isopropanol.
- Add the 10% APS and TEMED to the stacking gel ingredients, mix, and pour immediately on top of the resolving gel. For the sake of simplicity, fill the glass sandwich plates all the way to the top.
- Insert a comb into the unpolymerized stacking gel and allow it to set. The comb will displace some of the unpolymerized stacking gel, which will spill out. Wipe it away with some tissue paper.
- Carefully remove the comb in a vertical line. This should prevent wiggly and collapsed wells. Note that the end wells are prone to collapsing when old and tatty combs are used.
- Use right away or store correctly (see below) to use later.
A few extra pointers here will make your life a lot simpler.
A plastic Pasteur pipette works well for pouring the gels and gives you excellent control over the volumes you’re adding. A serological pipette also works well.
Aim for approximately 10 mm of stacking gel between the top of the resolving gel and the bottom of the sample wells formed by the comb. This will give you the best resolution between your protein analytes.
When wicking away the isopropanol, it’s best to use a lint-free wipe rather than blue roll. The filter papers used for Western blotting also work well.
And if you’re wondering whether to use 5-, 10-, or 15-toothed combs, Table 3 gives approximate sample volumes that the resulting gels can accommodate per well.
Table 3. Summary of the sample volumes that 0.75-, 1.00-, and 1.50-mm thick gels can accommodate when 5-, 10-, and 15-toothed combs are used.
Number of wells | 0.75-mm thick gel | 1.00-mm thick gel | 1.50-mm thick gel |
5 | 70 µL | 105 µL | 166 µL |
10 | 33 µL | 44 µL | 66 µL |
15 | 20 µL | 36 µL | 40 µL |
If you’re wondering what thickness of gel to use, here are a few considerations:
- Thicker gels are less prone to tearing.
- Thicker gels allow more sample to be loaded.
- Thinner gels run faster.
In most cases, 0.75-mm thick gels will be suitable.
How to Store Your SDS-PAGE Gels
Dampen some tissue paper under the tap and wrap it around your gels. Then, squeeze off the excess water and wrap the entire package in cling film.
Label your packs with the gel percentage and thickness, put them in the fridge, and use them within a few weeks.
Why Cast Your Own SDS-PAGE Gels?
If you read the SDS-PAGE gel recipe above and thought: “why should I bother with all that when I can buy pre-cast gels?” I hear you.
But there are good reasons to cast your own gels:
- You’ll save money;
- You’ll cut down on plastic waste;
- You’ll never run out;
- You’ll always have the correct percentage gel on hand. Even gradient gels!
Regarding point 1, the most expensive ingredient in an SDS-PAGE gel is the 30% acrylamide solution. It costs roughly £70-100 per 0.5L.
Quick math time!
Using the recipe table above, if you were to prepare exclusively 10% acrylamide gels, you would use ~7 mL of 30% acrylamide per 4 SDS-PAGE gels.
So, a 0.5L bottle of 30% acrylamide will make 4 x (500/7) = 285 gels. That’s £0.25-35 per gel.
The cheapest pre-cast gels I could find (albeit after a very cursory look) cost about £7 per gel.
You don’t need to be Sir Roger Penrose to work out which option is the cheapest.
I appreciate the other ingredients in the SDS-PAGE gel recipe also have a cost associated with them. I assume, however, that these ingredients are already available in bulk in your lab!
Meet the Cast: What the Components of SDS-PAGE Gels Do
Have you ever wondered what the ingredients in your SDS-PAGE gel recipe actually do?
Tris base at pH 6.8 in the stacking gel and SDS have the same function as they do in Laemmli buffer.
The reason for tris at pH 8.8 in the resolving gel is:
- At pH 6.8, glycine (from the running buffer) is near its isoelectric point of 6.08, meaning it’s negatively charged only a fraction of the time. Because of this, it travels behind the protein analytes in the stacking gel.
- The Cl– anions are negatively charged at both pH 6.8 and 8.8. Because of this, they travel in front of the protein analytes in the stacking gel.
So, in the pH 6.8 stacking gel, the proteins get sandwiched between glycine at the rear and Cl– at the front.
But when the glycine enters the pH 8.8 resolving gel, it gets fully deprotonated to become the glycinate anion.
Too small to be impeded by the gel porosity, glycinate moves in front of the protein analytes. So, all of the analytes are deposited into the resolving gel together. This is conducive to maximum analyte resolution.
Hence the name—stacking gel.
Glycinate and Cl–, meanwhile, fly off towards the positive electrode (anode), leaving the comparatively massive protein analytes behind to fight their way through the polyacrylamide gel matrix.
Hence the name—resolving gel.
For the structures of the rest of the ingredients, check out Figure 1. It should help you understand the description of their basic chemistry and function that follows.
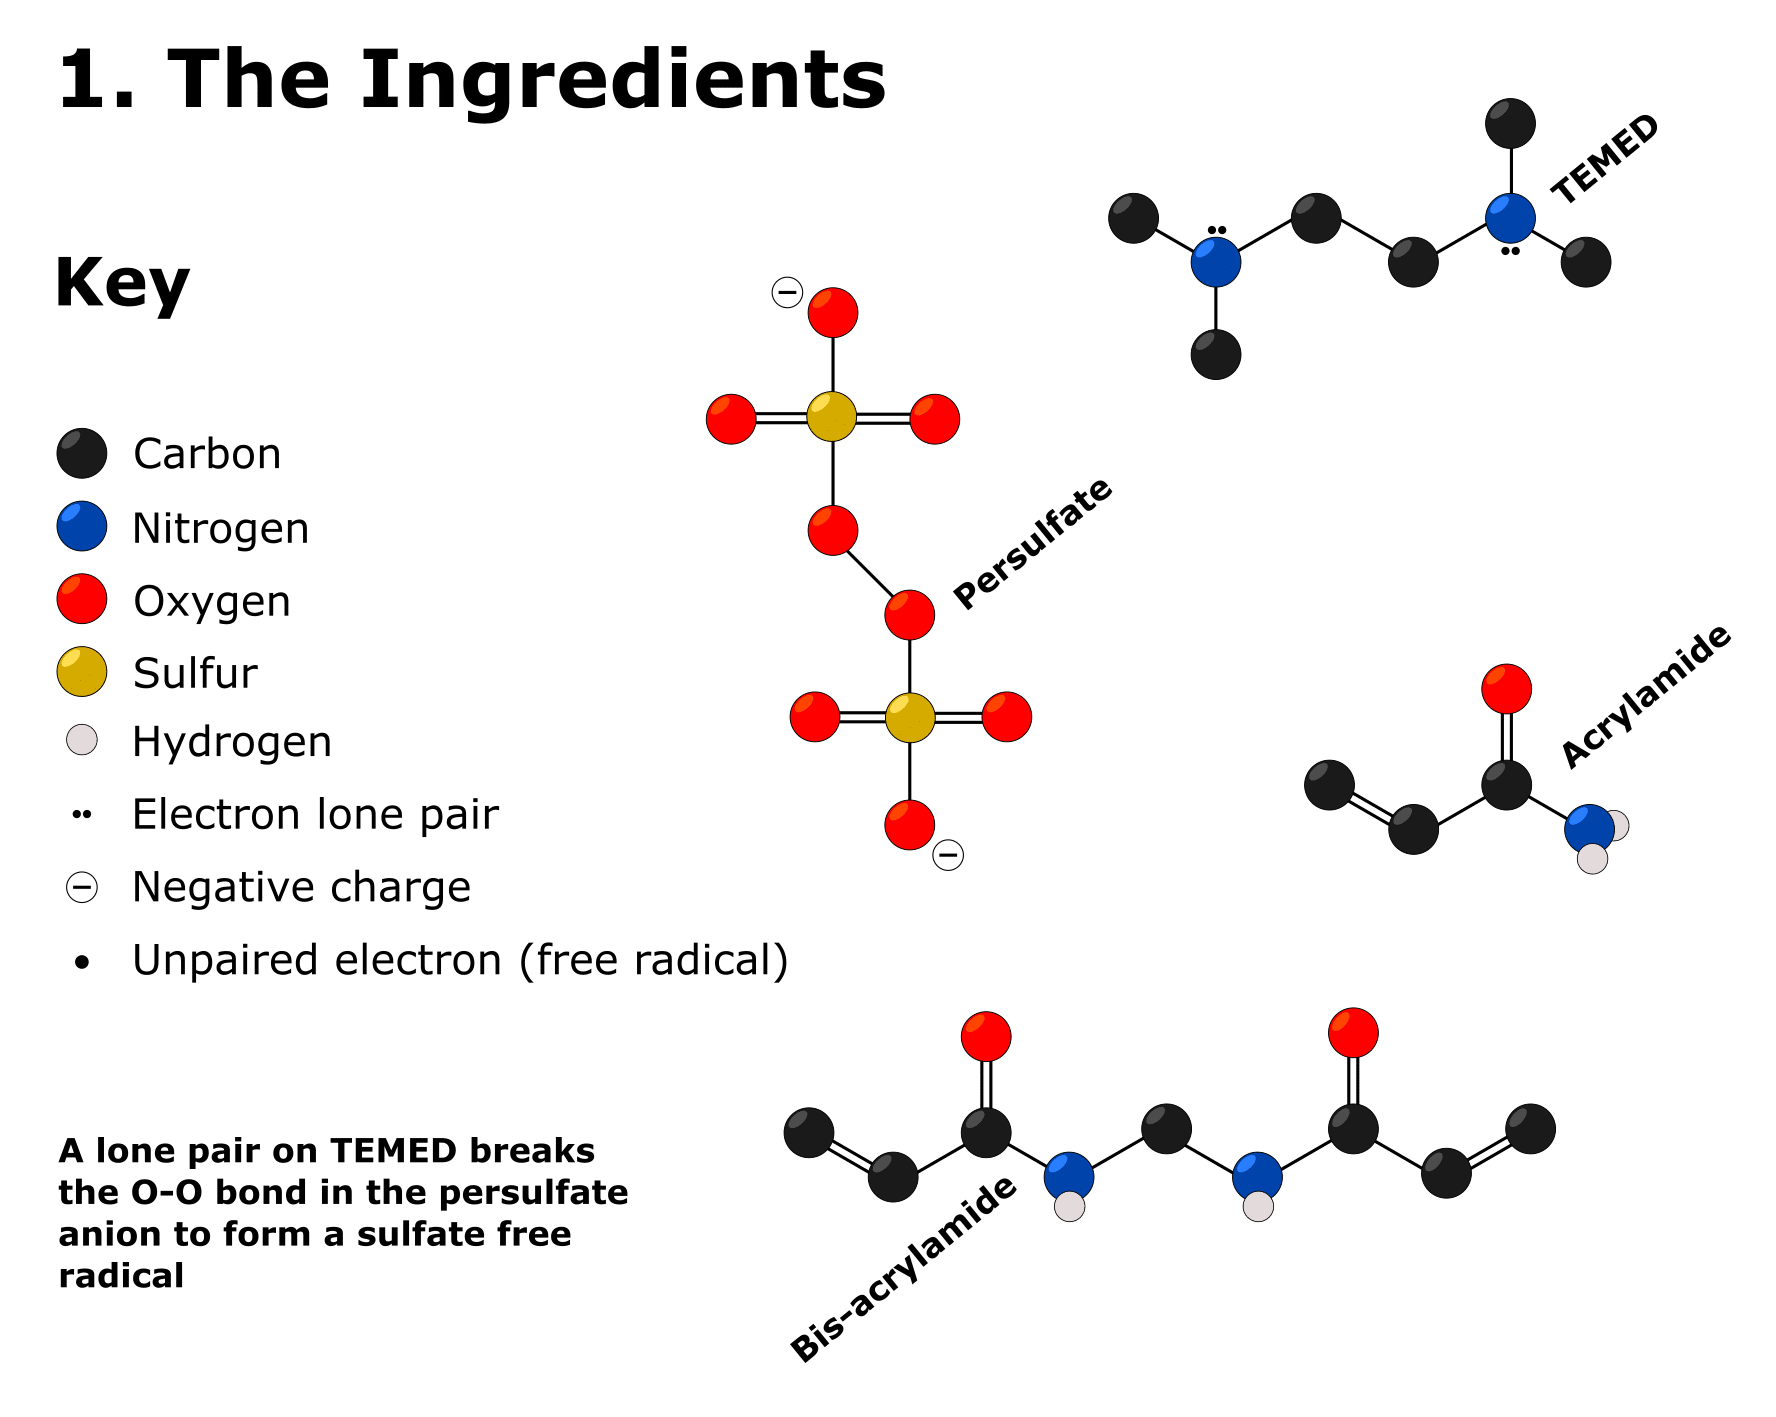
1. Acrylamide
Why Do We Need It?
As mentioned, we take “acrylamide” to mean a mixture of acrylamide and bis-acrylamide. These are the basic building blocks of the gel.
How Does It Work?
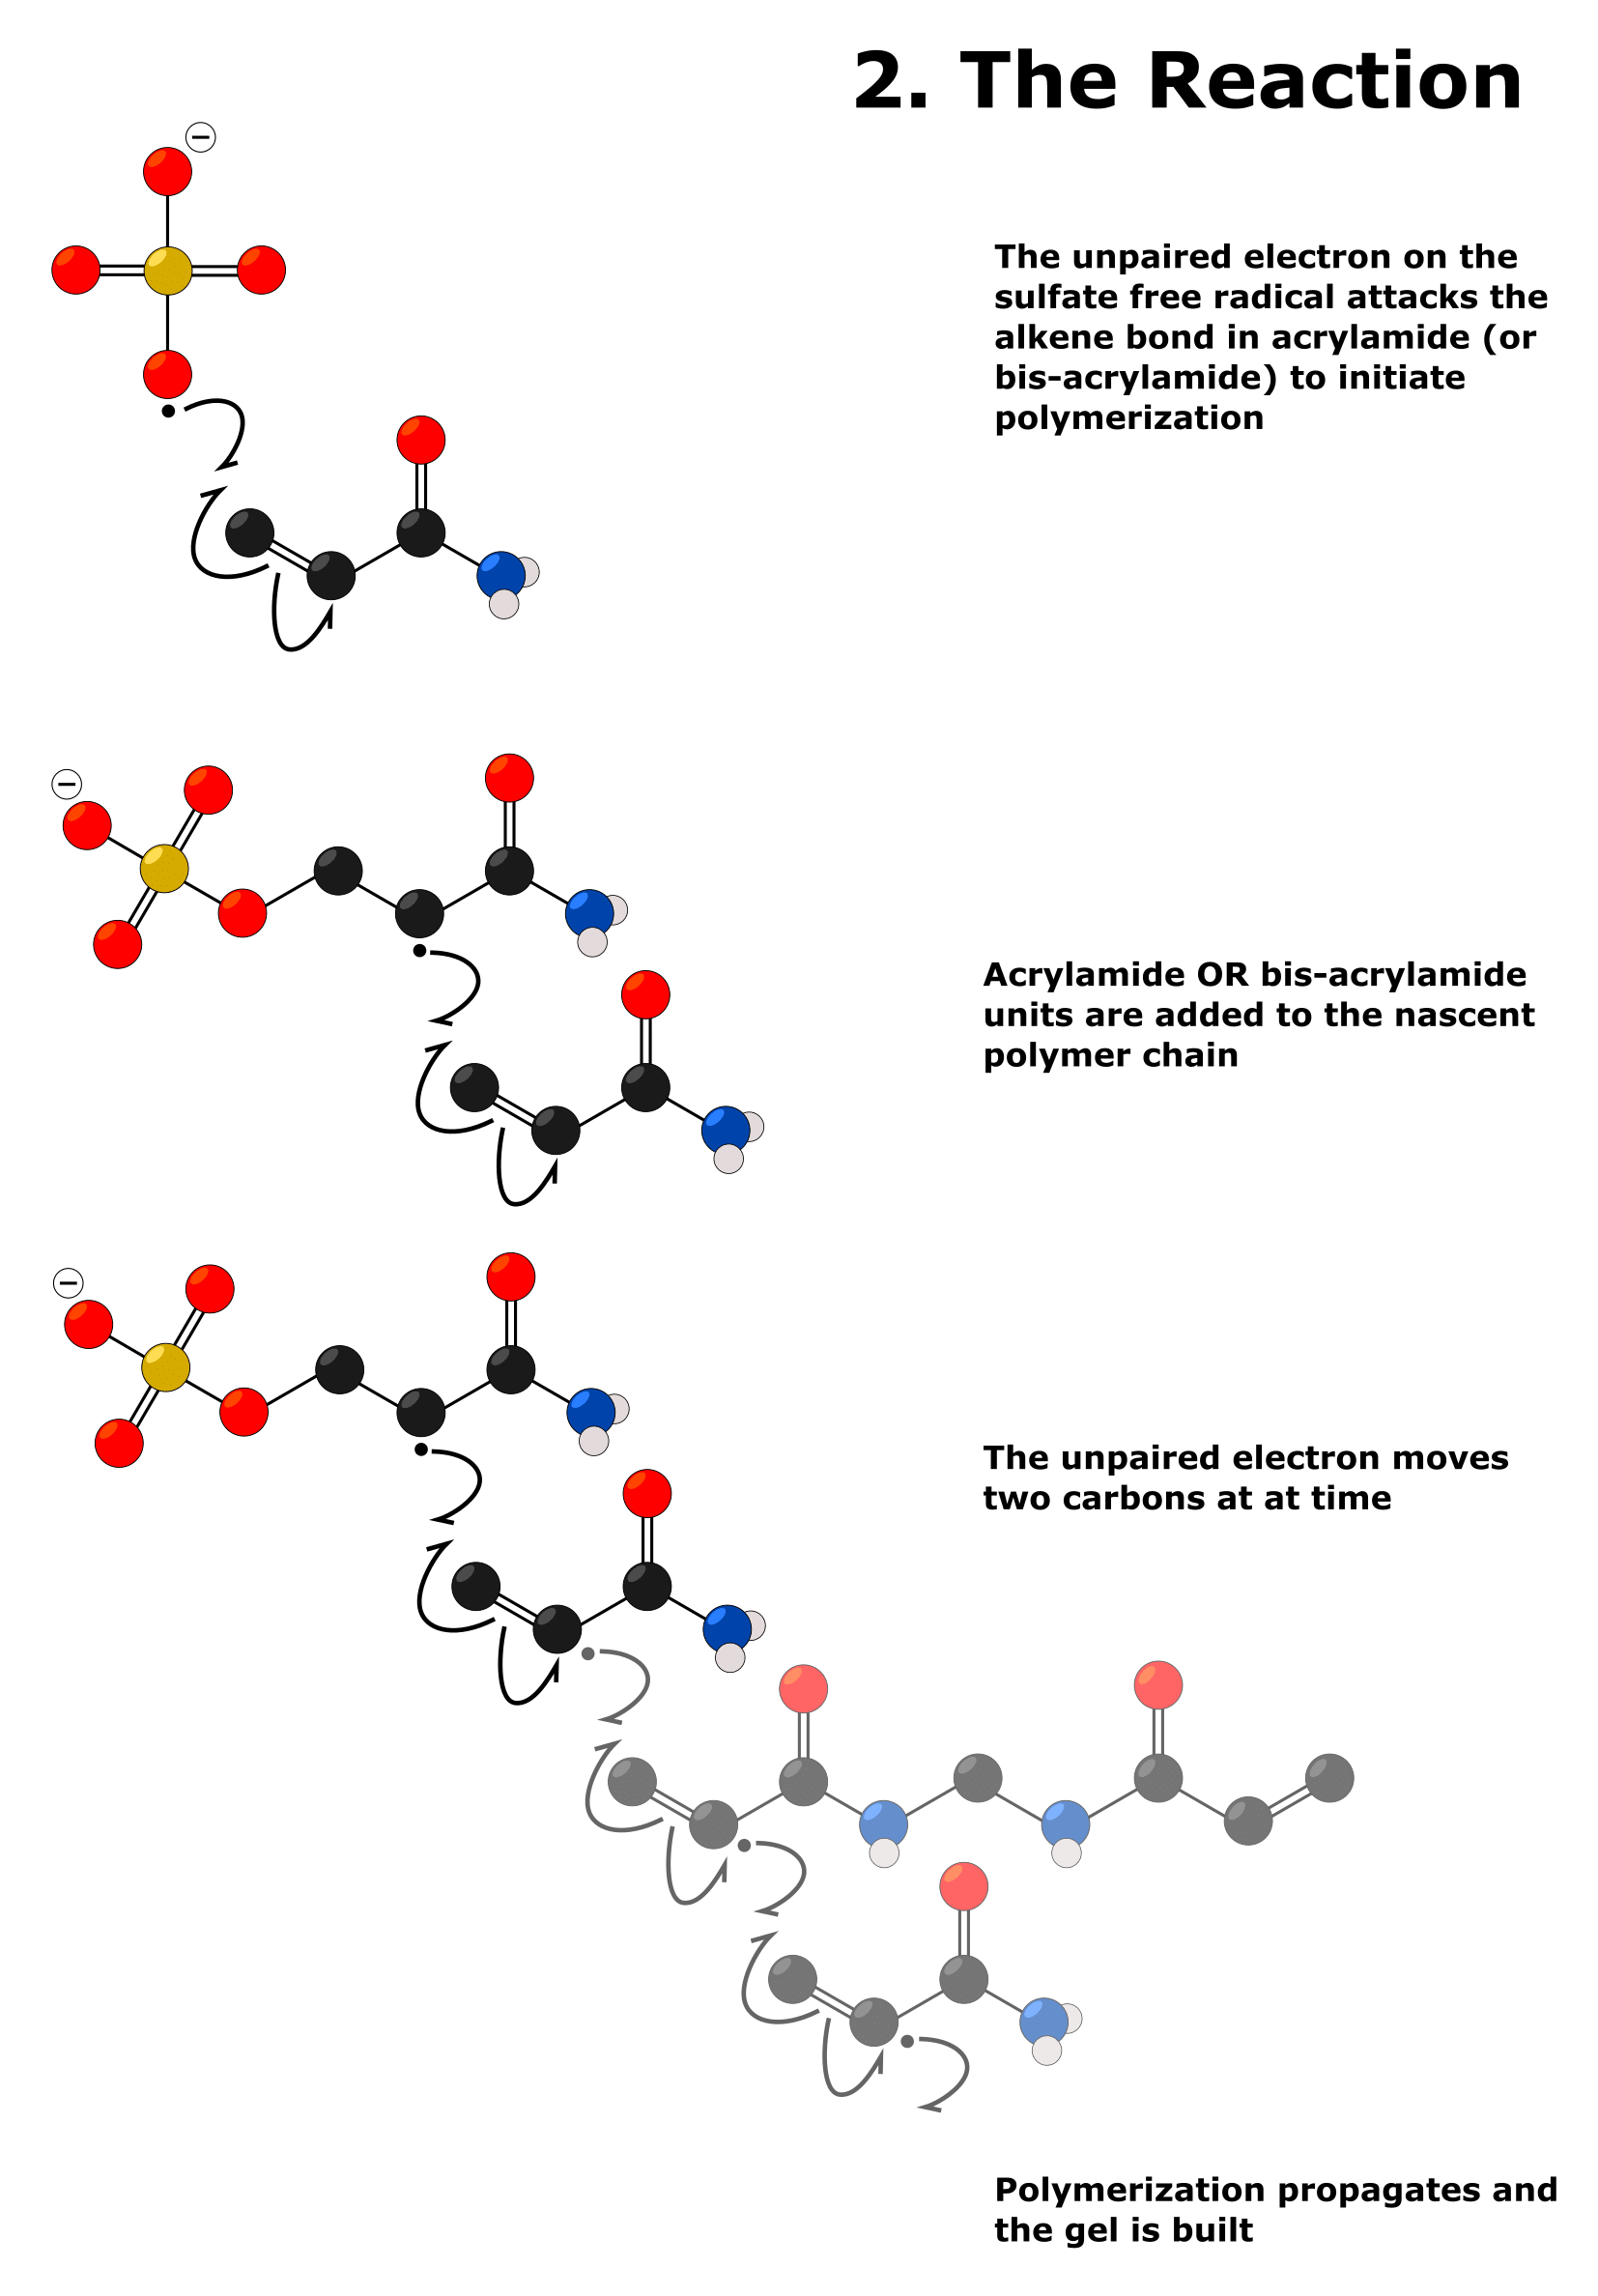
Acrylamide contains a terminal alkene bond that is susceptible to radical polymerization.
The unpaired electron on a sulfate free radical attacks and breaks the pi bond of the alkene on the acrylamide molecule. This leaves the sulfate group covalently bound to the terminal carbon of the acrylamide molecule by a single bond, and an unpaired electron on the adjacent carbon.
Thus, the entire molecule that results from this reaction is a free radical.
This free radical then breaks the alkene pi bonds on other acrylamide molecules. The result of this is increasingly longer polyacrylamide free radicals.
These attack more acrylamide alkenes, and so on, and the cycle repeats in a process called “chain propagation.” This reaction is shown in Figure 2.
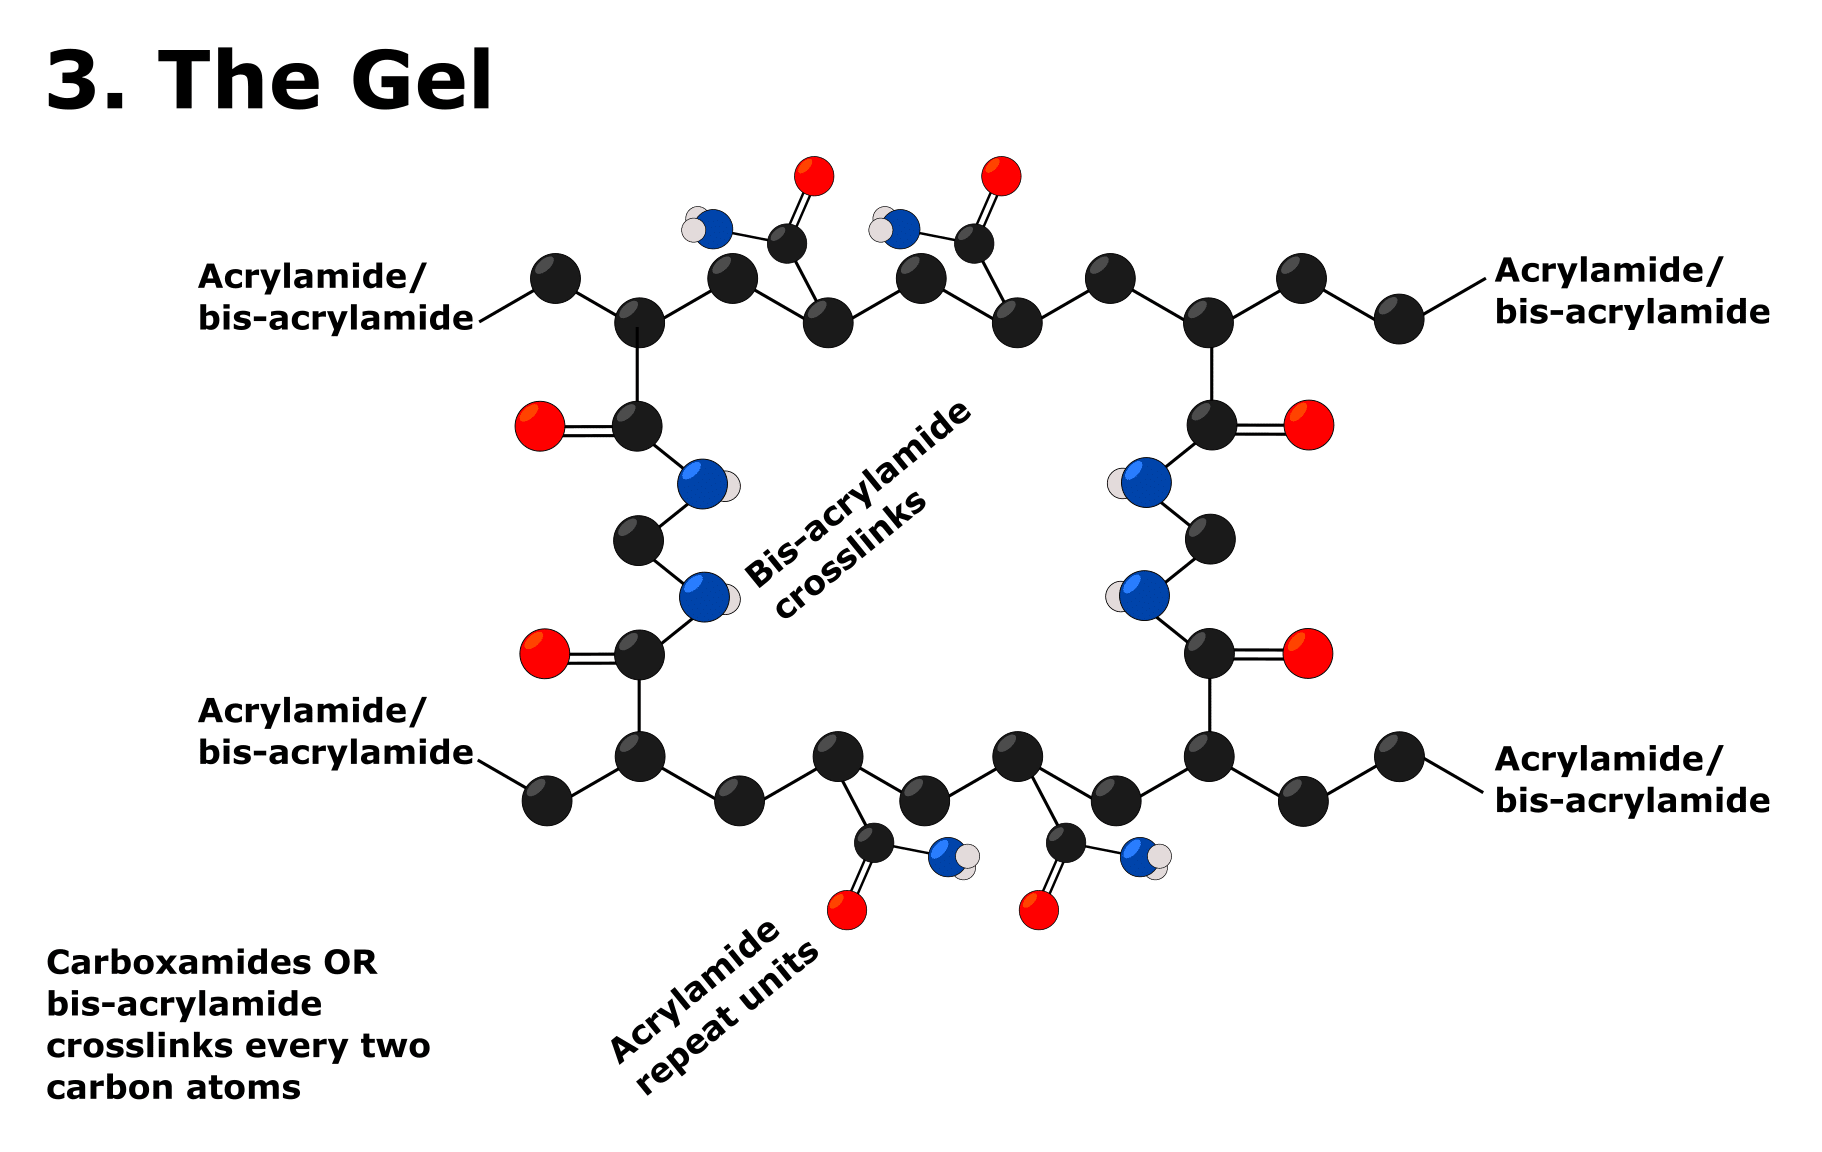
Bis-acrylamide, meanwhile, is essentially two acrylamide molecules joined together by a methylene (–CH2) bridge between the two amide N atoms. Because of this, the two alkene bonds effectively point outwards, and both are susceptible to radical polymerization.
So, the bis-acrylamide molecules form crosslinks between the nascent polyacrylamide chains.
Therefore, the ratio of acrylamide to bis-acrylamide is crucial to the porosity of the gel as well as the concentration of these two reagents.
Safety Notice
Acrylamide is a neurotoxin! So don’t sniff it, and keep the lid on the bottle as you work. Better yet, pipette it out in a fume hood if you have easy access to one.
2. APS
Why Do We Need It?
Ammonium persulfate (APS) is a source of sulfate free radicals required to initiate the polymerization of acrylamide and bis-acrylamide.
How Does It Work?
Ammonium persulfate is the ammonium salt of the persulfate anion.
The persulfate anion is (essentially) two sulfate anions joined together by an O–O (peroxide) bond. This bond is relatively weak and, in the presence of TEMED, breaks to produce a sulfate free radical.
3. TEMED
Why Do We Need It?
N,N,N´,N´-tetramethylethylenediamine (TEMED) catalyzes the production of sulfate free radicals. Without it, they don’t form.
How Does It Work?
OK, the reaction between TEMED and APS is quite complex and involves a transition state—Yikes! But the short version is as follows:
The TEMED molecule contains two N atoms, each bearing a lone pair of electrons. One of these lone pairs attacks an oxygen atom in a persulfate O–O bond and breaks it.
The products of this reaction are
- a sulfate anion; and
- TEMED bound to another sulfate anion through an N–O bond.
This N–O bond undergoes homolysis to form a TEMED free radical and the all-important sulfate free radical.
If you’re interested in the detailed mechanism, check out Figure 9 in this paper by Ziminska et al. [1]
Safety Notice
TEMED is harmful if inhaled or swallowed and corrosive (and it smells like a fishmonger). Wear your nitrile gloves and keep the lid on the bottle as you work.
4. Isopropanol
Why Do We Need It?
It removes bubbles from the meniscus of the unpolymerized resolving gel, generates a flat interface between the resolving and stacking gels, and prevents the gel from dehydrating.
How Does It Work?
The lowest energy interface between two immiscible liquids has the lowest possible surface area, i.e., a perfectly flat surface.
Bubbles can form only when the surface tension of the solution is sufficiently low. Adding isopropanol onto the resolving gel increases its surface tension beyond the point at which bubbles can form.
And water from the resolving gel cannot evaporate through the isopropanol layer.
When all these ingredients are combined and the gel has polymerized, it takes on the structure shown in Figure 3.
Troubleshooting Your Gel Casting
Although casting SDS-PAGE gels is really common, there are a few banana skins that you can slip on. Here are some of the common ones and some ways to avoid them:
What If My Gel Doesn’t Set?
Prepare fresh 10% APS and recast your gels. Persulfates are unstable compounds owing to the weak O–O bond, which will break over time.
As this happens, you lose your source of free radicals that initiate the polymerization of acrylamide.
This is why we usually store APS at –20 °C.
10% APS should last for up to 3 months at 4°C and up to 6 months at –20°C.
Be sure to split your 10% APS out into ~0.5-mL aliquots to reduce freeze/thaw cycles, which will accelerate its degradation.
What If the Resolving Power of My Gel Seems Incorrect?
What do I mean by incorrect resolving power, I hear you ask?
I simply mean a scenario where you have prepared (say) a 20% gel to resolve a 4-kDa protein, but the protein has fallen off the end of the gel before it separates from larger analytes.
If this is you, prepare fresh APS and recast. Double-check you dispensed the correct volume of 30% acrylamide as well.
Honey, I Shrunk My Gel
Prepare fresh gels and ensure that you seal them securely with cling film in a damp environment. The gels are prone to dehydration, which can cause them to shrink.
The chemicals in the destaining solution that’s used after Coomassie brilliant blue staining can also cause gels to shrink.
You can purposefully shrink your gels after you’ve stained them if you like. Just leave your gels out, and the entire thing will eventually miniaturize. This is a safe and convenient way of storing your gels.
How Do I Stop My Gel Leaking Before It Sets?
Apply a layer of parafilm to the bottom of the glass sandwich plates to seal them. You can also put two sponges between the sandwich plates and casting apparatus instead of one.
You can even take two sponges and wrap them in parafilm!
If these tips fail, just get into the habit of pouring a few more gels than you think you’ll need.
Easily Confirm the Resolving Power of Any SDS-PAGE Gel Recipe
Going to use a different SDS-PAGE gel recipe from the one provided here? (I forgive you.) Not sure if you believe how much acrylamide it tells you to add? You can easily check it by calculating:
(Volume of acrylamide added x 0.3) / Total volume of resolving gel prepared.
E.g., for a 10% gel from our SDS-PAGE gel recipe table, it’s:
(5 mL x 0.3) / 15 mL = 0.1 = 10%
Ta-da!
The Sun Sets on Another Helpful Article
Hopefully, the SDS-PAGE gel recipe and casting protocol will enable you to prepare the perfect gel every time. If you have any of your own helpful tips, be sure to share them in the comments section below!
Are you sick of leaky gels and wonky wells? Want all this information on hand in the lab? Download our free SDS-PAGE gel recipe and casting protocol cheat sheet. It works—at any percent.
References
- Ziminska M et al. (2020) Synthesis and evaluation of a thermoresponsive degradable chitosan-grafted PNIPAAm hydrogel as a “smart” gene delivery system. Materials 13:2530
- Mini-PROTEAN® 3 Cell Instruction Manual. Accessed Jan. 27, 2022
You made it to the end—nice work! If you’re the kind of scientist who likes figuring things out without wasting half a day on trial and error, you’ll love our newsletter. Get 3 quick reads a week, packed with hard-won lab wisdom. Join FREE here.


