
You know how many problems can crop up if you routinely perform western blotting. Ponceau S staining can help identify issues early on, saving time and effort in incubating and developing bad blots.
Read on to discover how Ponceau S works, how to perform staining, and get a detailed guide to interpreting what the stain means when troubleshooting your failed blots.
What Is Ponceau S and How Does it Work?
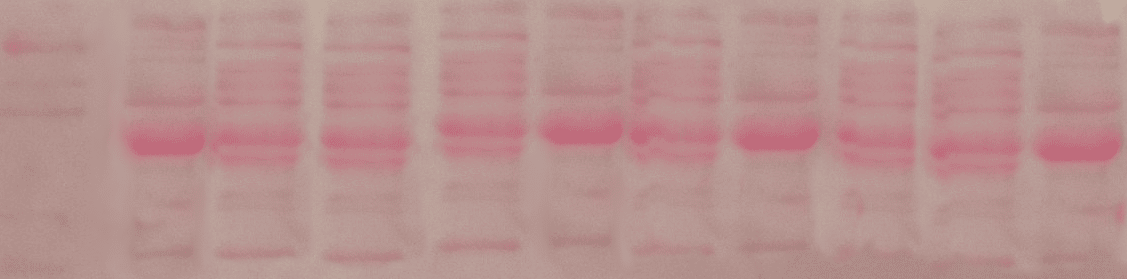
Ponceau S is a dye that binds to proteins on PVDF or nitrocellulose membranes, producing red bands where there is protein (Figure 1). Unlike Coomassie Blue, the other standard dye for visualizing proteins after SDS-PAGE, Ponceau S is reversible and is, therefore, compatible with most downstream applications.
Three key benefits of Ponceau S stain to note:
Choose a free resource to help you move forward
CHEAT SHEET
SDS-PAGE Protocol Cheat Sheet
DOWNLOAD
Western Blot Troubleshooting Card
- It does not affect the protein structure.
- It is easily eluted after staining.
- It is reusable.
The staining process is typically done on a blot after the transfer step to confirm that the transfer worked well with no issues.
However, like anything else on the benchtop, things can sometimes go awry. If you’ve stained your blot and found a less-than-ideal pattern, it could be indicative of several issues. Read on to find out what these are!
Ponceau S Staining Protocol
How To Make a Ponceau S Solution
Ponceau S can be purchased as a pre-made solution or as a dry powder. To make a 100 mL solution from the powder, weigh 100 mg of Ponceau S powder and make it up to 95 mL with distilled water before adding 5 mL of glacial acetic acid.
The final concentration will be 5% v/v glacial acetic acid and 0.1% w/v Ponceau S.
Store the prepared solution at either 4°C or room temperature, but ensure you protect it from light.
Staining Your Membrane With Ponceau S
- After the transfer of proteins onto your membrane is complete, wash the membrane briefly with distilled water (one minute with rocking is sufficient).
- Cover your membrane with the Ponceau S solution and close the lid to protect it from light.
- Let the membrane incubate on the benchtop for a minimum of one minute.
- Rinse the membrane with distilled water until the background staining is removed. You can save money by reusing the used Ponceau S.
- At this point, the protein bands stained with Ponceau S will be visible. You may image the membrane at this point.
- Wash the membrane 3x with 5 mL of TBS-T or your washing buffer for western blot.
- Proceed with blocking the membrane as usual. The blocking step will remove any residual stain, and will not affect the experiment.
FAQs about Ponceau S
How many times can I reuse Ponceau S stain?
It depends. Generally, you can reuse Ponceau S until the signal strength is noticeably lower. If you notice the strength is weaker, discard the old solution and replace it with a fresh solution.
How should I dispose of Ponceau S after staining?
Dispose of the stain following your laboratory’s protocols.
Can I use Ponceau S stain after the blocking step?
Perform Ponceau S staining before the blocking step. Since Ponceau S is a non-specific protein stain, it will also bind to blocking agents such as BSA or proteins in milk. The results will be more accurate if you perform the staining before blocking.
Is Ponceau S dangerous?
As always, consult the material safety data sheet before using a new chemical. Use standard lab PPE when working with Ponceau S as it can cause skin, eyes, and respiratory tract irritation.
Are there alternatives to Ponceau S?
There are alternatives, including Coomassie Blue and India Ink stains. The advantage of Ponceau S is its simplicity and reversibility. Coomassie Blue and India Ink are incompatible with downstream applications.
However, Ponceau S is relatively insensitive compared to other alternatives, so it may not be for you if your sample contains less protein.
7 Problems With Your Ponceau S Staining and What it Means
1. The ladder is visible on the membrane, but the Ponceau S stain shows no bands.
Using a pre-stained ladder in your SDS-PAGE can be very useful here. If the pre-stained ladder is visible, but there is no signal from the Ponceau S stain where your sample proteins should be, then it is reasonable to conclude that the problem lies not in the transfer but in the sample preparation.
If you haven’t done a protein quantification assay to determine the protein concentration in your lysate, and there is no signal from Ponceau S staining, there is a chance your sample has very little or no protein. You may not have homogenized the tissue sufficiently, or perhaps your cultured adherent cells were not dissociated from their plate.
2. The ladder is not visible on the membrane, and the Ponceau S stain shows no bands.
Again, this shows the utility of a pre-stained ladder. Assuming the SDS-PAGE gel was stopped before the ladder and samples ran off the bottom of the gel, you should be able to see the location of the pre-stained protein ladder in the gel before you initiate the transfer to the membrane.
If there is no Ponceau S-stained band after the transfer and the ladder is not visible on the blot, it is likely that your transfer did not work. If you are using PVDF, remember to activate the blot. Otherwise, check the transfer conditions, including the composition of the transfer buffer.
3. Bands are smeared.
A Ponceau S stain should produce crisp, discrete bands. If you see a reddish-pink smear where the bands should be, you may have a problem with your protein.
Some smearing is expected, but if it is excessive, there may have been a problem with the gel electrophoresis step. There could be several culprits for this one:
- Use fresh 2-mercaptoethanol in the sample loading buffer to ensure any disulfide bonds are broken.
- Ensure you are using sufficient SDS in the sample loading buffer, the running buffer, and the gel itself.
- Ensure the glycine concentration is high enough in the sample loading buffer to enable proper stacking of the sample before entering the separating gel.
- If you are unsure about any buffers, make them fresh and try again. This often resolves the problem.
- If the smeared bands are especially large and prominent, you have likely overloaded protein. Reduce the amount of sample loaded.
4. There is only one big band near the top of each lane.
This indicates that the protein separation by electrophoresis was unsuccessful. If you have a purified sample, your acrylamide gel pore size might be too is too small for your protein of interest. Try making a gel with a lower percentage. Typically, a gel should be less than 10% if the protein analyte is larger than 80 kDa.
If you are using a whole cell or tissue lysate, the problem lies with the separation itself. Make sure the pH of the running buffer and tris solutions used to make the gel are accurate, and check the electrophoresis settings to ensure the voltage is high enough to move the proteins through the gel.
5. The stain is inconsistent, or there is a space that is not staining.
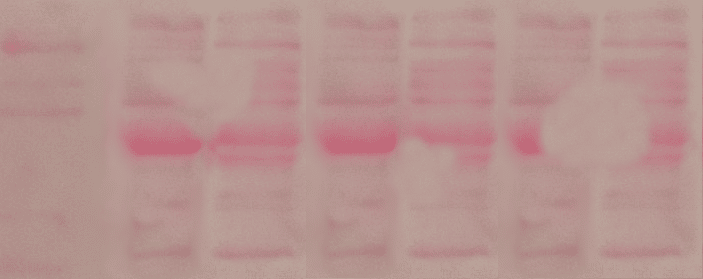
There is a problem with your transfer. Ensure there are no air bubbles between the membrane and the gel when setting up the sandwich, and take care when inserting the sandwich into the apparatus.
Forcing the sandwich into the apparatus may cause the gel to break, the membrane to wrinkle, or allow space for an air bubble to interfere with the transfer (Figure 2).
6. The stain is stronger in some lanes and weaker in others.
This is not necessarily a problem with your technique, but it shows a different amount of protein between lanes. If you need even protein concentration across lanes, try a Bradford or BCA assay before loading your samples to determine the exact quantities to load.
The amount of protein added is more important than the volume of the solution here, but you need to keep in mind the dilution of your loading buffer and add the appropriate amount.
7. The Ponceau S stain looks great, but I don’t see any bands after my antibody incubations!
Since the Ponceau S stain looks good, you can safely say that the problems seen at the end of the procedure do not stem from the electrophoresis or transfer steps. Look at your blocking, washing, antibody incubations, and substrate visualization steps to determine what happened.
Bonus Ponceau S Staining Tips
Don’t forget to check the signal on both the top and bottom of the blot. The proteins don’t transfer equally to both sides, so a weak or strange-looking signal may mean that you’re looking at the wrong side of the blot.
It sounds obvious, but sometimes the most obvious answers are the last ones we think of in the lab (especially when you’re running on less sleep than is ideal and you really need this blot to work)!
Additionally, western blots can be frustrating, and sometimes things don’t work out. If you’ve tried everything and your Ponceau S stains are still looking abnormal, sometimes the best thing to do is work on something else today and try with a level head from scratch the next day. The answer may be right there, and you might need to step away from it for a while.
Ponceau S Staining Summarized
Western blots can go sideways at any step in the protocol. Having a ‘checkpoint’ near the midway point of the protocol can help narrow down where any issues stem from. Ponceau S staining can help you accomplish this.
Depending on your staining patterns, the problem may lie with your sample preparation, the electrophoresis, or the transfer.
Alternatively, if the Ponceau S stain looks good, but the western blot still isn’t working, then you know to troubleshoot the latter part of the procedure from the blocking step onwards.
Ponceau S staining can be a handy step in your western blotting protocol to ensure everything is going according to plan. Hopefully, after reading this article, you can use this technique to clean up your blots and get better results! Have you got other tips on using Ponceau S staining? Leave a comment below.
You made it to the end—nice work! If you’re the kind of scientist who likes figuring things out without wasting half a day on trial and error, you’ll love our newsletter. Get 3 quick reads a week, packed with hard-won lab wisdom. Join FREE here.


 Showdown 6")

 8")
