
What Are Gradient Gels?
If you don’t already know the basics of sodium dodecyl sulphate polyacrylamide gel electrophoresis (SDS-PAGE), or if you need a refresher, check out our article on How SDS-PAGE works. [1]
OK, now that you’ve refreshed your memory on SDS-PAGE, let’s dive into gradient gels. Like fixed concentration polyacrylamide gels, gradient gels rely upon the “sieving” effect created by the matrix of polymerized acrylamide. The higher the polyacrylamide concentration, the smaller the pore sizes in the matrix. Higher concentration gels can separate or resolve smaller sized proteins, while lower concentration gels, with larger pore sizes, are better at resolving higher molecular weight proteins.
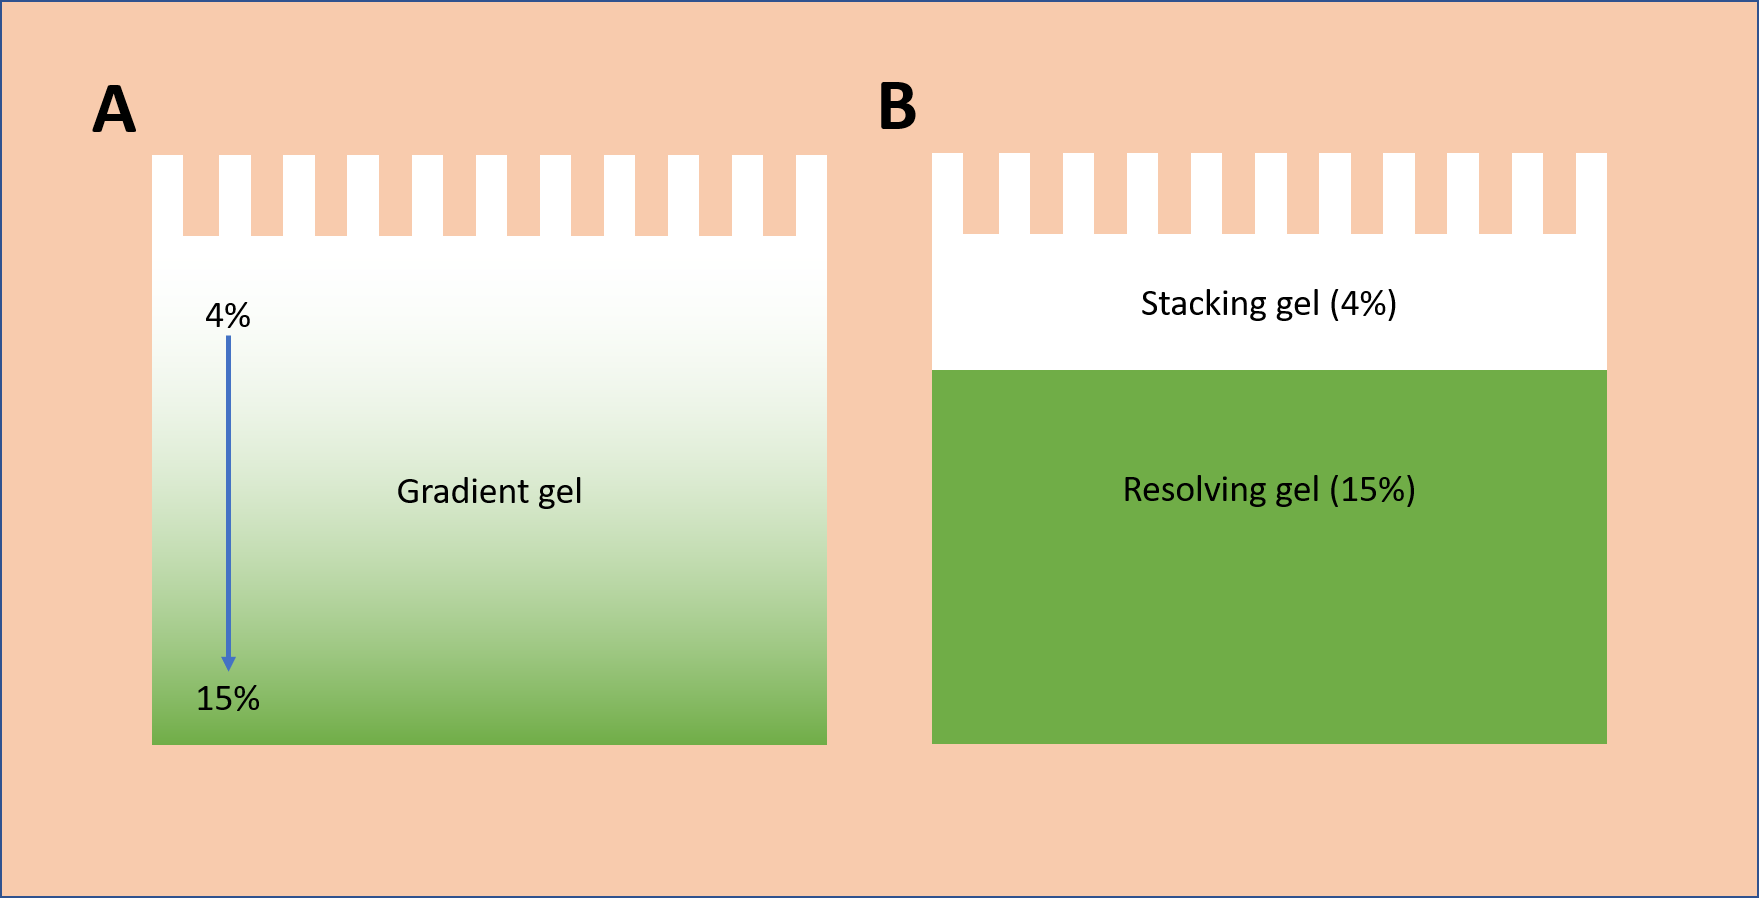
Unlike fixed concentration gels, gradient gels are formulated with a range of polyacrylamide concentrations, where the continuous gradient begins with a lower concentration and ends with a higher concentration (Fig. 1).
When to Consider a Gradient Gel
There are a few advantages of using gradient gels, but they do require more nuanced preparation or ca than a standard single concentration gel. So why go to the extra effort to create a gradient gel?
Choose a free resource to help you move forward
CHEAT SHEET
Western Blot Cheat Sheet
DOWNLOAD
Western Blot Troubleshooting Card
You Can Resolve a Broader Range of Protein Sizes on One Gel
This is especially useful if your sample is limited and you cannot run multiple gels. For instance, let’s say you want to resolve proteins ranging in size from 200 kDa down to 20 kDa. Looking at the gel percentage guide in Table 1, you can see that multiple fixed concentrations of gels would be needed to resolve proteins spanning that range of sizes. Running one gel is undoubtedly better than running three or four!
Gradients Produce Sharper Bands
Think about this, while proteins are migrating through the polyacrylamide matrix, the leading edge is encountering smaller pore sizes than the lagging edge. That means that the leading edge is passing through the gel at a slightly slower pace compared to the lagging edge. So, the band sort of piles up on itself just like traffic approaching a slowdown, resulting in a sharper band. While no one cares for traffic jams, sharper bands on your gel make for perfect publication figures and easily discernable data!
You Can Better Separate Similar-Sized Proteins.
We’ve all done this. You run your gel, transfer to nitrocellulose, run your Western blot and tilt the autorad every which way trying to catch the light just perfectly to make out the two bands you just know are there within that fuzzy doublet. There is a better way – the gradient gel provides you with sharper, more discrete bands, and the longer you run the gel, the more distance you’ll put between your close traveling bands.
PROTEIN SIZE | GEL PERCENTAGE |
4-40 kDa | Up to 20% |
12-45 kDa | 15% |
10-70 kDa | 12.5% |
15-100 kDa | 10% |
50-200 kDa | 8% |
>200 kDa | 4-6% |
Choosing the Right Gradient
Knowing what gradient to choose depends on the size of the proteins you are trying to visualize on your gel. Keeping Table 1 in mind, here are some scenarios and the matching gradient gels.
Range of protein sizes | Low / High acrylamide percentages | Application |
4 – 250 kDa | 4% / 20% | Discovery work; you are looking for everything under the sun |
10 – 100 kDa | 8% / 15% | A more targeted approach, but you want to avoid multiple gels |
50 – 75 kDa | 10% / 12.5% | You are trying to resolve similarly sized proteins |
Consider a Different Buffer
The buffering system used to cast and run the gel makes a difference too. For instance, proteins tend to migrate faster through the same concentration of polyacrylamide when using a running buffer based on MOPS instead of MES. The former will provide a greater resolution between gel bands, while the latter will allow you to visualize a broader range of protein sizes. Several providers of pre-cast gels offer comprehensive guides to help you choose the right gel for your work.[2] Just remember that choosing the right gel depends on having an idea about the sizes of proteins you wish to see.
Make or Buy
Now that you know what a gradient gel is, why you might use one, and picked a gradient to use, the big question is should you buy these or make you own? Like many things in science, there are tradeoffs, and one of them is money vs time.
Buying the gels is undoubtedly quicker in terms of hands-on time and might even let you achieve more reproducible results. Still, materials are more expensive and this method is less friendly to the environment. If you do pick this option, think about buying in bulk compared to transporting smaller quantities and creating more packaging waste.
On the other hand, if you can make your own, there is much less waste, and bulk materials are cheaper to buy. However, you will spend more time preparing the gels, and it might take a few goes to perfect your gradient pouring skills.
How to Make A Gradient Gel
If you’re going to be brave and make your own, here are two ways to do so. But before heading down that road, make sure you swat up on how to pour the perfect homemade SDS gel.[3] The same rules apply when making a gradient gel.
1. Using a Gradient Mixer
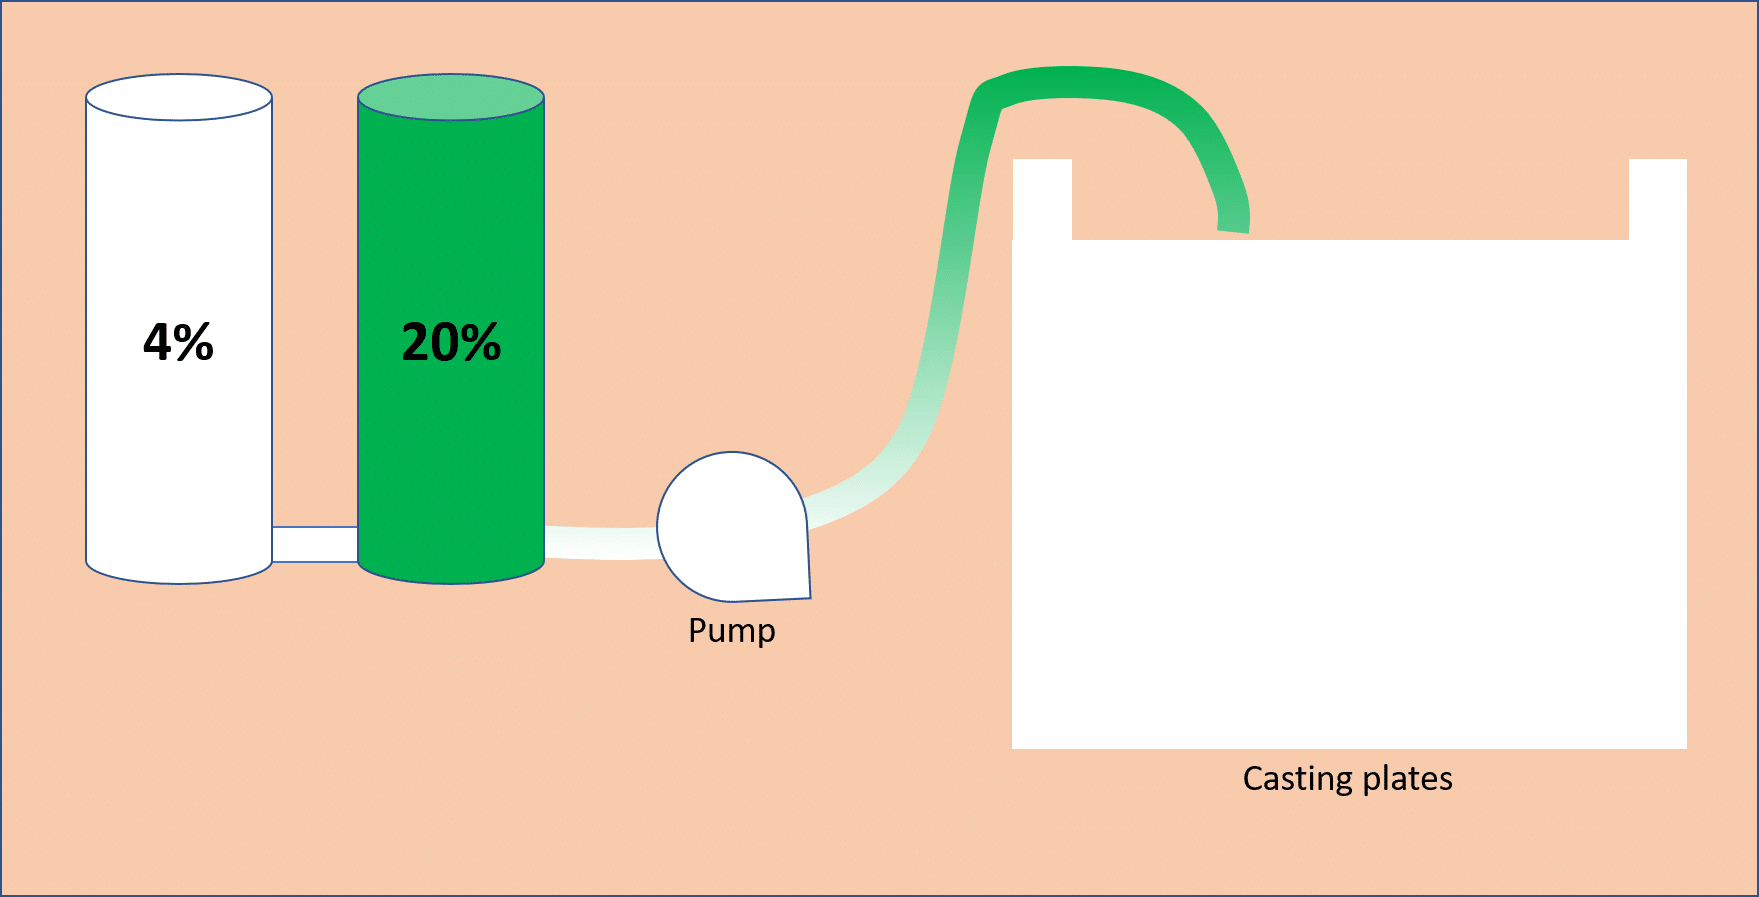
This approach uses two chambers, where one chamber contains the acrylamide solution at the lowest gradient concentration, and the other contains the higher acrylamide concentration (Fig. 2). Gravity flow or a pump is used to move the liquid from the lower concentration chamber through the higher concentration chamber into the gel casting plates. Be sure to wait until you are ready to begin pouring before you add the ammonium persulfate (APS) and TEMED (the ingredients that initiate polymerization of the acrylamide).
2. Pipette With an Air Bubble
If you do not have the patience to set up the gradient mixer, there is a hack that allows you to prepare a gradient gel much quicker and will make you look like a gel pouring pro.
- Prepare your low and high concentration acrylamide solutions in separate conical tubes (you can include the TEMED and APS at this point).
- Using a 5- or 10-mL serological pipette, pipette half the volume you need for the whole gel from the low concentration tube and then the other half from the high concentration tube.
- After removing the pipette, gently aspirate just a tiny bit of air to create an air bubble (approximately 0.5 mL) in the pipette and allow the air bubble to travel up the pipette to mix the acrylamide on its way up.
- Slowly pipette the gradient solution into the gel cast.
Beats the gradient mixer, right? If you need a visual, check out this video.
Hopefully, this article has helped you figure out how and why to make a gradient gel. We’d love to hear about your experiences making and using gradients gels, so please leave a comment below!
References
- Nick Oswald. How SDS-PAGE Works. Bitesize Bio. Published 13 July 2016.
- Protein Gel Electrophoresis Technical Handbook. Thermo Fisher Scientific. Accessed 24 March 2020.
- Conny Yu. The Practical Guide to Running a Perfect Homemade SDS-PAGE Gel. Bitesize Bio. Published 9 July 2016.
You made it to the end—nice work! If you’re the kind of scientist who likes figuring things out without wasting half a day on trial and error, you’ll love our newsletter. Get 3 quick reads a week, packed with hard-won lab wisdom. Join FREE here.


