
Protein–DNA complexes represent the molecular interface between stimulus and response for all organisms, and three-dimensional structures of these complexes are important in many research areas, including drug discovery [1] and epigenetics. [2]
Most protein–DNA complex structures are solved using protein crystallography which involves the crystallization of protein–DNA complexes. This technique has been providing detailed structural information on macromolecules since 1958. [3] Yet, crystallizing a protein remains a trial-and-error process, albeit one that is now facilitated by sophisticated robotics and informed by a wealth of successful cases.
For some of us, including myself, crystallizing protein DNA–complexes to solve their structure is a central part of our research. To that end, here are some key parameters to optimize to give you the maximum chance of success. Consider this article to be your protein–DNA complex crystallization protocol.
We’re going to cover many different scientific topics hard and fast here, so I’ve provided links to all the external resources you’ll need to convert the information in this article into results.
Choose a free resource to help you move forward
DIGITAL TOOL
The GC Setup Helper Pack
DOWNLOAD
Blood Collection Tube Chart
How to Determine the DNA Sequence to Which Your Target Protein Binds
You can’t crystallize a protein–DNA complex without some DNA. If you’re lucky, the nucleic acid sequence to which your target protein binds is available in the literature. If it isn’t, you’re going to need to determine it. There are two approaches to this.
The Bioinformatic Approach
Several bioinformatic tools enable you to search for likely protein-binding sequences on target genomes, including TransFac® [4] and CiiiDER. [5] To work, these tools require information such as the expected fold of your DNA binding protein (helix-turn-helix or zinc finger, etc.) and its primary sequence.
The Experimental Approach
Feel like getting your hands dirty with some experimentation? You can determine the DNA sequence to which your protein binds experimentally. The techniques used are collectively called DNA footprinting, and there are many ways to approach them. Check out this informative article to get started.
Once you’ve obtained a candidate sequence, you’ll need to anneal it to its complementary strand to form a double-stranded DNA molecule and check if it binds to your protein using a suitable assay. Electrophoretic Mobility Shift Assays (EMSAs) or Isothermal Titration Calorimetry (ITC) are the two most common choices.
Bigger is Not Always Better: Truncate the DNA
Once you’ve obtained a DNA molecule to which your target protein binds, it’s beneficial to determine the shortest possible version of it that will still bind to your target protein. Why? Because if you want to crystallize something, then it’s helpful to have the least entropic sample of that something.
Putting it more rigorously, unnecessary nucleotides add entropy to the target molecule by wobbling about in solution.
According to Gibbs free energy, losing entropy during a physicochemical process such as crystallization reduces its spontaneity, making it less likely to occur. Also, by removing unnecessary nucleotides, you’ll have fewer atoms to model into your electron density maps, saving you time.
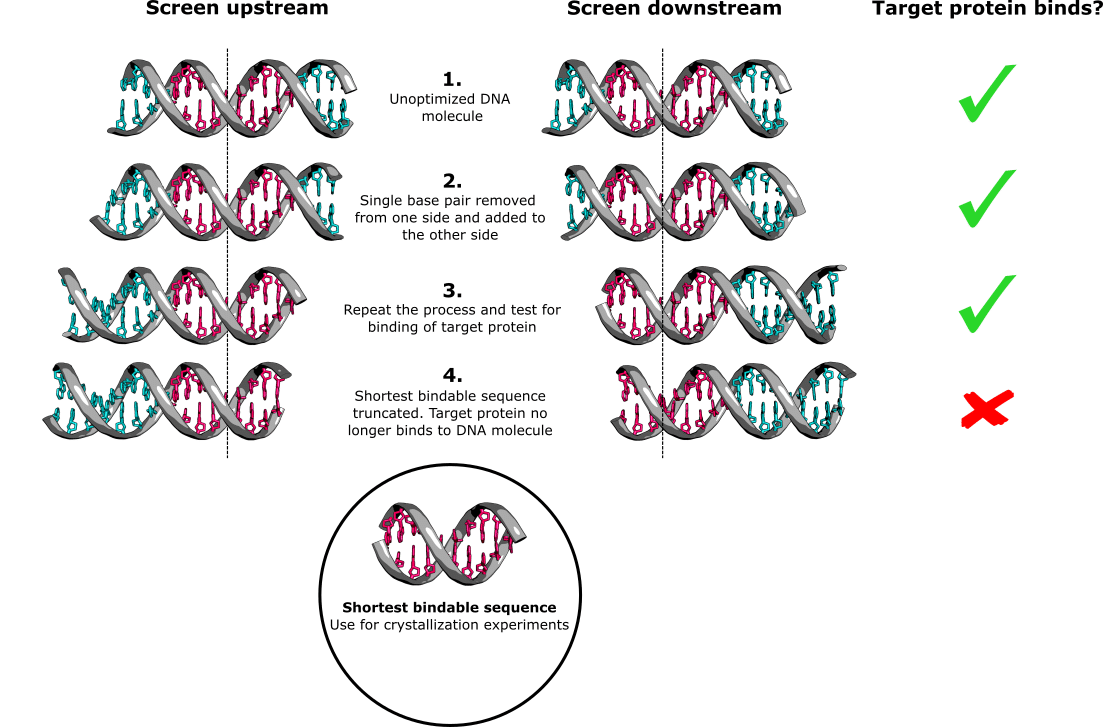
DNA truncation is the most effective way to determine the shortest “bindable” DNA sequence to which your target protein binds. Simply remove a base pair from one side of the molecule and simultaneously add a base pair to the other side (nothing fancy here, just buy new oligonucleotides each time). Then, perform your chosen DNA binding assay to check for binding, and keep repeating the process until you observe that the DNA molecule no longer binds to your target protein.
Repeat the entire experiment, but this time add base pairs to the side from which you were removing them and remove base pairs from the side to which you were adding them. The shortest bindable DNA sequence will be enclosed by the two instances in which your target protein fails to bind to the DNA (Figure 1).
Hold My Hand and Engineer a Crystal
Adding unpaired, complementary nucleotides to the 5’ end of each of the two single-stranded oligonucleotides in your DNA molecule is a proven way of promoting protein–DNA complex crystallization. [6,7] By adding (say) an adenine nucleotide to one 5’ end and a thymine nucleotide to the other, you can promote the formation of a crystal lattice through base pairing between overhanging nucleotides. This may occur through Watson–Crick base pairing or something more exotic such as Hoogsteen base pairing.
I have had success using this “sticky ends” strategy, obtaining crystals in which Hoogsteen base pairing between the overhanging nucleotides on adjacent DNA molecules was crucial to crystallization. In the absence of overhanging nucleotides, my sample turned to an amorphous talcum powder-like precipitate over time. So be sure to include this strategy in your approach.
Optimize the Protein-to-DNA Ratio
There are three schools of thought here, each with its own merits.
The Mix and Pray Approach
This is the one-stop solution for those who have a low tolerance for long-winded procedures. Simply mix your target protein with an excess of the DNA to which it binds (say a 1:2 ratio of protein:DNA), allow half an hour for them to bind, then proceed to crystallization experiments. If crystals do form, you can optimize this ratio to see if you can increase their size.
The downside to this approach is that the excess DNA reduces the homogeneity of your crystallization sample, which can be a critical factor to successful crystallization. [8]
The Stoichiometric Approach
This is the method of choice for ardent proponents of having the most homogenous sample possible. Mix your target protein with an excess of the DNA to which it binds, perform size-exclusion chromatography to isolate the 1:1 stoichiometric protein–DNA complex, and then use this sample in your crystallization experiments.
The downside to this approach is that it adds an extra size-exclusion chromatography step and a spin-concentration step.
The Empirical Approach
This one is for the mathematically minded. If you know the dissociation constant (KD) for your protein–DNA complex, then you can back-calculate the amount of DNA required to saturate a known concentration of your target protein.
The downside to this approach is that, in all likelihood, there will be some error in your protein concentration value. This will cause errors in your calculations, meaning you’re either under- or over-saturating your protein to some degree.
Whichever method you choose, err on the side of over-saturating your target protein, since excess DNA will usually be less detrimental to your crystallization experiments than two discrete forms of your target protein (unbound and DNA-bound).
Start Crystallization Experiments Using Mildly Acidic Conditions
Protein–DNA complexes tend to crystallize at a pH that is neutral or mildly acidic. [9] This is primarily because mildly acidic solutions promote polar contacts between the negatively charged DNA phosphate backbone and the positively charged DNA-binding residues on your target protein. [10] Best to play it safe then and go with the majority.
There are commercial crystallization screens that are designed specifically to crystallize protein–DNA complexes. For example, the Nucleix Screen is available through NeXtal Biotech, and the imaginatively named Protein-Nucleic Acid Complex Crystal Screen is available through Kerafast.
Caring for Your Crystals
Once you’ve grown crystals of your target protein–DNA complex, keep them hydrated and store them at the temperature they grew at. A word of warning here, protein–DNA complex crystals usually have a solvent content of ~ 60%. [11] This makes them extremely fragile and hard to manipulate.
When the time comes to screen your crystals for X-ray diffraction, be sure to cryoprotect them appropriately to reduce the damage caused by the high-energy X-ray photons. [12] Hopefully, you get some pretty X-ray diffraction!
Don’t be disappointed if your crystals diffract poorly, as this is really common. You can improve the diffracting power of your crystals by subtly optimizing the chemical and physical properties of the drop from which they grew. [13]
If the X-ray diffraction from your crystals remains of too poor quality to solve the structure of your target protein–DNA complex via X-ray crystallography, you could redissolve the crystals and try Nuclear Magnetic Resonance (NMR) on your sample instead. [14]
Final Comments on Crystallization of Protein–DNA Complexes
While all the parameters discussed in this article are critical for successfully crystallizing your target protein–DNA complex, don’t be dogmatic about them. Be open-minded, try things out, and you will succeed eventually!
Have I missed any parameters that you think are important for protein–DNA complex crystallization? Let us know in the comments section below.
References
- Bushweller JH (2019) Targeting transcription factors in cancer — from undruggable to reality. Nat Rev Cancer 19:611–24
- Harvey ZH, Chen Y and Jarosz DF (2017) Protein-based inheritance: epigenetics beyond the chromosome. Mol Cell 69:195–202
- Kendrew JC et al. (1958) A three-dimensional model of the myoglobin molecule obtained by X-ray analysis. Nature 181:662–6
- Wingender E (2008) The TRANSFAC project as an example of framework technology that supports the analysis of genomic regulation. Brief Bioinformatics 9:326–32
- Gearing LJ et al. (2019) CiiiDER: A tool for predicting and analysing transcription factor binding sites. PLOS One 14:e0215495
- Rice PA et al. (1996) Crystal structure of an IHF-DNA complex: a protein-induced DNA U-turn. Cell 87:1295–306
- Wedekind J and McKay D (1999) Crystal structure of a lead-dependent ribozyme revealing metal binding sites relevant to catalysis. Nat Struct Mol Biol 6:261–8
- McPherson A and Gavira JA (2014) Introduction to protein crystallization. Acta Crystallogr F Struct Biol Commun 70:2–20
- Krauss IR et al. (2013) An overview of biological macromolecule crystallization. Int J Mol Sci 14:11643–91
- Zhou HX and Pang X (2018) Electrostatic interactions in protein structure, folding, binding, and condensation. Chem Rev 118:1691–741
- Kantardjieff KA and Rupp B (2003) Matthews coefficient probabilities: Improved estimates for unit cell contents of proteins, DNA, and protein–nucleic acid complex crystals. Acta Crystallogr F Struct Biol Commun 12:1865–187
- Pflugrath JW (2015) Practical macromolecular cryocrystallography. Acta Crystallogr F Struct Biol Commun 71:622–42
- McPhersona A and Cudney B (2014) Optimization of crystallization conditions for biological macromolecules. Acta Crystallogr F Struct Biol Commun 70:1445–67
- Cavalli A et al. (2007) Protein structure determination from NMR chemical shifts. PNAS 104:9615–20
You made it to the end—nice work! If you’re the kind of scientist who likes figuring things out without wasting half a day on trial and error, you’ll love our newsletter. Get 3 quick reads a week, packed with hard-won lab wisdom. Join FREE here.


