Most scientists in the lab trust the measurements they are taking—but how can we know and verify that a measurement or method is truly accurate and reliable? One way is using Gage R&R studies.
The degree of variability in measurements is arguably just as important as the result itself. With so many factors that can alter or impact the “trueness” of a result (from laboratory technique and environment to instruments), the field of “measurement systems analysis” can become a critical means of trusting one’s data. The purpose of this article is to introduce you to gage repeatability and reproducibility studies (Gage R&R), which is a hands-on and statistically sound way to build confidence in the accuracy and precision of almost any method in the lab.
Trust and Measuring
“In God we trust. All others must bring data.”—W. Edwards Deming
Imagine you took a measurement in your lab—it could be a simple one such as weighing the mass of a material or figuring out the optical density of a solution, or something more complex like determining the number of colonies on a plate using an automated colony counter.
Put this article into practice
Choose a free resource to help you move forward
EBOOK
Guide to Lab Safety
CHEAT SHEET
Guide to Pipette Cleaning
- Do you know what kind of variability you would expect to see if you took the same measurement with the same material?
- What if you had a colleague take the measurement?
- Could you detect a meaningful change in your measurement if one arose?
Simply put, how much can you trust your measurements and results to be precise?
Determining with statistical rigor the repeatability and reproducibility of measurements is of critical importance to lab scientists because we must trust our data to form solid conclusions. It becomes even more important if we are measuring something brand new or using a totally novel technique for quantification.
If you’re at all concerned about the precision of a measurement method (and every scientist should be!), you’ve come to the right place.
In this article, we’ll cover Gage R&R studies, which provide a statistical picture of the variation you can expect from an instrument or method.
What is a Gage R&R Study?
Gage R&R studies, or gage repeatability and reproducibility studies, are conducted to quantify the measurement error that arises whenever a measurement is taken repeatedly.
These results can inform you whether a method is capable of detecting critical differences in a characteristic. In other words, a Gage R&R will inform you whether there is a great deal of variation from the method itself and help to identify which factors have the highest impact on your precision, such as environmental conditions, the person conducting the measurement, or variation between instruments.
To better define the “R&R” in Gage R&R, let’s look at five characteristics of measurement systems:
- Repeatability: variability in repeated measurements when the same person measures the same item(s) repeatedly with the same instrument.
- Reproducibility: variability in repeated measurements when different people measure the same item(s) repeatedly with the same instrument.
- Stability: changes in repeated measurements over time.
- Bias: differences between the measurement and the true (or reference) value.
- Linearity: an absence of bias across a range of values.
As the name suggests, Gage R&R studies typically focuses on repeatability and reproducibility. Other characteristics of your measurements system should also be understood and studied as needed.
Where Is Gage R&R Used?
Gage R&R is a quality technique most often employed in industry settings where product quality is critical and where faulty or subpar measurements can result in serious financial or hazardous repercussions.
For example, a pharmaceutical company that fills medicine containers by weight would want to ensure that the scale is capable of producing precise measurements across multiple operators. The company must have confidence that the measurement system (scale) can differentiate between, say, 10 grams and 11 grams, regardless of who is using the scale on a given day.
Gage R&R is also often used when different operators at a plant are required to make physical measurements on things like car parts or other mass-produced items.
With that said, this technique is NOT limited to measurements of mechanical dimensions or weights. It can be extremely useful in understanding the limits of more complex chemical and biological analyses as well! Below, we will learn how to design a Gage R&R study and look at what Gage R&R might look like in a lab setting.
When Should I Use Gage R&R?
Typically, Gage R&R isn’t a necessary prerequisite for most lab activities. The vast majority of measurements we make use instruments and techniques that are well understood and precise. However, running a Gage R&R can be useful if you are developing an entirely new method of measuring something for which you want to demonstrate repeatability and reproducibility.
Alternatively, you can execute a Gage R&R if you are experiencing an unusually high degree of variation between experiments that should yield similar results. The coolest part of Gage R&R is that you can drill down to exact variables that cause the greatest contribution to lack of precision—a handy metric for anyone working with a measurement technique.
Gage R&R Study Design in a Nutshell
A variety of software and tools exist to design a Gage R&R, including JMP® and Minitab®. However, even if you don’t have specialty software or dedicated quality platforms, you can still conduct a basic Gage R&R in Microsoft Excel—but remember, the more variables you include, the more challenging it may become.
A basic Gage R&R typically involves multiple analysts collecting data repeatedly on several known ‘parts’ in a random and blind fashion, which removes any bias each analyst might have.
After measurements are complete, data are compiled and comparisons against a “known” or master value are made, where possible.
Measurements on the same item that have been measured by the same person are compared to determine the “within” variation. Finally, each analyst’s observations are compared to obtain the “among” variation.
If there is a great deal of “within” variation, there is likely some inconsistency in the instrument or tool each person uses to conduct the measurement. In contrast, if the “among” variation varies greatly, there is likely inconsistency in technique between each person.
Gage R&R In Practice: OD600 Measurements
To better understand Gage R&R as it relates to a lab measurement, let’s look at a simplified example of where it might be employed.
Imagine that you and three fellow scientists are interested in supplementing media with an additive to determine whether it will significantly improve growth rates for your favorite cell line.
To determine if the additive works, you decide to measure OD600 after a known amount of time post-inoculation for both control and experimental conditions. You’ll need to employ the assistance of your colleagues to help run the experiment because sometimes measurements will need to be taken late at night.
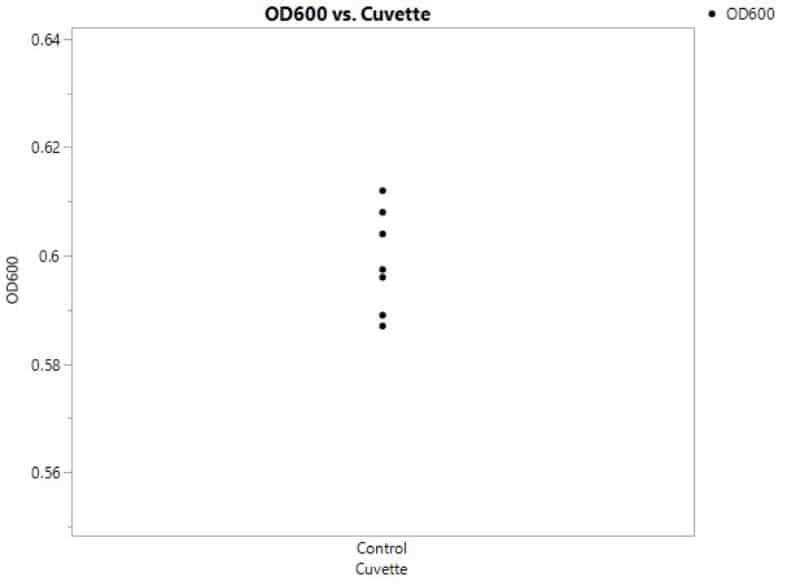
Even if you prepare samples identically by yourself, you would expect to see some degree of variability in the OD600. Figure 1 has some simulated data from repeated OD600 measurements for your control condition.

Where does this variability arise? There are two sources contributing to the spread in data or total variation. First, there’s variability that arises because of the process itself. For instance, these cultures may have been (unintentionally) inoculated with slightly different numbers of cells initially owing to slight pipetting differences. We call this process variation.
Second, there’s also variation that comes from the measurement itself, or measurement error, to consider.
Total Variation = Process Variation + Measurement Error
In this example, you could brainstorm some potential factors that might affect the measurement error:
- the spectrophotometer being used;
- the temperature of the instrument lamp;
- the cleanliness of the cuvette holding culture;
- the technique of the person transferring the media (cells may settle over time and the mixing/pipetting speed and intensity may influence results).
In an ideal world, all these factors would be strictly controlled and identical from measurement to measurement, but this isn’t possible in practice.
This is where Gage R&R comes into play: it helps you separate, and understand, the magnitude of measurement error and can point toward improvements to make measurements with greater precision.
The biggest take-away from this section is that we must ensure that our measurement error is low relative to the changes we hope to see with any additives so that we can best detect small changes in growth rate.
You decide to conduct a simple Gage R&R to see how much of the variation you might see when you run your experiment is attributed to the technique each scientist is using or to the instrument. After putting together a study plan, you and your colleagues take samples and conduct the measurements.
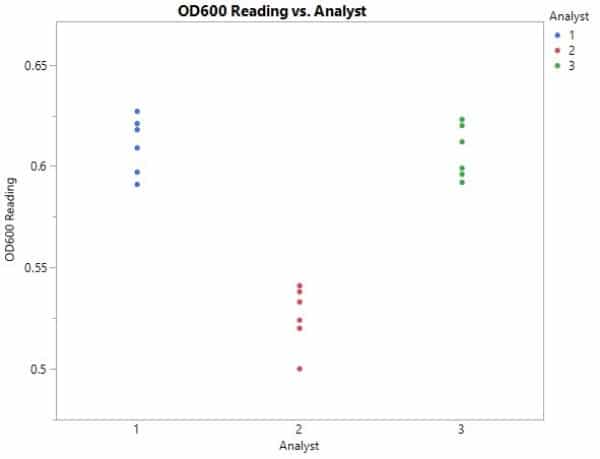
After all the measurements are taken, you sit down to analyze the data and create the graph in Figure 2.

Even without going into a statistical deep dive, we can glean some key observations.
First, it appears that the “within” variation is similar from analyst to analyst, which means that this variability is probably limited by the spectrophotometer itself. However, one analyst’s measurements are consistently lower than the rest of the group’s readings. Why would this be?
We identified earlier that an analyst’s technique can significantly affect OD readings when it comes to cultured media. In this case, perhaps Analyst 2 is not mixing the culture well enough or is letting it sit for too long prior to taking the measurement on the spectrophotometer.
A closer look at Analyst 2’s technique might help the group as data are collected moving forward, and lead to more precise measurements.
This is a very simple example where a statistical analysis might not be necessary, but there are very powerful techniques to design and analyze a Gage R&R study.
For instance, the powerful and intuitive software JMP provides a very simple tool to generate an analysis that includes standard deviation for each analyst, as well as components contributing toward the overall variation. If you have a more complicated Gage R&R that includes sources of potential variability beyond analyst (like instrument, method, or tool), this becomes very handy!
What Now?
What you do with the results of your Gage R&R is dependent on a lot of factors—primarily, the results you get and how much time you have to devote to improving your measurement precision. In the example above, where significant variation was attributed to analysts themselves, alignment between group members and training would be appropriate.
In other instances, sample preparation or instruments may need a second look. Ultimately, the path forward will depend on your specific situation, but you’ll be armed with more knowledge to drive decision-making in your lab.
Alternatives to Gage R&R
Of course, Gage R&R is only one of several methods to perform a measurement systems analysis. Recall that measurement systems analysis includes a collection of experiments and analyses to evaluate the capability and performance of a method. If a Gage R&R isn’t right for your measurement, consider alternatives such as calibration studies, fixed-effect ANOVA, and components of variance. If you are working with discrete rather than continuous data, consider an attribute gage study.
Conclusion
While you might not need to conduct a Gage R&R on a spectrophotometric method, the technique can be applied to almost any measurement. Whether it’s HPLC quantitation, fluorescence measurements, or flow cytometry, a solid understanding of and basis in measurement precision can make the difference between results that are confusing and those that are meaningful.
While the example provided in this article was fairly simple, the Resources section in this article includes advanced reading to guide you if you’re looking to perform a more complex Gage R&R in your project.
Do you have any experience conducting Gage R&R or examples of where you might use this technique? Let us know in the comments!
Resources:
- Simplilearn (2020). What Is Measurement System Analysis: Understanding Measurement Process Variation. Simplilearn. Published 25 September 2020. (Accessed 28 September 2021)
- Muelaner J. Measurement Systems Analysis (MSA) and Gage R&R. Muelaner. (Accessed 28 September 2021)
- Gage Repeatability & Reproducibility (Gage R&R). Quality-One International. (Accessed 28 September 2021)
- Kappele WD et al. (2005) An Introduction to Gage R&R. Quality 44 (13):24–5.
- Dejaegher B et al. (2006) Improving method capability of a drug substance HPLC assay. J Pharm Biomed Anal 42:155–70.
- Ermer DS (2006). Improved Gage R&R Measurement Studies. Quality Progress. (Accessed 24 September 2021)
You made it to the end—nice work! If you’re the kind of scientist who likes figuring things out without wasting half a day on trial and error, you’ll love our newsletter. Get 3 quick reads a week, packed with hard-won lab wisdom. Join FREE here.
Put this article into practice
Choose a free resource to help you move forward
POSTER
Top 10 Tips for Proper Pipette Care
CHEAT SHEET
Guide to Pipette Cleaning


