
Before getting down to the business of discussing salt and protein crystals, I’d like first to pose a question.
What’s the most valuable asset to research scientists like us?
Is it an understanding supervisor? Or a hefty consumables budget, perhaps? Both are beneficial, sure, but I’d argue that our most valuable asset is time.
When we’re not training up new starters or justifying our decision-making in update meetings, we’re all making minor yet difficult breakthroughs, mostly on fixed-term employment contracts.
Choose a free resource to help you move forward
CHEAT SHEET
SDS-PAGE Protocol Cheat Sheet
DOWNLOAD
Western Blot Troubleshooting Card
And speaking of justifying our decisions, we know only after the fact whether our experimental design was efficacious. How many of us have been left feeling more than a little dumb after spending months barking up the wrong tree as it were?
All of this is true irrespective of discipline. But to return to the topic of this article, it’s acutely pertinent to my own field of protein crystallography. “Why is that?” I hear you ask.
Well, going from construct to crystal generally takes a long time (months at least). When you arrive at a synchrotron X-ray source ready for action with your crystals, you barely have any time (usually 8 hours or less per visit), and, besides, the whole process of solving a protein structure ends in failure most of the time. (The failure rate is about 80–90%. Yikes!) [1]
Salt Crystals: The Enemy Within (The Crystallization Drop)
The biggest faux pas a protein crystallographer can make is spending months purifying the wrong protein. Why haven’t I written an article on this? Because it’s easy enough to avoid—do a Western blot on your purified sample as soon as possible.
The second biggest faux pas a protein crystallographer can make is spending months elegantly and dexterously growing fat crystals of (say) ammonium sulfate, thinking all the while that they are your fancy, uncharacterized drug-receptor or what have you.
Think of it this way. You don’t want to spend the time between now and your next synchrotron visit re-growing and enlarging crystals of some random uninteresting chemical, but you don’t want to wait until then to find out that they are protein crystals after all.
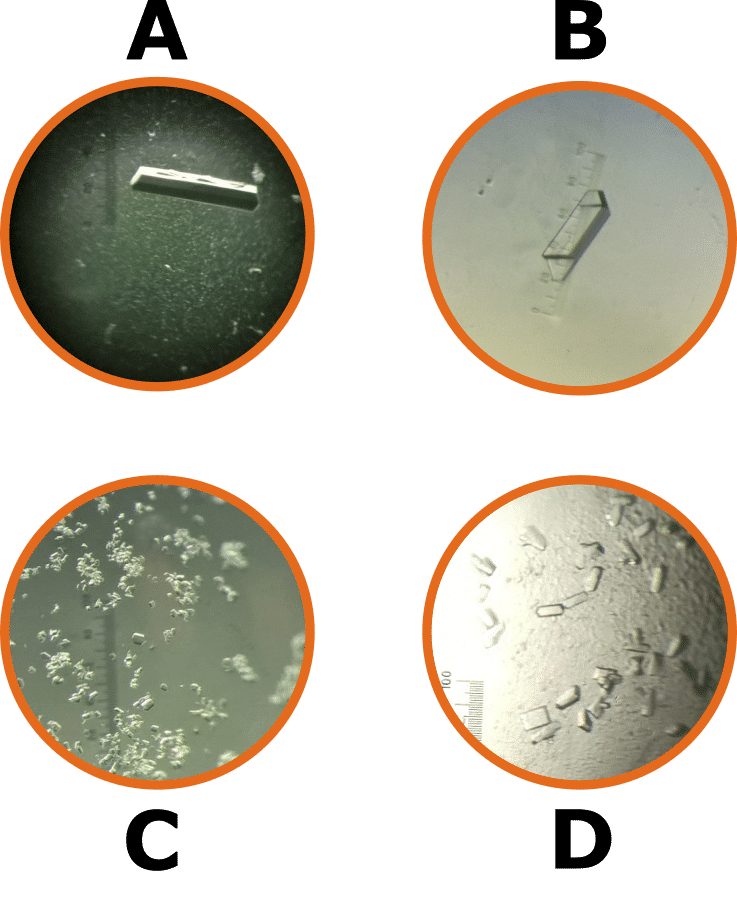
And think you can tell protein and chemical crystals apart by eye? Quiz time! Which of the crystals in the figure below are the protein crystals? The answers are at the end of this article.
Why Do Salt Crystals Grow?
Before answering, it’s worth noting that protein crystallographers call any false-positive crystal a salt crystal regardless of what it’s made of.
Right, now that’s cleared that up, salt crystals grow because of the diverse range of chemicals in the protein crystallization cocktail solution(s), and to a lesser extent, in that of your sample buffer too. Combine these with the dehydrating nature of a crystallization experiment, and you have a recipe for confusion.
Have a browse through the brochure of this common protein crystallization kit to get an idea of their average chemical complexity.
Can I Tell Salt and Protein Crystals Apart Without Using X-rays?
Yes, you can, and I’ve got your back. Read on, ye steady-handed, for five easy ways to tell the difference between salt and protein crystals.
1. The Crush Test
This is quite a violent method of telling salt and protein crystals apart, so it’s great if you’ve got some pent-up frustration to vent.
Protein crystals contain, on average, about 40% solvent (they’re very gap-ey), [2] whereas it’s relatively common for salt crystals to contain no solvent at all. The average protein molecule is also a lot bigger than a chemical. Consequently, the number of intermolecular contacts per atom in the crystal is significantly lower for protein crystals than for salt crystals.
Protein crystals are, therefore, very soft. Salt crystals, meanwhile, are rock hard. Think of crushing a grain of table salt between your fingers. You get the idea.
Grab an acupuncture needle (or whatever you use to manipulate crystals in your lab) and crush your crystal of unconfirmed composition. If it goes with a satisfying CRACK! then it’s a salt crystal. If, on the other hand, it smears and melts noiselessly, it’s a protein crystal.
2. Soak in a Dye
This method also takes advantage of the high solvent content of protein crystals. Because protein molecules are large and have irregular shapes, they don’t often pack in an optimal way. This leads to channels and cavities in the crystal lattice, which are large enough to accommodate even quite large chemicals. [3]
Salt crystals, however, except for those of large supramolecular assemblies that aren’t found in protein crystallization mixtures, are usually packed in such a way as to occlude all solvent, or usually anything much larger than a water molecule.
So, you can titrate a small volume of dye solution into the drop that contains your crystals of unconfirmed composition. If your crystals turn the same color as the dye itself, then they must be protein crystals. This is because they must have channels large enough for the dye molecules to soak in.
There is a commercial dye called “Izit Crystal Dye” that you can use to perform this experiment. It comes with an instruction sheet containing some handy images to guide you through the results.
But if you’re on a tight research budget, don’t panic, because Izit dye is just a dilute solution of methylene blue, which you probably already have on your chemical shelf. So, you can make it up yourself and have a go.
Be careful, however, because titrating in too much dye can make any transparent crystal appear the same color as the dye for roughly the same reasons why the moon looks like it’s glowing when it’s actually just reflecting light from the sun. You’ve been warned.
3. Fish and Wash Crystals and Run an SDS-PAGE Gel
There’s not too much to say here. Protein crystals are… made of protein. So they will produce a band on an SDS-PAGE gel. Carefully fish half a dozen or so of your mystery crystals and wash them in a solution that matches the drop from which you just took them, minus any protein.
This will wash any solution-state protein molecules that may be adhered to the surface of the crystals, which would also give you a band on your gel.
Then, dissolve them in Laemmli buffer and run an SDS-PAGE. If you see a band, then hooray: you’ve crystallized your protein! If you don’t get a band, however, then they are probably salt crystals.
And if the latter happened, then you’d probably doubt whether you fished enough crystals to show up on an SDS-PAGE gel, right?
Go ahead and run a Western blot as well since they typically detect way smaller amounts of protein. (As little as 0.1 ng compared with 0.5 \(\mu\)g for SDS-PAGE, although these values vary depending on the stain or antibody used, etc.)
A Western blot takes time and can be very involved if you don’t routinely perform them. But that’s the price you pay for a definitive answer to the salt and protein crystal conundrum, I’m afraid.
4. Image Your Crystals Using a UV Microscope
Most proteins contain at least a few of the aromatic amino acids tryptophan, tyrosine, and phenylalanine. These residues allow you to detect your protein sample via UV absorbance at \(\lambda\)=280 nm during purification.
If you’re lucky enough to have access to a microscope that can illuminate samples at 280 nm, take a peek at your crystals. If they are protein crystals, then they should glow (fluoresce)! [4]
Opting for this way of telling salt and protein crystals apart? Then be very cautious for two reasons:
- Crystals of aromatic chemicals may very well fluoresce at 280 nm. That would be a false-positive result of a false-positive result. I have been caught out by this.
- Tryptophan is the dominant fluorophore in protein molecules. So, if your protein has no tryptophan residues and is low on tyrosine and phenylalanine residues as well, then your protein crystals may not fluoresce at all. So be sure to check the primary sequence of your target protein first. [5]
5. Set Up Control Drops
This one’s really simple. Set up a protein crystallization experiment identical to the one that produced your crystals of unknown composition, only do so without any protein present.
If crystals form that look identical to your crystals of unknown composition, then you can be pretty sure you’ve not crystallized your target protein. If the control drops stay clear, however, then you have probably crystallized your target protein.
Some caution is needed here because simply subtracting your protein from the equation doesn’t result in a perfect control scenario. This is because, in doing so, you will fundamentally change the physicochemical properties of the drop. That’s to say, protein molecules dehydrate chemicals just like polyethylene glycol, and other long-chain polyols (intentionally) dehydrate proteins to induce crystallization. [6]
Still, you can consider yourself very unlucky if you get identical crystals growing in the control and experimental drops, but one set turns out to be protein crystals and the other salt crystals.
Bonus Sanity Check
In a vapor diffusion protein crystallization experiment (the most common type), the experimental drop is incubated against a comparatively large volume of solution identical to the one with which you mixed your purified protein sample.
This is colloquially termed “the reservoir” and is what slowly dehydrates the experimental drop to (hopefully) induce crystallization of your target.
Always check the reservoir for crystals! If the experimental drop contains crystals and the reservoir solution (which doesn’t have any protein in it) contains identical crystals, then you can be pretty sure that you have not crystallized your target protein.
Final Thoughts
Except for the Western blot, which is the most labor-intensive technique to perform, none of these methods alone is likely to provide you with definitive, clear-cut answers. Be sure to try a few of them to give you confidence in their outcome!
Also, it should be obvious, but 1, 2, and 3 are destructive methods. So please don’t try them out if you’ve got only a few crystals to go at. That could lead to serious heartache.
Last, if you are collaborating with a colleague or supervisor who is not a crystallographer, it’s important to stress that before flashing some X-rays at a crystal, it can be very difficult to tell what they’re made of!
If we could tell exactly what a crystal was made of in the absence of X-rays, then the entire field of X-ray crystallography would be largely redundant.
Have these tips and tricks helped you distinguish between salt and protein crystals? Have you got any more fun ideas on how to tell if your crystals are made of protein or not? Leave them in the comments section below if so.
References
- Pusey ML et al. (2005) Life in the fast lane for protein crystallization and X-ray crystallography. Prog Biophys Mol 88:359–86
- Chruszcz M et al. (2008) Analysis of solvent content and oligomeric states in protein crystals–does symmetry matter? Protein Sci 17:623–32
- Weichenberger CX et al. (2015) The solvent component of macromolecular crystals. Acta Crystallogr D Biol Crystallogr 71:1023–38
- Desbois S et al. (2013) Some practical guidelines for UV imaging in the protein crystallization laboratory. Acta Crystallogr Sect F Struct Biol Cryst Commun 69:201–8
- Ghisaidoobe AB and Chung SJ (2014) Intrinsic tryptophan fluorescence in the detection and analysis of proteins: a focus on Förster resonance energy transfer techniques. Int J Mol Sci 15:22518–38
- McPherson A Jr (1976) Crystallization of proteins from polyethylene glycol. J Biol Chem 251:6300–3
Further Reading
Here’s a fun pyrotechnical take on the conundrum of telling salt and protein crystals apart:
- Raghunathan K et al. (2010) Trial by fire: are the crystals macromolecules? Acta Crystallogr Sect F Struct Biol Cryst Commun 66:615–20
Quiz Answers
A and D are the protein crystals.
You made it to the end—nice work! If you’re the kind of scientist who likes figuring things out without wasting half a day on trial and error, you’ll love our newsletter. Get 3 quick reads a week, packed with hard-won lab wisdom. Join FREE here.


