You’re probably aware of the two main types of restriction cloning: sticky-end and blunt-end cloning, but do you know the difference? And do you know how to do both?
Blunt and sticky might sound dull and dirty but knowing how these different cloning methods work is important when choosing which method to use.
Here we give you a guide to how blunt-end cloning works.
What Is Blunt-End Cloning?
Blunt-end cloning is the cloning of DNA fragments containing no unpaired bases at the 5 and 3 prime ends (denoted 3’ and 5’ respectively) into linearized vectors
Put this article into practice
Choose a free resource to help you move forward

CHEAT SHEET
Nuclear Extraction Protocol

PROTOCOL
Chemically Competent Cells Protocol
Because there are no overhanging bases, the ends are blunt.
It is unlike sticky-end cloning, where both the insert and the vector contain single-stranded overhangs that complement each other.
Why Would I Want to Use Blunt-End Cloning?
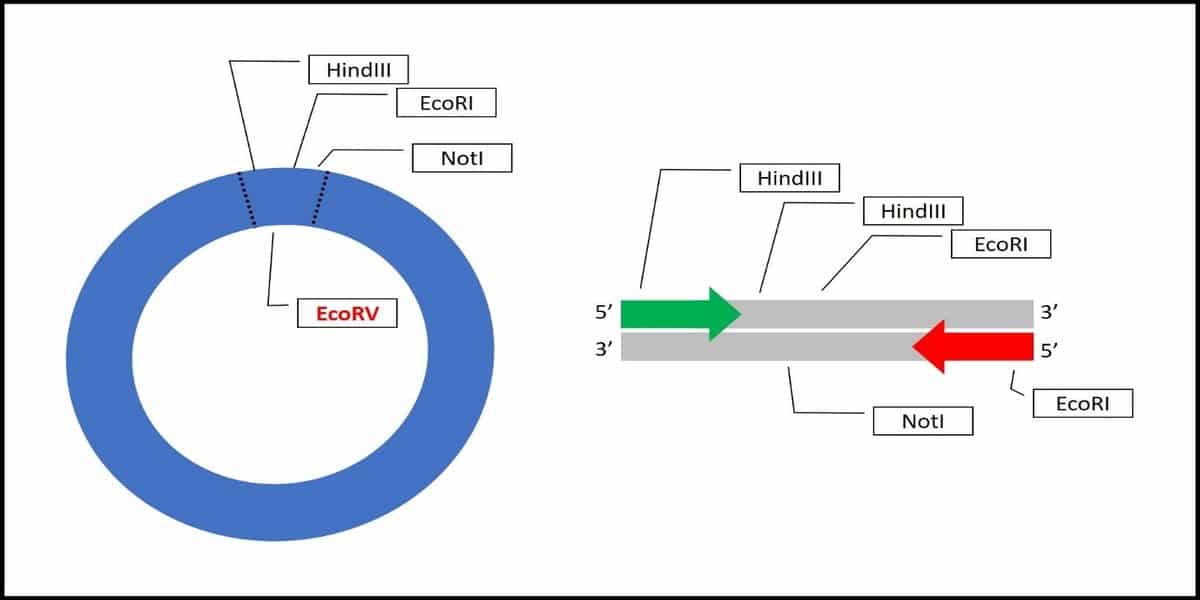
Imagine you wish to clone a PCR product that contains many common sticky end restriction endonuclease sites, such as EcoRI or HindIII, at the ends and within the sequence. It would be challenging to perform partial digests that generate the sticky overhangs without also cutting up your PCR product (Figure 1).
Note that this is only true if you use a DNA polymerase with a proofreading function, such as Pfu. We’ll learn more about this in the discussion on how blunt-end cloning works.
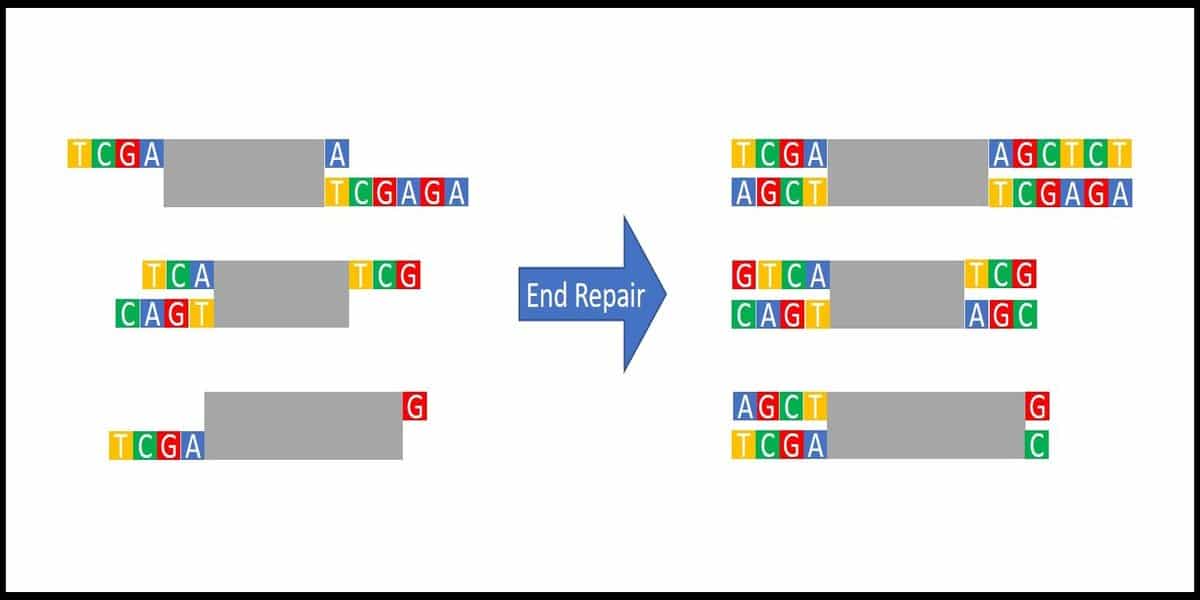
Consider another scenario, you wish to clone fragments of genomic DNA after physically shearing and repairing the ends. You could expect those ends to be random in nucleotide sequence and to vary in the number of nucleotides at each end and from fragment to fragment.
It would be difficult, if not impossible, to clone these into the multicloning site of any vector (Figure 2). However, after end repair, all ends would be blunted and compatible with a blunt-ended linearized vector.
Whatever the case, the main advantage of blunt-end cloning is the universality of blunt ends, whereas cloning sticky-ended fragments must take the complementarity of the overhanging sequences into account.
How Does Blunt-End Cloning Work?
Basically, the blunt-ended insert and linearized vector are mixed with DNA ligase, and the reaction proceeds when the insert, vector, and ligase come together in solution.
The insert is joined to the vector when the ligase catalyzes the formation of a covalent bond between the 3’-hydroxyl group of one base to the 5’-phosphate group of the adjoining base. We won’t get into detail here, but you can check out this article on DNA ligation for more detail on the mechanism of DNA ligase.
The Importance of 5’-Phosphates
The presence of 5’ phosphates in the fragments being ligated is critical, as the covalent linkage of 5’ phosphates with 3’ hydroxyl groups circularizes the vector/insert complex and allows it to be cloned upon bacterial transformation.
5’-phosphate groups can be introduced into PCR products, end-repaired fragments, or linearized vectors, if not already present, by using T4 polynucleotide kinase or using PCR primers synthesized with a phosphate group on the 5’ terminal nucleotide. Table 1 shows the phosphorylation status of inserts and vectors following various treatments.
Table 1. Phosphorylation status of inserts and vectors following various treatments.
Vector | 5’-phosphorylation |
Blunt end cut. Treat with alkaline phosphatase | Both 5’ ends are phosphorylated Both 5’ ends are de-phosphorylated |
Sticky end cut followed by end repair. Treat with alkaline phosphatase | Both 5’ ends are phosphorylated Both 5’ ends are de-phosphorylated |
Cut vector, amplify using high fidelity polymerase or polish post-amplification; non-phosphorylated primer | Both 5’ ends are not phosphorylated; this will ligate to insert with phosphorylated ends, but will not re-circularize during ligation |
Cut vector, amplify using high fidelity polymerase or polish post-amplification, one or both primers phosphorylated at 5’ nucleotide | One or both 5’ ends phosphorylated |
Insert | 5’-phosphorylation |
PCR product amplified using polymerase with proofreading activity or remove 3 ’terminal A post-amplification; non-phosphorylated primers | Both 5’ ends are not phosphorylated; the vector must contain phosphorylated 5’ ends |
While 5’-phosphate groups are critical to creating a circular construct, their absence can also be used to your advantage. If you are using PCR to create the insert or to amplify a linearized vector, PCR primers lacking 5’-phosphates are useful to reduce the background of the re-circularized vector during cloning. Likewise, enzymatic methods can be used to remove phosphates by treating the DNA fragments with alkaline phosphatase.
How to Generate Blunt-End DNA
Blunt ends can be generated in three main ways:
- End repair with T4 DNA polymerase, where 5’ or 3’ single-stranded protruding ends are filled in.
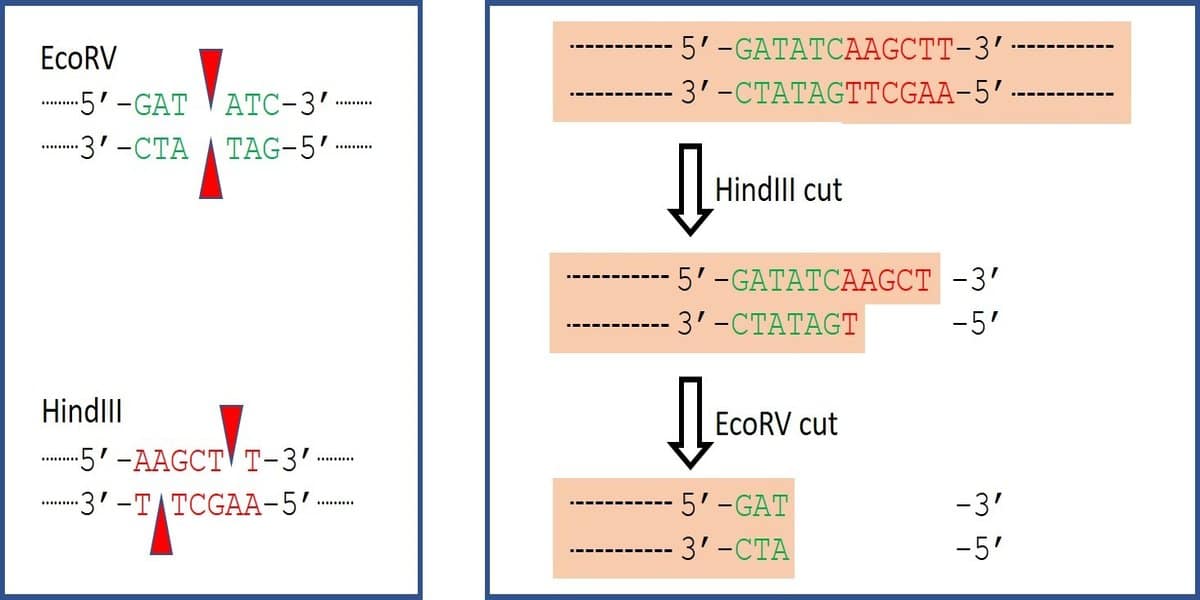
- Using restriction endonucleases that produce a straight cut in the DNA backbone like EcoRV.
- Filling in single-stranded overhangs remaining after physical shearing (Figure 2) or cutting with restriction endonucleases that generate sticky ends.
The single-stranded overhangs can be repaired using a mixture of DNA polymerases such as T4 polymerase and the Klenow fragment.
You can also simply cut the DNA with a restriction endonuclease that leaves blunt ends. SmaI and EcoRV are two such endonucleases that can be used to linearize circular plasmids or cut off sticky ends leaving blunt ends ready for ligation (Figure 3).
Generating Blunt Ends via PCR
One important consideration for generating blunt ends by PCR is the presence of 3’ adenines (A) post-amplification. Taq polymerase, which lacks 3’–5’ proofreading activity, will leave an A on the 3’ end of the amplified product.
While this is useful for TA cloning, this will prevent blunt end ligations. So, when using a PCR polymerase without 3’–5’ proofreading activity, the 3’ adenine (A) overhang must be removed by exposing the amplified material to an enzyme possessing proofreading activity.
This is known as PCR polishing and is usually performed using the Pfu polymerase. Of course, you could also amplify your insert or vector with Pfu in the first place to avoid 3’ adenines, but this comes at the expense of speed.
For more information on the benefits of Taq vs. Pfu polymerase, you can check out this article on the different types of polymerases.
Issues When Performing Blunt-End Ligation
Now that we’ve explored why you’d want to use blunt-end cloning and how blunt-end cloning works, let’s discuss a few disadvantages of blunt-end ligations and how to overcome them.
Blunt-End Ligations Are Less Efficient
Compared to sticky-end ligations, blunt-end ligations are less efficient, in fact, 10–100 times less efficient. This is because, unlike sticky end cloning, there is no hydrogen bonding between the complementary nucleotide overhangs to stabilize the formation of the vector/insert structure.
For this reason, a blunt-end ligation requires more ligase, and more of your linearized vector and insert. More is not always better, because too much ligase and too much insert can lead to the concatenation of your insert and even multiple inserts being cloned into the vector.
This will likely require optimizing your ligation conditions to get it exactly right. For more information, consult this article on how to improve blunt-end ligations.
Potential Vector Re-Ligation
Related to this relative lack of efficiency is the potential for re-ligation of the linearized vector, as an intramolecular ligation is much more likely than an intermolecular ligation.
This problem is easily overcome by de-phosphorylating your vector before ligation or amplifying your linearized vector with PCR primers lacking 5’-phosphates. While these approaches add additional steps, they effectively solve that problem and are the way to go if you are not concerned about the orientation of your cloned insert.
Inserts Can Be Ligated in Two Directions
As mentioned above, a 5’-phosphate group is covalently linked to the corresponding 3’-hydroxyl group of the adjoining base. This happens on both complementary strands, and for that reason, a blunt-ended insert could be ligated into the vector in two orientations (i.e., in both directions).
Blunt ends are universally compatible with other blunt ends, so the directionality you can achieve by using sticky ends with different overhang sequences is not possible.
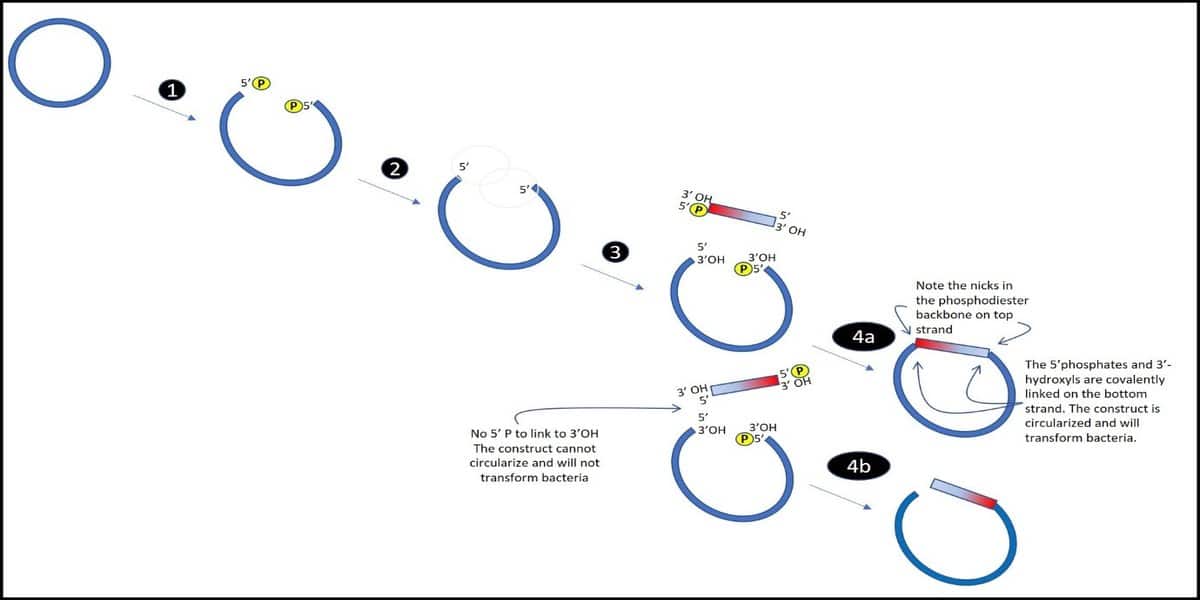
So, what if you are hoping for a directionally cloned insert? In that case, simply dephosphorylating your vector will not be enough—that will help with the background, as we mentioned above, but not with orientation. Luckily, there are a few techniques that provide workarounds for this problem. One, as described by Costa and Weiner, [1] takes advantage of monophosphorylated vectors and inserts.
The strategy here is to create 5’-phosphate groups on only one of the DNA strands in the double-stranded vector and insert—so that a complete circularizing covalent linkage is possible in only one orientation (Figure 4).
Another useful technique is Staby® Technology. Here, the cloning vector is engineered to contain a truncated anti-toxin gene known as ccdA.
A 14-base region is incorporated at the 5’ end of the insert, and when cloning into the linearized vector, the ccdA gene is restored when the insert is ligated in only one direction (Note: both vector and insert have blunt ends). The desired orientation of your insert can be controlled by the way you connect to the 14-base pair section of the ccdA gene.
Only clones possessing the insert in the desired direction will be selected upon the transformation of the specialized E. coli strain that is cultured under the selective pressure of the toxin. Clones with the insert in the opposite direction do not produce a functional ccdA gene because it is still truncated, and the selective pressure prevents propagation of those clones after transformation.
In addition, a re-ligated empty vector will also lack a functional ccdA gene, and any transformants will be similarly selected against in the presence of the toxin.
Blunt-End Cloning in Summary
New cloning technologies are available and overcome many of the challenges associated with blunt-end cloning. Be sure to look out for an upcoming Bitesize Bio article on these.
Originally published December 2019. Revised and updated March 2023.
References
- Costa GL and Weiner MP. (1994) Protocols for cloning and analysis of blunt-ended PCR-generated DNA fragments. PCR Methods Appl 3(5): S95–106
You made it to the end—nice work! If you’re the kind of scientist who likes figuring things out without wasting half a day on trial and error, you’ll love our newsletter. Get 3 quick reads a week, packed with hard-won lab wisdom. Join FREE here.

Put this article into practice
Choose a free resource to help you move forward
PROTOCOL
Chemically Competent Cells Protocol
CHEAT SHEET
Nuclear Extraction Protocol