If efficient cloning is what you are after, you must give Overlap Extension PCR Cloning a go!
This restriction enzyme and T4 DNA ligase-free technique is faster, more reliable and easier to troubleshoot than traditional restriction methods. With only two PCR reactions required, you can insert a DNA fragment into a plasmid without spending time solving tricky, restriction-based puzzles!
How it works
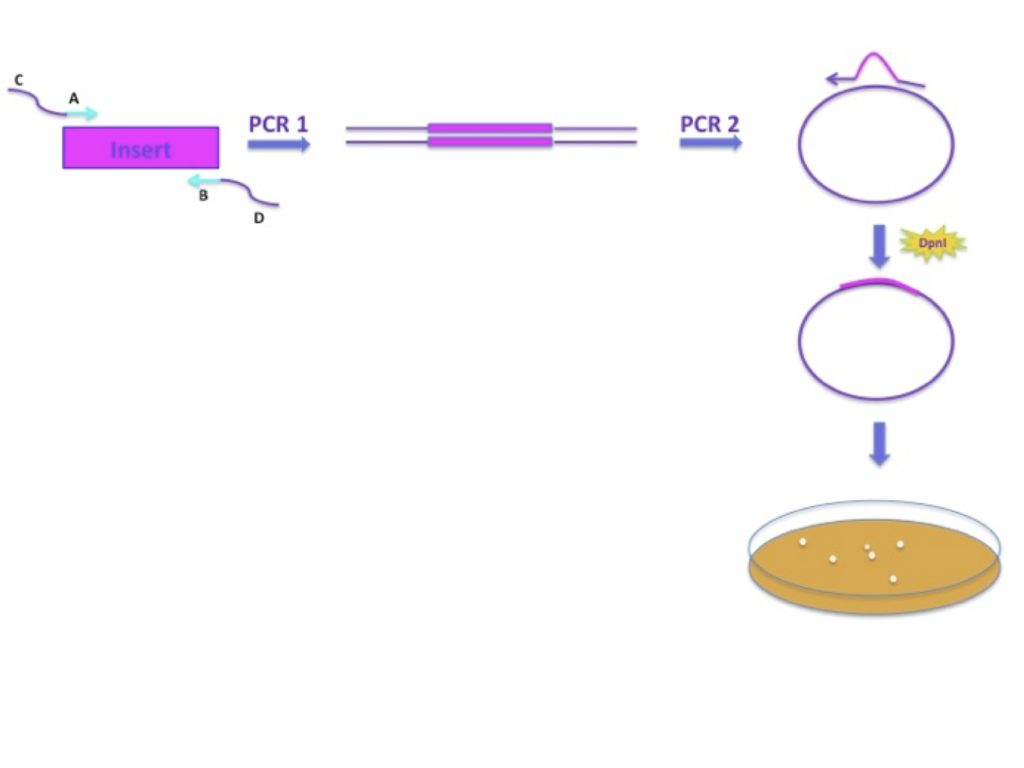
The first of two PCR reactions allows you to create a linear insert containing plasmid sequence at both ends. These will enable the strands of the PCR product to act as a Megaprimer on the vector. Then, using the “insert”, the template vector is amplified in a second PCR producing nicked circular DNA. After DpnI treatment, the mixture is transformed into competent E. coli cells to yield a plasmid containing your insert of interest.
Here’s a diagram:

Here’s how you’ll do it
Perform your first PCR
This is when you create your insert, which will include plasmid sequence at both ends so it can later ‘overlap and extend’ from these points. Perform the PCR reaction using standard conditions, then clean up your PCR product using a DNA column. Quantify your product and make sure you have a high enough concentration of DNA for the next step. Keep in mind you will need between 300 and 500 ng of purified DNA, so it’s a good idea to perform 50 ?l PCR reactions..
Do your second PCR
The product from your first PCR, sometimes called ‘Megaprimer’, will be used to amplify your plasmid of choice, which is actually now your template. Perform your second PCR using a polymerase with high processivity and without strand displacement activity. In terms of quantities, you will find in the literature that optimal results are achieved with a 250-fold molar excess of your megaprimer to your target plasmid. Generally, 300 ng of Megaprimer and 3 ng of target plasmid is always a good start,
Degrade the parental plasmid by incubating the product with DpnI for 1-2 hours at 37°C. DpnI only cleaves methylated DNA so your PCR product will remain intact.
Your final product will be a double-stranded fusion plasmid with two nicks, one on each strand.
Transform E.coli with your final product
Transform competent E. coli cells with the final product (bacterial DNA repair enzymes will seal the nicks) and bang! You’re ready to grow those colonies!
Zero Point-Design of Primers
Good primer design is critical to successful cloning. You can think of the primers as ‘bridges’ that will link the two parts you want to assemble together.
Make the effort and take the time to design good primers, as this will save you time later.
- Design the appropriate primers to amplify the insert of interest (there are a plethora of online primer design tools, so you can find the one that works best for you).
- Pick the insertion points on the plasmid (they can be close to each other, but it often to work better when they are a few hundred base pairs apart).
- Select 30 – 40 bp both upstream of the left point of insertion on the ‘top’ strand of the plasmid, and downstream of the right point of insertion of the ‘bottom’ strand of the plasmid. Include these sequences in your primers. Keep in mind you want a Tm of 60-65°C – this will improve your chances of success. Use Oligo Calculator to estimate the Tm.
A few things to keep in mind:
- The almighty PCR always requires optimization
- Use an annealing temperature around 60°C
- Optimize your elongation step according to the size of your insert
- Choose a high fidelity DNA Polymerase
- The number of clones peaks at 17-18 PCR cycles
- In general, the longer the insert, the lower the number of colonies
- Remember: you can always run a little of your PCR products next to a DNA ladder in an agarose gel to make sure everything is working smoothly.
Republished in 2019.


