Splitting, passaging, and subculturing all describe an important process for maintaining healthy cell culture cells. Whether you are new to cell culture or are looking to refresh your knowledge, this article can help you with detailed guidance on how to passage cells, why it’s so important, and what can go wrong.
Adherent vs Suspension
Before diving into how to passage cells, we need to explain the difference between adherent and suspension cells.
Adherent cells attach to the surface of culture flasks and dishes. This means that their growth is limited by the surface area of the plate or flask. It also means that they need to be detached before they can be reseeded in new dishes.
Cell culture plates and flasks are often coated to help promote the attachment of cells to the surface.
Suspension cells don’t attach and instead float freely in the culture medium. Therefore, their growth is not limited by the surface area but instead by the density of cells in the culture. Suspension cells require agitation to ensure optimum growth and gas exchange and are often grown in spinner flasks or in shaking incubators.
Because suspension cells do not need to be detached from the culture flasks, they are considered to be simpler to passage.
Table 1 outlines the differences between adherent and suspension cultures.
Table 1. Comparison between suspension and adherent cells.
| Suspension cells | Adherent cells |
| Easier to culture Can be diluted without removing all old media | Require more steps for passaging Require regular complete media change |
| Do not need mechanical or chemical dissociation | Require trypsinization to subculture, which is stressful for the cells |
| Not easy to determine confluency Require daily cell count | Can be easily inspected under a microscope to determine confluency |
| Growth limited by cell concentration | Growth limited by surface area |
Passaging Adherent Cells
You’ve checked the confluence of your cell cultures, and they are ready to passage. Now what? There are four main steps to passing adherent cells:
- Rinse
- Detach
- Inactivate
- Seed
We’ll go through each of these steps and how to perform them.
1. Rinse Cells With a Balanced Salt Solution (BSS)
Before detaching cells from the dish, it is important to aspirate off the old, spent media and rinse cells with a balanced salt solution (BSS).
Why Do You Need to Rinse Your Adherent Cells?
Rinsing the cells will help eliminate proteins and ions found in the media that might inhibit the action of cell-releasing solutions. BSSs are used because they maintain a physiological pH and salt concentration.
Typical salt solutions include:
- Phosphate Buffered Salines (PBS)
- Hanks’ Buffered Salt Solutions (HBSS)
- Earle’s Balanced Salt Solutions (EBSS)
Calcium- and magnesium-free salt solutions should be used when subculturing cells, as both calcium and magnesium promote cell clumping.
2. Detach Cells From the Bottom of Dish/Flask
Cells are released from the dish by breaking the cell protein interactions with the dish’s surface. Different cell types have different properties when it comes to adhering to the bottom of the dish. Some cells remain like little balls barely flirting with the dish, while others flatten out and slather down multiple layers of proteins that bind them to the dish.
Your goal is to detach the cells from the dish using the least damaging procedure for each cell type. How you choose to release the cells from the dish will depend upon the adherence property of the cells.
Choice 1: Mechanical Detachment
Some lightly adherent cells will begin lifting from the dish with the addition of BSS (calcium- and magnesium-free). In this case, simply spraying the cells directly with the BSS and tapping the plate will be sufficient to remove the cells.
Loosely attached cells can also be removed a by gently using a cell scraper.
Choice 2: EDTA
EDTA is a chelating agent that will bind the Ca2+ ions that integrins require to maintain cell adhesion. EDTA (1-10mM, depending upon cell type) is one of the gentler ways to detach cells from the dish, but EDTA alone is not potent enough for most cell types.
EDTA is most effective when prewarmed to 37°C, however for very sensitive cells, use EDTA that is at room temperature or 4°C.
Choice 3: Enzymatic Release
Proteolytic enzymes can be used to digest the proteins that adhere cells to the dish. This option is necessary for passing strongly attached adherent cells and is therefore commonly used in passing adherent cells.
However, caution is required as proteolytic digestion can damage the integrity of the cell by cleaving cell surface proteins. Treatment should be limited to the amount of time required to just achieve the detachment of cells to prevent cell damage.
There is no hard and fast rule on how long to treat cells. Treatment time will need to be determined empirically for each cell type and depends on how strongly cells adhere, the length of time cells have been in culture, and the confluency of the culture.
Trypsin is the most frequently used enzyme for passaging cells. Trypsin cleaves after lysine or arginine residues that are not followed by prolines. Working trypsin concentrations range from 0.025% to 0.5%, and trypsin solutions are commonly made with EDTA to enhance cell detachment.
3. Dissociate and Inactivate
To prevent clumping and uneven disbursement of cells, cells should be in a single-cell suspension. If they are not, add a small volume of liquid to the cells and gently pipet the liquid into and out of a 5-ml pipette.
Some labs add warmed growth media, while others add BSS containing 10% fetal bovine serum (FBS). Adding warmed growth media or BSS+FBS inactivates the agent used to detach cells from the dish and provides more volume for pipetting.
To completely inactivate the detachment agent, collect the cells in a larger volume of growth media or BSS+FBS and centrifuge the cells. You can omit the centrifugation step if the cells are diluted into a large volume of growth media for replating and residual trypsin/EDTA does not affect cell attachment.
4. Seed New Dishes/Flasks
While the cells are detaching from the dish or are in the centrifuge, I usually set up the plates I am going to move my cells into by labeling the required number of plates and adding the warmed growth media to the dishes.
Once your cells are detached, resuspend the centrifuged cells in a small volume of growth media and count the cells using a hemocytometer. Dilute the cells to the appropriate density and aliquot them into the new dishes. I like to add enough media to pipet 1-2 ml into each recipient dish. Gently swirl and shake the dishes to disperse the cells evenly throughout the dish.
Tailoring the Cell Passage Method for Your Cells
The culture conditions you use, including the medium and the protocol for splitting, will vary depending on your cell type. While these basic steps will work for most cell lines, it is best to ask someone who has worked with a particular cell type to get the details of the appropriate cell growth media, cell-releasing solution, and the time required to detach cells from the dish.
Alternatively, the ATCC is an excellent resource for cell-specific protocols.
How to Passage Suspension Cells
Some cells, such as cells of hematopoietic origin found in our bloodstream, naturally live in suspension in body fluids and do not attach to surfaces.
Culturing these suspension cells is somewhat easier than adherent cell cultures because suspension cells do not require trypsinization as they are already free floating. Therefore, the passaging process is much faster and less stressful for the cells.
Determining When to Passage Suspension Cells
Suspension cells are usually maintained in culture flasks and reseeded when they reach confluency every 2 or 3 days. You can tell when suspension cells reach confluency because they will begin to clump together and float on top of the medium; the medium will change color slightly and appear more turbid.
Passaging suspension cells involves two main steps:
- Counting
- Diluting
However, if cells have reached a high density and the media has become acidic, you may wish to remove the old media by adding a centrifugation step.
Before you split your cells, you should view cultures under an inverted phase contrast microscope. Healthy growing suspension cells should be round and bright, with minimal cell debris. Check if the medium is acidic by looking at its color: phenol red turns yellow when the pH is acidic, indicating that you have too many cells in the culture.
1. Counting Cells
Suspension cells are usually maintained in culture flasks and reseeded when they reach confluency every 2 or 3 days. If you are preparing flasks for experiments, you will probably want to count the number of cells first to ensure you are seeding flasks with the appropriate amount of cells.
Counting suspension cells is the same as adherent cells (after they have been detached and resuspended). However, to ensure your counts are accurate for adherent cells, ensure that you have a well-distributed culture by gently pipetting the culture before taking a sample to count.
If you are splitting cells for maintenance, you can skip the counting step.
2. Diluting cells
It’s not necessary to actually remove all of the old media for suspension cells as is done for adherent cells. Instead, some of the old culture can be removed, and the remaining culture can be diluted to an appropriate cell density with fresh media.
Alternatively, a fraction of cells could be pipetted from an old flask and diluted into fresh culture media.
However, removing the media is advisable when your culture is acidic. To remove the old media, centrifuge at 150 x g for 5 minutes, remove acidic media, gently resuspend the cell pellet in warm media, and reseed in fresh media.
Tips for Passaging Cell Cultures
1. Warm up all reagents in a 37°C water bath for approximately 30 minutes before use. This will help keep your cells happy and avoid the shock of a temperature change.
2. Set up your tissue culture hood before you begin, ensuring the hood is clean and you have all the equipment you need. This limits the time it takes to passage your cells and limits potential contamination from you having to leave the culture hood/room.
3. Have distinct ‘clean’ and ‘dirty areas’ of your tissue culture hood and set them up logically so you aren’t passing over the ‘clean’ area with dirty equipment.
4. Ensure you use aseptic technique throughout to minimize potential contamination of your cells. Don’t forget to wipe down reagents after removing them from the water bath and spray items with 70% ethanol or IMS before placing them in the hood.
5. Use only a small volume of trypsin to release cells (1-2 ml/25 cm2) and keep the time in trypsin to the minimum required to release cells (when cells are just detecting). Use a firm ‘smack’ to plates and flasks to help release cells after trypsinization.
6. After trypsinization, add a small amount of warmed growth media to the trypsin and cells, then repeatedly run the liquid in and out of a 5-ml pipette to break up any cell clumps.
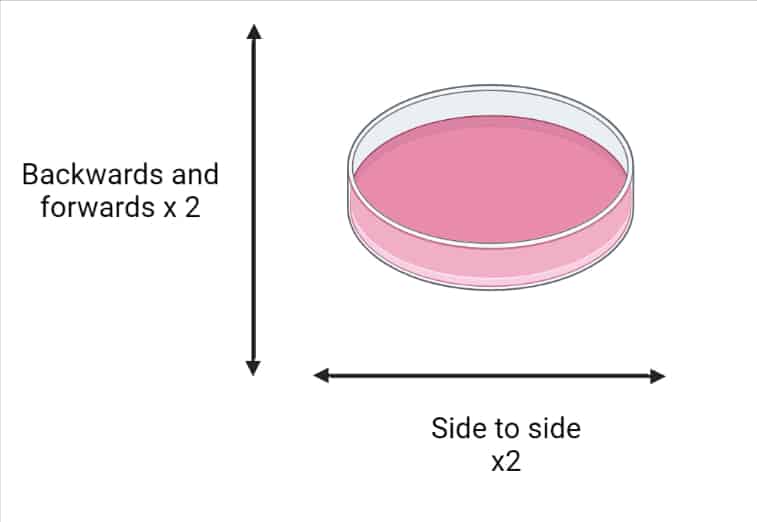
7. When reseeding cells (particularly adherent cells), gently shake/swirl the plate to ensure an even distribution of cells. See Figure 1 below for details.

8. Pre-label plates before you start, and add warm media while cells are trypsinizing. This minimizes the time cells are out of the incubator, limiting the amount of environmental shock and disruption.
9. Split cells at dilution ratios of between 1:2 and 1:10. Any more and your cells will quickly become too crowded; any less and they may not survive because of low density. (Even cells get lonely!)
10. Set a routine for splitting your cells (e.g., on Tuesdays and Fridays). A routine will make remembering to passage your cultures easier, avoiding cells becoming over-confluent.
11. Organize your incubator, so you know exactly which cells are where. This limits the amount of time you spend looking for cultures. Holding incubator doors open for prolonged periods can change the environment and affect the growth of your cells and any ongoing experiments.
Passaging in Cell Culture Summarized
While passaging cells is relatively simple, this important process will differ depending on your cell type. Checking advice from your cell stock supplier or experienced users can help you set a protocol suitable for your cells.
No matter what cell type you culture, you should be accurate, sterile, and fast when splitting cells to minimize contamination and stress on your cultures. Being prepared and organized can also help limit the time needed for splitting your cells.
Setting a routine to split your cells can help keep your cells healthy and helps you plan your week.
If you take the time to passage your cells regularly, you will be rewarded with an abundance of cells, all waiting for your manipulation!
Originally published January 16, 2013. Reviewed and updated, November 2022.


