The tools you use in the lab must be correctly cared for and cleaned. Contaminants could cause many experimental issues, so cleaning pipettes is especially important.
Like a Jedi’s light saber, your pipette is an extension of your arm and the lifeline to your (lab) existence. You probably should give it a little TLC once in a while to keep it free from contaminants and ensure its accuracy.
How Often Should You Clean Your Pipettes?
Pipettes should be given a quick clean every day. To clean your pipette daily, wipe the outside surfaces with 70% ethanol.
Pipettes should also have a deeper clean, performed at least every three months. Exactly how often you deep clean your pipette depends on the experiments you perform and how often you use your pipettes. If you do highly sensitive RNA work, you may wish to deep clean more regularly.
For your trusty P100 that gets used daily? Give it a good clean every couple of weeks. Your P1 that barely makes it off the shelf every month? Less cleaning will be required.
You can use also filter tips to help maintain a contaminant-free pipette.
How Do You Deep Clean A Pipette?
No matter how careful you are, dirt and contaminants can get inside your pipette, where your daily clean won’t reach. Therefore it is wise to deep clean your pipette regularly to tackle these hard-to-reach places. The first step of a pipette deep clean is to take it apart.
Dismantling Your Pipette (Scary But Necessary!)
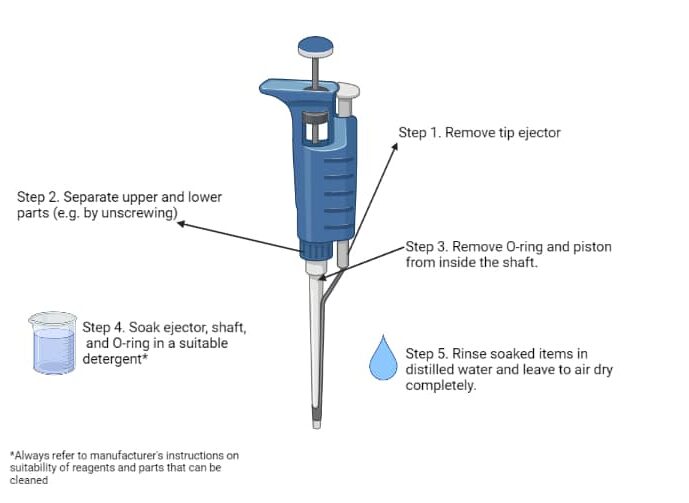
It should tell you how to dismantle your pipette in the instruction manual. Many companies provide manuals online. For most pipette types, you need to remove the tip ejector, disconnect the upper and lower parts, and remove the O-ring and the piston (Figure 1). Just make sure you remember how to put it back together again!

Cleaning a Dismantled Pipette
Now that your pipette is dismantled, it’s time to clean the parts by soaking them in an appropriate detergent, e.g., Deconex® 12 Basic. Not all pipette parts can be submerged, so please check the manual and only submerge suitable parts (e.g., tip ejector, shaft, O-ring, piston).
Once the parts have been cleaned using the detergent solution for an appropriate time, you need to rinse the dismantled components in distilled water and let air dry.
Reassemble.
Removing Specific Contaminants
If your pipette has become contaminated (e.g., because you accidentally over-aspirated your sample), you will need to decontaminate it. The procedure for decontaminating your pipette depends on the contaminate and the type of pipette you have. [1,2]
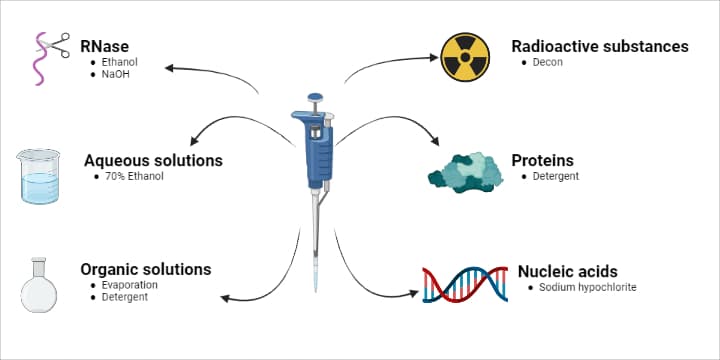
You should refer to the instruction manual for a detailed account of how to clean specific pipettes and contaminants, but we provide a general overview on removing the most common contaminants (Figure 2).

Aqueous Solutions, Buffers or Inorganic Acids and Alkalis
- Rinse all contaminated parts in 70% ethanol or 10% isopropyl alcohol.
- Air dry at up to 60ºC.
Organic Solvents
- Allow the solvents to evaporate from the opened pipette on its own, or
- Alternatively, immerse the contaminated part in a detergent solution.
- Air dry at up to 60ºC.
Radioactive substances
- Rinse the pipette with a strong detergent such as Decon® or Deconex®.
- Rinse with distilled water several times.
- Dry as described above.
- Do a wipe test to make sure all radioactivity has been removed.
Proteins
- Do NOT use alcohol to clean the pipette; it will set the proteins.
- Rinse the contaminated parts with a detergent solution.
- Rinse well in distilled water.
- Air dry as above.
Nucleic acids
- Immerse your pipette parts in at least 3% (w/v) sodium hypochlorite for at least 15 minutes.
- Rinse with distilled water.
- Air dry as above.
- You can also use UV light to further reduce DNA contamination.
Cleaning Pipettes for RNA Work
It is especially important that your clean your pipettes before doing any RNA work, as any RNase contamination will degrade your precious samples!
- Rinse with a detergent solution.
- Rinse well with distilled water.
- Rinse in 95% ethanol.
- Allow to air dry.
- Soak the parts in 3% hydrogen peroxide for 10 minutes.
- Thoroughly rinse with distilled water.
- Air dry as above.
Autoclaving Your Pipettes
Believe it or not, some pipettes can even be autoclaved (20 minutes at 121ºC) to remove infectious liquids or DNase. [3] Make sure you check the manufacturer’s instructions before shoving them in the autoclave though, or you might just find that your pipette has changed a little since you saw it last!
Assembly
Make sure all parts of your pipettes are completely dry before reassembling. Lightly lubricate the piston with silicone grease (usually provided with your pipette) and reassemble the pipette. And don’t forget the O-ring! Check the calibration of your pipette before using it again.
Cleaning pipettes is just one key way of looking after them. You also need to take proper care of them in terms of storage and calibration, annual pipette maintenance, and know what you shouldn’t do to your precious pipettes!
While you’re here, why not download our handy pipette cleaning guide and share it with your lab buddies, or stick our pipette care poster up in your lab? They’re free!
Happy pipetting!
This article was originally published May 2014. Updated and republished August 2022.
References
- Sartorius. Cleaning and Decontamination Guide for Sartorius Pipettes. Accessed 22 July 2022.
- Eppendorf. Cleaning and Inspection of Pipettes. Accessed 22 July 2022.
- ThermoFisher Scientific. Pipette Decontamination. Accessed 22 July 2022.


