
Staining proteins following SDS-PAGE or 2-dimensional electrophoresis is necessary for visualizing a global population of proteins or checking the expression of your recombinant proteins.
But how do you know which protein staining method to use?
This article explains the pros and cons of three of the most common protein staining methods: silver staining, coomassie brilliant blue staining, and InstantBlue™ staining. For tracking newly made protein rather than total protein, see this overview of protein turnover using 35S.
1. Silver Stain
Need a high sensitivity stain with no requirement for downstream applications? Silver staining may just be what you need.
Choose a free resource to help you move forward
CHEAT SHEET
SDS-PAGE Protocol Cheat Sheet
CHEAT SHEET
Western Blot Cheat Sheet
How Does It Work?
Silver staining exploits the silver cation (Ag1+) binding capacity of proteins. The silver cations bind to the target protein(s) and are subsequently reduced to silver metal using a developing solution. This creates a visible image.
Pros and Cons
The primary benefit of silver staining is its high sensitivity (see below). However, silver staining involves multiple steps and reagents, making the process relatively time-consuming and laborious.
In addition, the gel requires developing after staining, in order to visualize the proteins, and the length of time required for developing is highly variable between gels. The upshot of this is low reproducibility.
Another disadvantage of silver staining is that the use of formaldehyde when fixing the gel makes silver staining incompatible with mass spectrometry. Silver staining protocols do exist that are compatible with mass spectrometry but at the sacrifice of sensitivity.
Silver staining also has a narrow linear dynamic range (the range at which the level of staining is directly proportional to protein concentration), making it less suitable for quantification.
Approximate Limit of Detection
Silver staining can detect ~ 1 ng of protein [1] which makes it extremely useful for applications involving low protein levels.
A Researcher’s Opinion
Silver staining is my least favorite of the protein staining methods, not just because of the multiple steps required but also due to the use of several dangerous chemicals (including silver nitrate and formaldehyde), which I like to avoid if possible. It’s also really difficult (from my experience) to remove silver stains from benches and equipment—so beware!
If you want more information on and protocols for different silver protein staining methods, including those for use with mass spectrometry, check out this paper by Chevallet et al. [2]
2. Coomassie Brilliant Blue
Coomassie staining is probably the most well-known protein staining technique. Two main types of coomassie staining exist:
Let’s discuss them in that order.
Classical Coomassie
Need a reliable, bread and butter protein staining method that you can share with your lab group? Classical coomassie protein stain is the way forwards.
How Does It Work?
The classical coomassie protein staining technique involves incubating the gels with a coomassie staining solution.
This stains the entire gel, not just the proteins. The stain is subsequently removed by agitating the gel in a solution of 10% acetic acid, 50% methanol, and 40% H2O. This process is called destaining.
Because the dye is retained better by the protein molecules than the porous gel matrix, the protein bands become visible.
Pros and Cons
The classical coomassie protein staining method is cheap and easy, but is considerably less sensitive than silver staining, making visualization of low abundance proteins difficult. The low reproducibility of classical coomassie staining is also a disadvantage due to the difficulty in standardizing the destaining step.
One big advantage of coomassie staining is that it is compatible with mass spectrometry.
Approximate Limit of Detection
Classical coomassie has a lower limit of detection of ~ 100 ng. [1]
A Researcher’s Opinion
This protein staining method is my personal favorite for simple tasks such as visualization of recombinant proteins, or generated antibodies, as it’s simple and quick to perform. This makes it great for day-to-day use.
Colloidal Coomassie
Colloidal coomassie protein stain provides a happy medium between classical coomassie staining and silver staining, having relatively high sensitivity and being simple to perform. It’s also compatible with protein mass spectrometry.
How Does It Work?
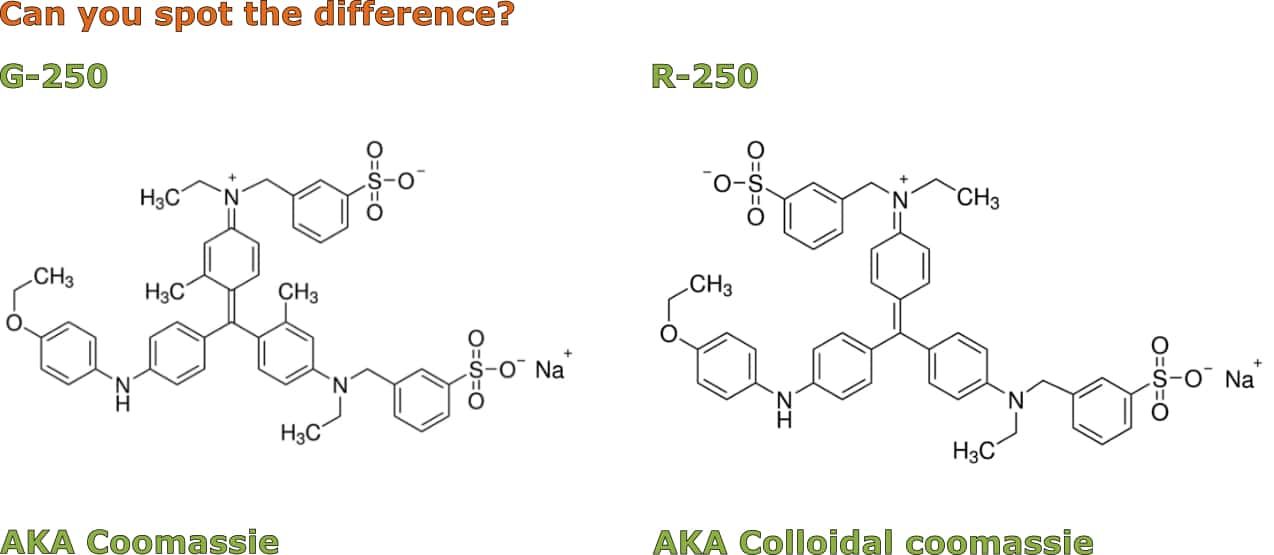
This method is an adaptation of classical coomassie staining that uses a modified coomassie dye (G-250 instead of R-250). Fancy a game of spot the difference? The structures of G-250 and R-250 are shown in Figure 1 below.
Because the colloidal dye does not penetrate the gel, no destaining is required. Destaining may be performed, however, to increase the contrast between the protein bands and the background.
Pros and Cons
Colloidal coomassie has several advantages over classical coomassie protein staining. These include increased sensitivity and higher reproducibility than silver and classical coomassie staining due to the absent destaining step.
All good things come at a cost, however, and colloidal coomassie kits will cost you a bit more than your regular coomassie stain.
Many protocols for protein staining using colloidal coomassie are available, several of which are described and compared in this paper by Dyballa and Metzger. [3]
Approximate Limit of Detection
Colloidal coomassie has a detection limit of ~ 10 ng, making it about an order of magnitude more sensitive than classical coomassie.
A Researcher’s Opinion
The increased sensitivity of this protein staining method over classical coomassie makes it great for experiments involving low protein levels, such as analyzing binding proteins in co-IPs, especially when you’re considering quantifying the protein bands using mass spectrometry.
3. InstantBlue™
In a rush? Or simply can’t be bothered with all that staining and destaining malarkey? Thank goodness for InstantBlue™.
It’s another coomassie-based protein stain but formulated in such a way to provide one-step visualization of your proteins.
How Does It Work?
I’d love to be able to tell you how this protein staining method works, but that big registered trademark symbol means there’s a bit of an information vacuum.
The user manually cryptically states “InstantBlue contains Coomassie [sic] dye, ethanol, phosphoric acid and solubilizing agents in water”.
Given that no destaining is required, it must act similarly to colloidal coomassie and stain specifically protein molecules and not the gel.
Pros and Cons
InstantBlue™ protein stain works fast. Very fast. You’ll see your protein bands in 10–15 minutes. Being a one-step procedure, it’s also quick and reproducible. And like the other coomassie-based stains it’s fully compatible with mass spectrometry.
It’s photosensitive, however, and will degrade over time. You can re-use it, but siphon off the re-used stuff into a separate opaque container and discard it when you notice it’s no longer staining your proteins.
Approximate Limit of Detection
InstantBlue™ protein stain can detect proteins down to ~ 5 ng. If you’re struggling to see faint protein bands, soak your developed gel in water to increase their contrast.
A Researcher’s Opinion
When I’m purifying proteins for X-ray crystallography, I don’t have the time to wait for my gels to destain before I can be sure I’ve actually expressed my target. That’s why I use the InstantBlue™ protein staining method. The only problem is other lab users steal it, so keep your own secret stash.
A Recap of the Protein Staining Methods Discussed
It wouldn’t be a great article if it wasn’t information-dense! Here’s a summary of the different protein staining methods presented above.
Table 1. A summary of silver, coomassie, colloidal coomassie, and InstantBlue™ stains.
Staining method | Detection limit | Level of reproducibility | Mass spec compatible | Speed to perform |
Silver staining | ~ 1 ng | Low | No | ★ |
Classical coomassie | ~ 100 ng | Low | Yes | ★★ |
Colloidal coomassie | ~ 10 ng | High | Yes | ★★★ |
InstantBlueTM | ~ 5 ng | Very high | Yes | ★★★★★ |
Hopefully, you’re now armed with enough information to choose the protein staining method that’s most appropriate for your intended experiments.
Has this article on protein staining methods been a boon? Have we missed some salient facts out? Be sure to let us know in the comments section below!
Originally written and published September 2012 by Laura Grassie. Reviewed and updated January 2022 by Thomas Warwick.
References
- Weiss W et al. (2009) Protein detection and quantitation technologies for gel-based proteome analysis. Methods Mol Biol 564:59–82
- Chevallet M, Luche S, and Rabilloud T (2006) Silver staining of proteins in polyacrylamide gels. Nat Protoc 1:1852–1858
- Dyballa N and Metzger S (2012) Fast and sensitive coomassie staining in quantitative proteomics. Methods Mol Biol 893:47-59
You made it to the end—nice work! If you’re the kind of scientist who likes figuring things out without wasting half a day on trial and error, you’ll love our newsletter. Get 3 quick reads a week, packed with hard-won lab wisdom. Join FREE here.


