One of the first things any scientist should consider when measuring any attribute, whether it is the concentration of a solution, the quantity of DNA in a sample, or fluorescence intensity, is how accurate is this measurement?
Understanding accuracy (and limitations) in the lab is of the utmost importance to forming sound conclusions about experiments. This article discusses accuracy and precision and provides concrete examples of ways to understand method limitations and improve measurements in your lab
What Do We Mean by Accuracy and Precision?
You likely have a good understanding of the difference between accuracy and precision. Since accuracy and precision are fundamental to almost all the sciences, they are typically one of the first subjects covered in introductory STEM courses. With that said, let’s get a quick refresher before we proceed to the consequences of misunderstanding accuracy and precision in the lab.
For every measurement we make, there is an actual value that we are trying to obtain. Furthermore, whenever we prepare a material by weighing or dispensing it, there is a target value we are trying to reach. Simply put, accuracy is how close a measurement is to the actual true value, whereas precision is how close those measurements tend to be to each other.
For example, consider that you have four pipettes that you are using to dispense 30 µL of water. If you took 10 measurements from each pipette and knew the actual volume dispensed, you could determine whether each pipette was accurate and precise (see Figure 1 for an example).
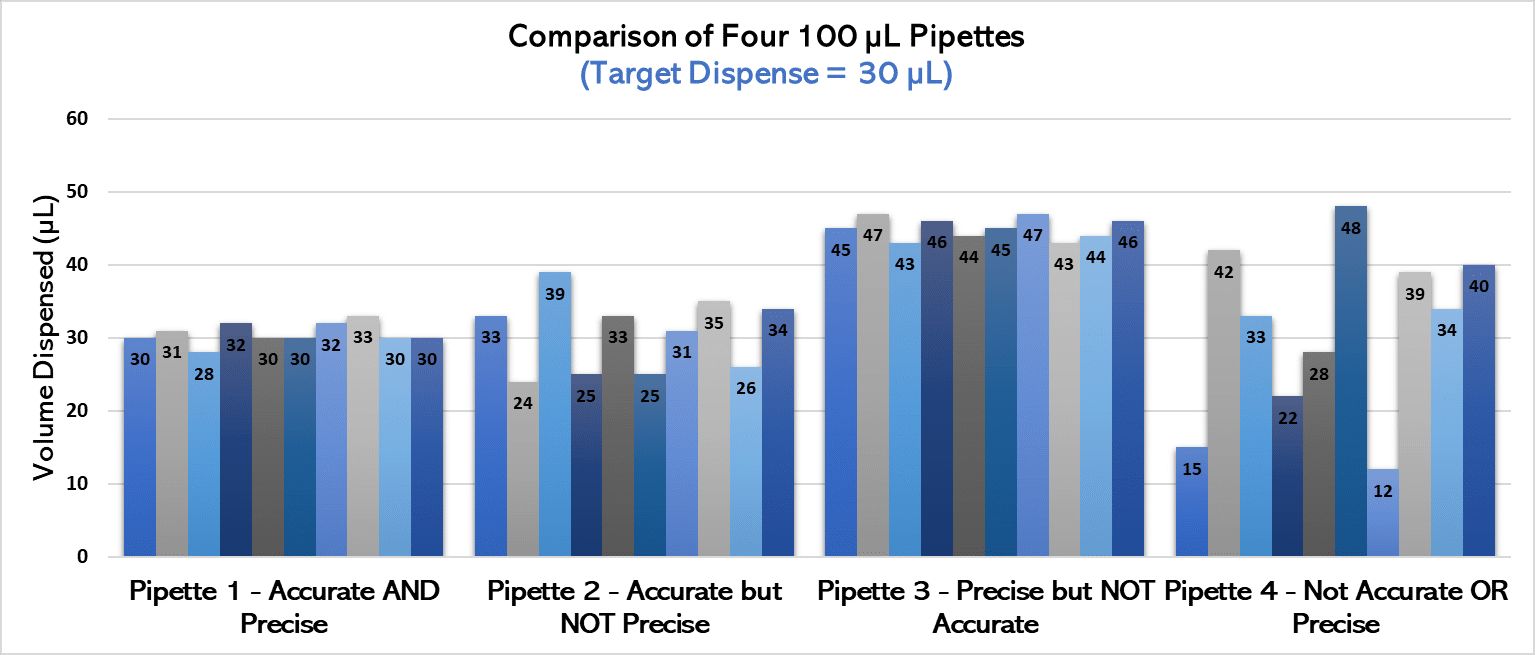
Let’s analyze the chart in Figure 1 more closely.
• Pipette 1 definitely outperforms the other three in terms of accuracy and precision—it most consistently dispenses volumes closest to our 30 µL target. We’ll give a gold star to this pipette.
• Pipette 2 is relatively accurate compared to pipettes 3 and 4, but it’s not nearly as precise as pipette 1. That is, it does not consistently pipette similar volumes when used multiple times and has greater variability.
• Pipette 3 is extremely precise, and pipettes have nearly identical volumes each time it is used. However, it’s not anywhere near the target! Therefore, it has lower accuracy than pipettes 1 or 2.
• Finally, pipette 4 is the least accurate and precise of the bunch. Not only are the volumes dispensed all over the place (low precision), but they’re often nowhere near our target volume (not accurate)! This is a pipette in need of some serious TLC.
For more on this topic, check out our article on checking pipette accuracy.
Why Is It Important to Be Aware of the Trueness and Precision of Our Measurements?
Understanding the concepts of accuracy (also known as trueness) and precision in a simple pipetting example is one matter, but it’s trickier to identify and monitor ALL the factors that may affect accuracy and precision, as well as the resulting impacts on your results.
Consider a situation where you are preparing custom cell culture media.
Perhaps you plan to weigh out 200 g of dextrose for your weekly experiments. You might go ahead and add dextrose with a scoop until the scale reads 200.0 g. How often do you think about how close the scale is reporting to the TRUE mass? It could be the case that the scale is out of calibration, and the actual mass you are adding is closer to 196 g. In other words, how accurate is your measurement?
Let’s assume that your scale is accurate. You still must consider the precision of the measurements! What if the scale is on a wobbly table, or a vent that turns on and off affects the measurement? In this case, the finished culture might turn out slightly differently from week to week.
Although this is a simple example, the effects can be pretty profound. In our example above, the composition of cell culture media directly affects the health and growth of cultures, which further influences other measurements we are taking and could change conclusions drawn from the entire experiment.
Simple issues like these can quickly compound and cascade into a plethora of issues, like increased variability and invalid results. Therefore, determining if your system measures a characteristic without bias and repeatably is clearly of crucial importance.
Is Any Measurement Ever Truly 100% Accurate and Precise?
Here’s the bad news—while being 100% accurate and precise is clearly ideal, it is impossible in reality. There is always some non-zero variability from factors outside our control, such as the instruments, environmental conditions, and lab personnel.
With that said, there are many things we can do to maximize accuracy and precision when conducting experiments. Drum roll, please…!
8 Ways to Improve Your Accuracy and Precision in the Lab
1. Keep EVERYTHING Calibrated!
Calibration is the number one item on this list for a very important reason: it is the MOST critical means of ensuring your data and measurements are accurate.
Calibration involves adjusting or standardizing lab equipment so that it is more accurate AND precise.
Calibration typically requires comparing a standard to what your instrument is measuring and adjusting the instrument or software accordingly.
The complexity of calibrating instruments or equipment varies widely, but, typically, user manuals have recommended recalibration recommendations. Bitesize Bio has several articles on routine calibration, including routine calibration of pipettes and calibrating your lab scales.
2. Conduct Routine Maintenance
Even if all instruments in your lab are calibrated, odds are they need regular care to operate at their maximum accuracy and precision.
For instance, pH meters need routine maintenance that can be performed by novice scientists, while more sensitive instrumentation may require shipment of parts to vendors or even on-site visits.
Again, check your user manuals and call equipment manufacturers to ensure you take appropriate measures to keep lab equipment running under conditions optimal for accuracy.
3. Operate in the Appropriate Range with Correct Parameters
Always use tools that are designed and calibrated to work in the range you are measuring or dispensing. For example, don’t try to measure OD600 beyond an absorption of >1.0 since optical density (OD) readings this high are beyond the dynamic range of most spectrophotometers! If you are ever unsure about using an instrument to measure accurately at an extreme value, reach out to a trusted peer or mentor for advice.
What if you are choosing between two tools that are both calibrated for use at a given target? You might have two pipettes that are both designed to dispense 100 µL (e.g., 20–100 µL or 100–1000 µL pipettes). When in doubt, choose the tool with more precision—in this case, the 20–100 µL pipette.
Watch our on-demand webinar on improving your pipetting technique for more information.
4. Understand Significant Figures (and Record Them Correctly!)
The number of significant figures (“sig figs”) you use and record is critical. Specifically, sig figs provide the degree of uncertainty associated with values.
Keep sig figs consistent when measuring items repeatedly, and ensure the number of sig figs you are using is appropriate for each measurement.
5. Take Multiple Measurements
The more samples you take for a given attribute, the more precise the representation of your measurement. In situations where sampling is destructive, or you can’t take multiple measurements (e.g., growth rates in a culture), you can increase the number of replicates to compensate.
However, for measurements like OD readings or cell counting, it’s reasonably easy to measure multiple parts of a single sample.
6. Detect Shifts Over Time
Some systems are prone to drift over time. For instance, background absorption in high-performance liquid chromatography (HPLC) may be indicative of column failure.
If you notice that measurements drift in a single direction over weeks or months, address the issue immediately by recalibration or preventative maintenance.
7. Consider the “Human Factor”
We don’t often talk about how a technique in the lab may vary from person to person, resulting in differences in the measurements of a single property.
To minimize the inherent variability between scientists, ensure that procedures are kept up to date and are as descriptive as possible.
In some cases, it may be easiest to have only one person responsible for a given measurement, but this may not always be possible. Ensure that all lab personnel are trained, especially on highly manual techniques like pipetting, to maximize accuracy and precision.
8. Perform a Measurement Systems Analysis (MSA)
While this is a relatively complicated method to gauge accuracy and precision, measurement systems analysis (or gage repeatability and reproducibility analysis) is the most comprehensive and statistically sound way to get a complete picture of the accuracy and precision of your measurement. This technique mathematically determines the amount of variation that exists when taking measurements multiple times.
To conduct an MSA, you’ll need to design a study that incorporates known and unknown sources of variation. There are various analysis methods available, but if your measurement is absolutely critical, it may be worth exploring. Stay tuned for a future article explaining various ways to conduct an MSA!
Final Thoughts
There are a wealth of resources on these topics if you want to learn more. For a more statistics-based primer on accuracy, precision, and trueness, check out Artel’s resource library on these topics. You might also consider reading about accuracy and precision through the International Organization of Standardization, which is a global organization that works to align scientists and engineers in every field when it comes to these topics.
Do you have more ideas on how to keep your lab measurements accurate and precise? Let us know in the comments below!
FAQs
Q: What specific procedures or guidelines should be followed for the calibration of complex instruments like HPLC or mass spectrometers?
A: Calibration procedures for complex instruments like HPLC or mass spectrometers typically involve using known standards to ensure that the instrument’s readings are accurate.
For HPLC, this involves running calibration standards through the system to check for consistency in retention times and peak areas.
Mass spectrometers often require calibration with specific calibration mixtures or reference gases. Follow manufacturer guidelines and industry standards, and document all your calibration activities.
Regular calibration checks should be part of a routine schedule in your lab, with adjustments made based on the instrument’s usage and performance.
Q: How can I effectively troubleshoot and address common issues that arise during calibration or maintenance, such as unexpected equipment behavior or inconsistent results?
A: Encountering issues during calibration or maintenance is frustrating. Verify that the calibration standards and materials are correct and have not degraded.
Check for any obvious physical issues, such as leaks, blockages, or component damage.
Rebooting the instrument or resetting to factory settings can sometimes resolve unexpected behavior.
If inconsistent results persist, recheck the calibration procedure, ensure the environment is stable (e.g., temperature, humidity), and consult the user manual or technical support.
Documenting the troubleshooting steps will help identify patterns and prevent future occurrences.
Q: What are some practical examples of Measurement Systems Analysis (MSA) being applied in real lab scenarios, and how can these methods be adapted to different types of experiments?
A: MSA might be used in quality control environments to ensure that different operators and equipment produce consistent results. For example, in a pharmaceutical lab, MSA could be applied to assess the variability in tablet weight measurements across different scales and operators.
This could involve conducting a Gage R&R study, where multiple operators measure the same sample using different instruments to assess repeatability and reproducibility.
To adapt MSA to different experiments, tailor your analysis to the specific measurement type, whether it’s physical properties, chemical composition, or biological assays, and consider the potential sources of variation unique to that experiment.
Originally published October 11, 2021. Reviewed and updated August 2024


