Your lab weighing scales are one of your most commonly used bits of equipment in the lab. So, we’ve put together an easy guide on how best to clean and calibrate your lab balance.
Following this simple guide will ensure your balance remains clean and, perhaps most importantly, will provide you with accurate readings. Throughout this article, we’re using the term “weight” even though “mass” is technically the correct term.
Everyday Cleaning For Your Scales
We understand things can get a little messy during the weighing process but be sure to use a small balance brush to gently sweep any residue from the balance and do this every time you use them! This ensures that the risk of cross-contamination is low.
Deeper Cleaning Of Your Lab Balance
How often deeper cleaning of your scales is required will depend on a couple of factors: how often they are used and how good you and other members at keeping up daily maintenance on them are key here! Even if they look ok, be sure to give them a more thorough clean every couple of months or so.
The Do’s
- Moisten a thin wipe (like a Kimwipe) with purified water and carefully clean the pan and around the scales. Wipe dry.
- Remove the pan to facilitate a more thorough cleaning to maintain your lab balance.
- If you’ve moved your scales and it has a leveling bubble, check it’s centered.
The Don’ts
- Press down on the balance pan as this can damage the internal mechanism, particularly for scales that measure very small weights. Be gentle!
- Turn the scales upside down and shake them to help remove residue. Don’t be abusive!
- Drop the scales or put them down on a surface roughly. Imagine the scale is a sleeping baby: only move it if you have to and do with all the tender care with which you’re capable.
- Use cleaning fluids that are harsh, as they can react with agar, salts, and other common ingredients. Check the user manual for recommended cleaning products.
- Leave salts on the scales. This can corrode the scales resulting in poorer performance.
Checking Accuracy: Why it’s Important and How to Check
Ensure your scales are completely free of residue before moving on to check the scales’ accuracy.
Accuracy is how reliably the scales are at measuring the weight of a sample. This can be deduced by several tests designed to help you ensure your scales are functioning at peak efficiency.
1. The Repeatability Test
If the minimum weight capacity of your scales is 1 g and the max is 100 g, measure out a weight somewhere on the upper end of this, say 75 g. You’re looking for a weight value of 50–100% of the weighing capacity of the instrument.
Ideally, you should use standard weights to do this, but if you’re stuck, improvise (e.g., measure out 75 ml of water), but be aware that not having a sample of known weight means you’ll be able to spot random error but not systematic error. Please note that your sample must have reached thermal equilibrium before it is used.
Whatever you’re using will be referred to as the “sample” here. Each time you weigh a sample, your scales should give you the same weight within a certain margin of error. This accuracy is stated in your scales manual or can be found on the manufacturer’s website.
Place and remove the sample 10 times and record each reading as soon as the balance indicates that the reading is stable. Work out the range of values and see if it is within the acceptable margin of error.
If it is, great! If not, it’s time to calibrate your scales.
2. The Pan Position Error Test
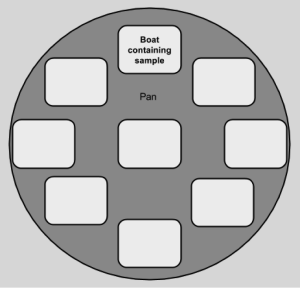
Your scales should be able to weigh your sample accurately even if you’ve placed the sample off-center. To test this, note the weight value given when your sample is placed in these positions on the scales’ pan shown in Figure 1.

Again, look at the range to tell you how consistently your scales are weighing your samples across the different pan positions.
3. The Linearity Test
Take two samples, each with a weight of half the weighing capacity of the scales. Add sample 1 to the scales and note the value. Zero the scales. Add sample 2. Note the value. Add sample 1 alongside sample 2. If the value changes outside of the acceptable range, it’s calibration time.
Calibrating a Balance: The What and How
When to Calibrate Your Lab Balance
Times to recalibrate your scales:
- When you first buy it.
- When you move it somewhere new.
- When there is a significant change in ambient temperature.
- When the scales have been unplugged for a while.
- If the accuracy is off.
How To Calibrate: External Vs. Internal Calibration
There are two main options to calibrate your lab balance, depending on your individual balance. Nearly all balances can be externally calibrated, but some also have the option for internal calibration.
Internal calibration is performed with little to no input from the user and can be triggered manually or set automatically at predetermined times (e.g., overnight or during lunchtime). Check with your lab manager or lab head to find out if your scales automatically perform internal calibration, and refer to your user manual for how to manually trigger internal calibration, if needed.
External calibration is necessary for scales that do not have an internal calibration mechanism. It involves using calibrated weights of set amounts (these will differ depending on your specific balance). Check with your lab manager to see if your lab has a process (and a dedicated person) for externally calibrating scales.
Because of the need for calibrated weights and training, many labs outsource external calibration of scales to an outside company. Inform your lab manager or lab head if this is the case and you feel calibration is necessary.
Note that calibration does not necessarily mean any adjustments will be made to the balance. Calibration is a specific way to check the accuracy of your scales. If the accuracy is outside the tolerated limits, then adjustments may be necessary. In this case, you will need to get your balance adjusted and serviced by a qualified supplier or company.
Cleaning and Calibrating Your Lab Balance Summarized
You should now have a good grounding on how to clean and calibrate your lab balance. To summarize the main points, you should:
- Lightly clean your balance before each use and clean up any spills.
- Deep clean balances regularly, but be careful to ensure that you use appropriate cleaning solutions, as harsh chemicals can damage the scales.
- Regularly check the accuracy of your balance using The Repeatability Test, The Pan Position Error Test, and The Linearity Test.
- Calibrate your lab balance where possible, either using the internal calibration function or via external calibration.
Do you have any other tips on how to clean and calibrate your lab balance? Let us know in the comments below.
Resources
For a more extensive guide on the ins and outs of cleaning and calibrating your lab balance, see this handy guide from Grainger.
Originally published June, 2015. Reviewed and updated September, 2022.


