
Specimen preparation is the most important aspect of biological electron microscopy (EM), as it influences everything from the preservation of the sample itself to the kind of information that can be obtained. Choosing the right method of fixation for electron microscopy is critical.
To choose the right fixation technique, it is vital to define the questions you are asking of the sample before embarking on an electron microscopy project.
This enables you to conduct a hypothesis-driven study, which will not only save a lot of money but will also enable you to gain meaningful results more rapidly. In short, you should optimize sample preparation for your sample type and the questions you are asking.
The first step in any biological EM sample preparation is fixation. Fixation is the method that halts and preserves all metabolic processes of a biological specimen as close to the living state as possible through subsequent processing and imaging stages. There are two main types of fixation: chemical fixation and cryofixation.
Choose a free resource to help you move forward
POSTER
Histological Stains Poster
DOWNLOAD
Culture Contaminants Reference Card
Chemical Fixation
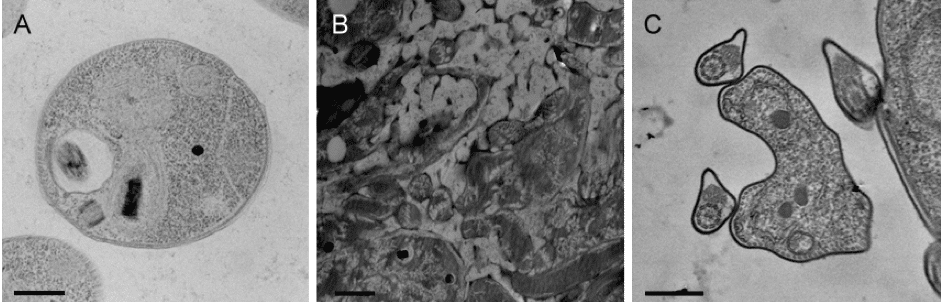
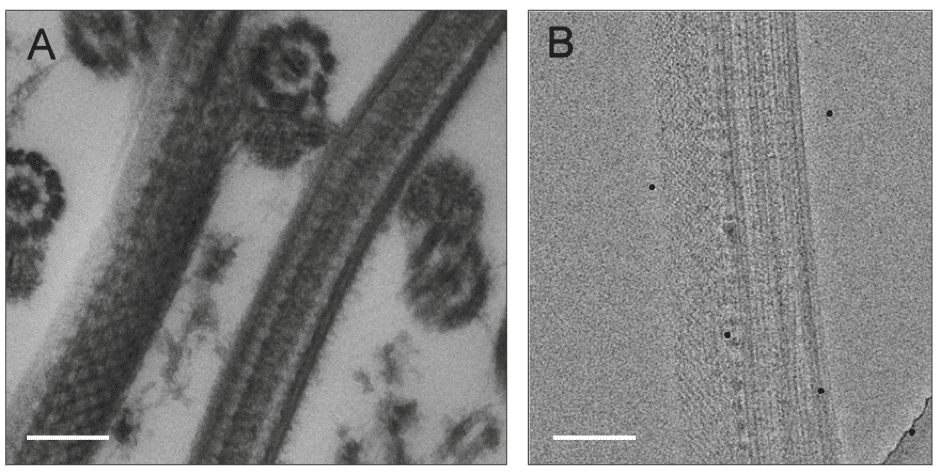
Chemical fixation is the most popular and accessible fixation method for biological EM (Figure 1 and 2). There are several chemicals that, once applied to a biological sample, will form cross-links between amino acids, proteins, and lipids, usually in the form of covalent bonds.
Chemical fixation is superior in the preservation of morphology to coagulating fixatives (e.g., solvents and acetic acid) that are typically used for light microscopy. However, chemical fixation can also lead to protein denaturation, which may be problematic in downstream antibody-labeling techniques. This is a challenge when using correlative light and electron microscopy (CLEM).
There are several chemicals that are widely used for the initial or primary fixation, including glutaraldehyde, formaldehyde, and acrolein.
Glutaraldehyde and acrolein cause extensive, rapid and permanent cross-linking of proteins. It is possible to apply glutaraldehyde as the only fixative; however, it penetrates into a sample slowly and during this period tissue degradation may occur. For this reason, many researchers choose to combine glutaraldehyde with formaldehyde (known as Karnovsky’s fixative).
Formaldehyde penetrates a sample rapidly, providing a temporary cross-linking of proteins that is subsequently replaced by glutaraldehyde.
Fixatives must be applied to a sample in a buffer solution, an isotonic vehicle for the fixative that prevents cells from shrinking or swelling, thus preserving the sample as close to the living state as possible. The osmolarity and osmolality of a buffer solution can be adjusted to suit your sample.
A secondary fixation step is often applied, especially for TEM sample preparation. Osmium tetroxide is the most common secondary fixative and it has the advantage of preserving lipid membranes, which are not preserved with aldehyde fixation alone. It also acts as a stain and provides a significant amount of contrast and conductivity to the sample.
Cryofixation
Cryofixation requires that the specimen is frozen quickly enough to cool water from its normal liquid state to its solid state (vitrification) without an intermediary ice-crystal phase. Ice has a larger volume than the liquid form of water, which can cause distortions to biological ultrastructure.
During the formation of ice crystals only the pure water freezes, resulting in the segregation of solutes within cells and characteristic segregation artefacts. There are several ways to achieve vitrification of water, including plunge freezing, slam freezing, or high-pressure freezing (Figure 1).
While a wide range of specimens are suitable for freezing, only small volumes of the sample will produce amorphous (free of ice crystals) ice, generally less than 100 micrometers from the edge of the sample. This means that while viruses, proteins, organelles, and cells can be vitrified, it is much harder to achieve good cryofixation for tissues and multicellular organisms due to their volume.
Cryo electron microscopy (cryo-EM) involves imaging a frozen and hydrated biological sample, without the need for stains or fixatives. Cryo-EM usually refers to transmission electron microscopy (TEM) but cryo-stages (microscope stages cooled to temperatures below which ice-crystals can occur, usually using liquid nitrogen) are also available for scanning electron microscopy (SEM) (Figure 2).
Although cryofixation is fast (milliseconds) and provides the best preservation of your sample, cryo-EM sample prep and imaging are challenging and specialist equipment is required to prepare, store, hold, and image biological samples. Furthermore, frozen samples are vulnerable to damage from the electron beam.
Low-dose imaging regimes that limit the number of electrons hitting the sample, thereby reducing damage are common in cryo-EM. However, these may have the disadvantage of low signal-to-noise ratios in the final images. Data processing is often required to improve contrast.
You can use cryofixation to fix your sample even if you do not have a cryo-stage or the capability to perform cryo-EM on your microscope. Sample processing steps identical to those used following chemical fixation can be applied to frozen samples following freeze substitution (see below).
Post-Fixation Specimen Preparation
After fixation, sample dehydration is necessary. This is accomplished by using a gradient series of ethanol, methanol, or acetone solutions in water, usually 30%, 40%, 50%, 60%, 70%, 80%, 90%, and several changes at 100%. You can dehydrate cryofixed samples at -90? (freeze substitution) in very high solvent concentrations (95% or higher), some of which can include stains such as osmium tetroxide for contrast.
Samples for routine SEM are dried, usually via critical point drying, mounted onto specimen stubs, and coated with a few nanometres of conductive coating (gold, platinum/palladium, or carbon).
For TEM and advanced SEM techniques, samples are embedded in resin, a viscous liquid that infiltrates the sample over a few hours or days, and that is polymerized using either heat or UV light. The resin provides support for the sample during sectioning (sliced at a thickness of 40-500 nm). The samples are either sectioned prior to going into the microscope or while inside the microscope.
Fixation for Electron Microscopy: Health and Safety
All chemicals and methods of fixation for electron microscopy are hazardous and some are extremely toxic. They are designed for killing and preserving cells, and you do not want them anywhere near your own tissues. You must use appropriate health and safety equipment, such as gloves, eye protection, and a fume hood for the chemical procedures.
All chemicals will be supplied with safety data sheets (SDS) and risk and/or COSHH assessments must be conducted before using the chemicals.
Whatever the application of your electron microscopy experiment, the fixation method you choose is imperative in obtaining reliable results. Before you get started on your next EM experiment, be sure to take the time to optimize your sample preparation protocol – your future self will thank you.
Further Reading
- Hayat M (2000) Principles and techniques of electron microscopy, biological applications. 4th Cambridge: Cambridge University Press.
You made it to the end—nice work! If you’re the kind of scientist who likes figuring things out without wasting half a day on trial and error, you’ll love our newsletter. Get 3 quick reads a week, packed with hard-won lab wisdom. Join FREE here.


