You likely know your way around a light or confocal microscope, but what if you need to see outside the optical range of these microscopes?
Enter electron microscopy. Electron microscopes (EMs) can magnify samples by ~ 1-2000 times more than a light microscope. Crazy, huh?! And that isn’t even the start of how powerful and complex these machines are.
Prepare to be enlightened as we look at some of the fantastic biological applications of electron microscopy. We’ll discuss what information you can obtain and the challenges biologists face.
How Electron Microscopes Work
In contrast to light microscopes that use light to illuminate sample specimens, an electron microscope uses an accelerated beam of electrons as its illumination source. Because the wavelength of an electron is ~ 100,000 times shorter than that of visible light photons, EMs have a higher resolving power than light microscopes.
This allows you to view smaller objects.
All EMs use electromagnetic and/or electrostatic lenses to control the path of electrons and focus it to form an image. On its way down the microscope column towards the sample, the electron beam passes through a coil of wire.
A current is passed through this wire to induce an electromagnetic field. And since electrons are very sensitive to magnetic fields, this current can be tuned to control the electron’s path precisely. Ultimately, this allows you to magnify objects up to two million times!
Differences Between Electron Microscopes
There are two main types of EMs: Transmission Electron Microscopes (TEMs) and Scanning Electron Microscopes (SEMs). What’s the difference, you ask?
In a nutshell: one uses transmitted electrons to form an image, and the other uses electrons to produce a scan of the sample surface.
This is a major divergence with profound consequences, so check out the Bitesize guide to electron microscopy techniques to fully appreciate the two methods.
Challenges with Biological Applications of Electron Microscopy
There’s a reason we biologists are all caffeinated and, if we’re honest, a wee bit neurotic. Living organisms can be a nightmare to work with, can’t they?
Fair enough, chemists might have to pop in at odd hours to stop a reflux step. But it’s not as if physicists have to do a 12-hour time course assay on galaxies!
Okay, maybe a bit flippant. But the main point stands: biological samples are tricky.
If you’re using a living organism to produce a specimen—it can die.
After you’ve attained said specimen—it can denature.
Overcome both of these—and accidentally tip Virkon in your sample out of exhaustion.
It’s not surprising then that these challenges manifest in biological applications of electron microscopy as well. Let’s address a few of these.
Vacuum
The electron beam operates within a high vacuum. If this were not the case, air would stop the electrons.
Vacuums cause massive problems for biological tissue. For one, evaporating (boiling, technically speaking) water destroys the specimens being imaged.
Say bye-bye then to the possibility of imaging live samples with EM.
Fortunately, there are protocols to stabilize samples during workup for EM applications. For example, samples can be rapidly frozen (v
Poor Contrast
In electron microscopy, electrons are diffracted by the sample and refocussed by electromagnetic lenses to produce an image.
Unfortunately, biological tissue doesn’t diffract many electrons. Electron-dense stains or advanced EM techniques are often necessary to visualize biological ultrastructure. Lead and uranium are frequently used for this purpose. Nasty!
Sample Transparency
The electron beam must get through the sample in a TEM. This is because, by design, TEMs analyze the transmitted electrons (hence the name). Some samples are small enough that they can be imaged whole. An example that springs to mind are viruses.
But most cells and tissues need to be sectioned into 50-200 nm-thick slices before they are applicable for TEM.
Sample Charging
Biological samples are non-conductive, creating issues when bombarded by a negatively charged electron beam. The samples can be unstable and drift, blurring the image.
Or they may create distortions in the signal due to the accumulation of negative charges on the sample. Heavy metal staining ameliorates this, and, in SEM, a conductive coating is applied to the sample to dissipate the charge. This process is called sputter coating.
What Can You See Under an Electron Microscope?
That’s all very important but perhaps a bit dull. Let’s get onto cool images and what you can actually do with electron microscopy.
Taking a Peek with TEM
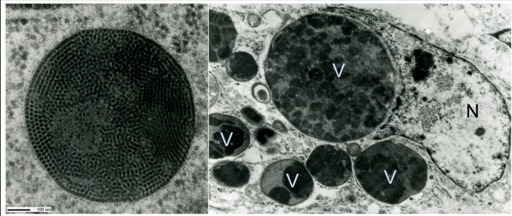
TEM is appropriate for imaging either very small samples, such as molecules or viruses, or the inside of cells and tissues (Figure 1). The image produced is analogous to an X-ray since it’s a projection through the biological sample.

TEM Considerations
Unlike a light microscope and SEM, everything in the image will be in focus due to the relatively large depth of field and ultrathin samples. TEM images are also two-dimensional.
It is possible to obtain three-dimensional information of viruses or molecules using a computerized image processing technique called single particle analysis (2017 Nobel Prize, anyone?)
Larger samples have to be sectioned down to between 50 and 200 nm to enable the electron beam to penetrate the sample. A series of sections can be imaged, and the data assembled into a three-dimensional volume. This is called serial section TEM. And three-dimensional data of 200-500 nm-thick sections of cells and tissues can be obtained using electron tomography.
Stealing a Glance with SEM
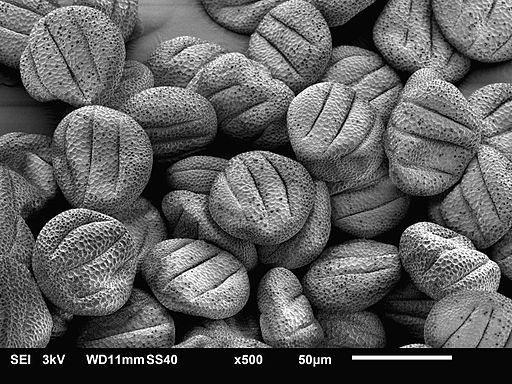
SEM is used to image the surface of bulk samples, such as bacteria, cells, tissues, and organisms (Figure 2). Atomic contrast can be detected using backscattered electrons as heavier atoms produce a brighter signal.

Another interesting feature, SEM micrographs create the optical illusion they are three-dimensional. However, no Z-dimension (that’s up and down to you and me) data is generated, thus making the images two-dimensional only. Three-dimensional information can be obtained by tilting the sample to create a stereoscopic image.
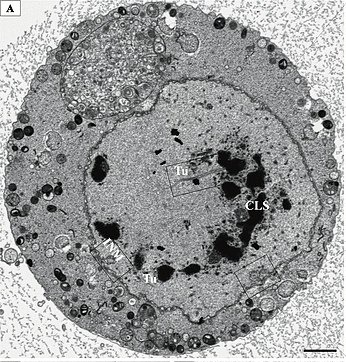
Also, SEM can be used to image sections and resin embedded samples. This creates TEM-like images and three-dimensional data (Figure 3). This method is used in advanced SEM techniques such as array tomography [3], serial block-face scanning electron microscopy (SBFSEM), and focused ion beam scanning electron microscopy (FIB-SEM).

Smart and beautiful!
Applications of Electron Microscopy Summarized
With all that said, you are now equipped with a decent understanding of biological applications of electron microscopy in both its main guises. Though let’s face it, the images probably did the legwork!
Anything else you’d like to add? Feel like sharing a cool micrograph for us to include in this or future articles? Get in touch or drop a comment below!
Originally published July 2014. Reviewed and updated March 2022.
References
- Glaeser RM et al. (2016) Factors that Influence the Formation and Stability of Thin, Cryo-EM Specimens. Biophys J 110:749–55
- Hayat M (2000) Principles and techniques of electron microscopy, biological applications. 4th Edition. Cambridge: Cambridge University Press
- Micheva KD and Smith SJ (2007) Array tomography: A new tool for imaging the molecular architecture and ultrastructure of neural circuits. Neuron 55:25-36


