Your thesis has come a long way in a few short articles – we’ve now created a thesis outline, generated a table of contents, and merged all the chapters into a single thesis master document. The end is in sight! To round off the series, I’d like to finish with a few final quick tips for writing your thesis in Word that I have picked up along the way. It’s probably not fair to call most of these “Advanced” Word functions, but I have met a few people whose world was rocked by them, so I feel they’re worth mentioning!
3 Tips for Writing Your Thesis in Word
Tip #1 – Use Keyboard Shortcuts
Specialized symbols are a fairly common occurrence in thesis writing, °C, ®, \alpha, \beta, etc., all crop up regularly. Wouldn’t having a faster way of inserting them make a huge difference? Quick tip – there is a way!
When inserting a symbol from the menu, it is possible to create a keyboard shortcut for the symbol that can save you time every time thereafter.
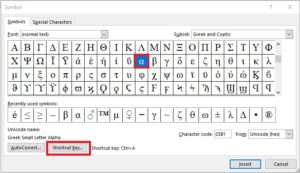
1. Go to the Insert tab and click on “Symbol”, select “More Symbols”.
2. Pick the symbol you wish to create a shortcut for and click “Shortcut Key”
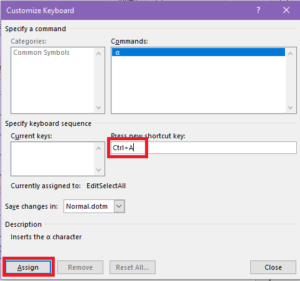
3. Create a shortcut for the symbol and click “Assign” then “Close”.
Notes for Using Shortcuts
- Make your shortcuts intuitive! The most important thing is to create shortcuts that you are going to remember!! For example “Ctrl + d + alt” for “\alpha” is a terrible shortcut!! Try something like “Ctrl + a” for “\alpha”, and keep it consistent, use “Ctrl + b” for “\beta”, and continue along the same lines for all the Greek letters you need. If you make your shortcuts easy to remember they’ll save you time and effort, on the other hand, if you overcomplicate them, they’ll just waste your time and end up irritated!
- Do not use shortcuts that already exist on your keyboard. For example when using PCs, “Ctrl + s” automatically saves the file you are working on, so this won’t work as a shortcut for a symbol!
-
You can also use keyboard shortcuts for things like subscript and superscript. This can be really useful when you’re dealing with chemical formulae like H2O2 or Cu2+ and need to switch between the two quickly.
The command for subscript (text below the line) is “Ctrl + =”. Once you have your subscript inserted you can press that combination again to get back to normal text.
To get superscript (text above the line) use the command “Ctrl + shift + =” and enter that again to return to normal text.
Tip #2 – Insert a Cover Page
Okay, this one isn’t overly difficult, but it’s sometimes it’s overlooked. Quick tip – having a cover page is useful because it won’t be included when you start numbering your pages so you’ll have less fiddling about with the page number formatting to worry about!
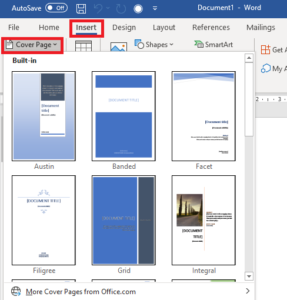
1. At the very start of your document, go to the Insert tab, select “Cover page” and pick a style of the page to insert.
Tip #3 – Get Your Page Numbers in Order
Inserting page numbers is a fairly easy process; however, inserting non-continuous page numbers can be a bit trickier.
Non-continuous page numbering can be handy. For example, when you have your final thesis ready to go you may want the table of contents, acknowledgments, etc., to be labeled with Roman numerals and your chapters in ordinal numbers starting from page 1. Rather than saving things as separate documents (which is exactly what undergraduate me did), you can simply tell Word that those 2 sections are separate and need to be numbered differently!
To do this:
Add a Break
Pick the point at which your document needs to be broken up (usually the 1st page of the introduction),
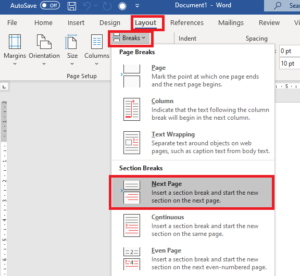
1. Go to the Layout tab
2. Select “Breaks”
3. From the Section breaks select “Next page”.
There is now a break between your introductory pages and your chapter
Insert the Numbers
Now that you have different sections, you can add your page numbers.
4. Go to the Insert tab to the Page Number tool
5. Select the location for your page numbers, e.g. “Bottom of Page”
Update the Format
6. Return to the Page Number tool
7. Select “Format Page Numbers”
8. Under the page numbering heading, select “Start at”. The value “1” should appear. This will start numbering this section independently of the previous section
9. Return to the previous section of the document
10. Select “Format Page Numbers”
11. Change the “number format” from “1, 2, 3…” to “i, ii, iii….”.
And there you have it, non-continuous page numbers with some Roman numerals thrown in – not quite as easy at 1, 2, 3 but not nearly as difficult as you might have thought it was!
Wrapping Up Our Tips for Writing Your Thesis in Word
Hopefully, this series will prove useful to those of you squaring up to the challenge of writing a thesis – if you have any tips for writing your thesis in Word that you want to share, leave a note in the comments.
Sharing is caring after all!
Originally published November 5, 2014. Reviewed and updated on December 07, 2020.
**Note: All screenshots taken from Word for Windows, 2019.


