In the last post on thesis writing tips for Word, I showed you how to make an outline for your thesis in Microsoft Word. You should now have a document outline with a list of headings for your sections (maybe even with a few sections filled in if you were feeling motivated to make a start!). From here, our next set of thesis writing tips for Word move on to:
- Setting up a table of contents
- Learning to insert captions, which will make compiling lists of figures and tables a painless process at the end of your write up
- Learning how to cross-reference your document, so that figures or sections that you refer to in the body text are always numbered correctly, even when you move things around.
Tip #1: Automatically Generate a Table of Contents
A thesis requires a detailed table of contents that lists the headings and page numbers of each section. Rather than manually scrolling through your document making notes of where everything is (and having to go back and change numbers every time you [or your supervisor] add something new or move a section) why not let Word do all the hard work?
When your document is properly laid out, generating a Table of Contents in Word is as simple as 1, 2, 3 (something my silly undergraduate self could sorely have done with knowing).
With the cursor at the start of the document where you want to insert the Table of Contents:
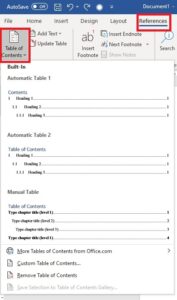
- Click the “references tab”
- Select Table of Contents
- Pick a style
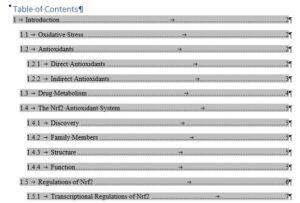
Done. It’s that easy when you have things set up properly (as described in the previous post)! Look how pretty (and easy) it is:
The table of contents will be generated automatically using the different levels of heading that you defined when you set up your outline. This is why it’s really important to use the headings from the styles gallery rather than just manually changing the size and style of font that you’re using.
Don’t forget, if you move things around, add bits in or remove others, you should update your table of contents. It’s good practice to update the table of contents just before you finalize the document to catch any updates needed after any last-minute tweaks.
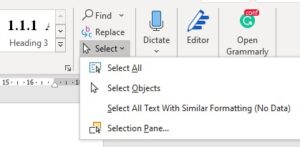
Return to the Table of Contents options in the References tab and select “Update Table”, or select all the text in the document and use the F9 key to refresh all fields.
Tip #2: Insert Captions
After a table of contents, most theses also include a list of tables and a list of figures. To make compiling this list less difficult, you can use a specific kind of label each time you insert tables and figures (or equations, etc.) that will allow you to generate the list automatically in Word.
To do this:
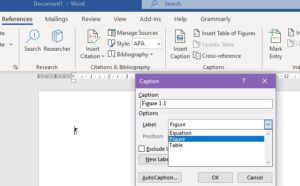
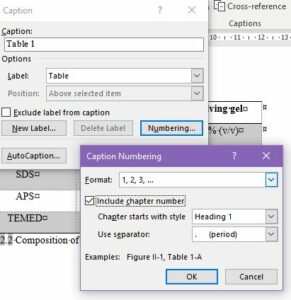
1. Go to the References tab and click on “Insert caption”
2. Select a label from the dropdown list for what you are inserting, i.e. Table or Figure and press “OK”.
3. Next to the caption Table 1, add a title for your table, which will appear in the list of tables.
4. When adding a figure legend for tables or figures, make sure to go to the next line after the title to ensure the entire legend doesn’t get included in the list!
5. Optionally, you can also insert captions that are numbered by chapter, so if it’s the first table in chapter 2, it will be listed as Table 2.1, etc.
-
- Go to the caption numbering tab
- Tick the “include chapter number” box
- Select how you want the numbers to look.
Create a List
Once your figures and tables have been captioned, inserting a list is very similar to how you created a table of contents.
With the cursor at the point where you want to insert the list:
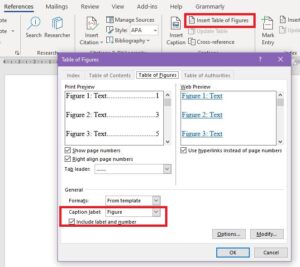
- Click the References tab
- Click “Insert table of figures”
- Select a caption label (table or figure)
- Click “OK”
Update
Ideally, you will be inserting lists of figures and tables at the end when the layout of your thesis is pretty much finalized. However, if you need to move your tables or figures around and the order or page number changes, don’t forget to update your list!
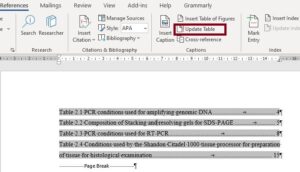
- Click anywhere on the list to highlight it
- Click “Update table”
And done! I repeat –it’s that easy!
Tip #3: Make Sure You Cross-reference
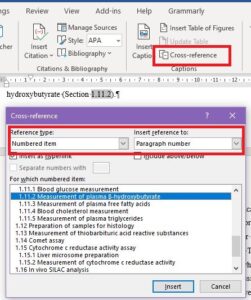
Another useful tool found in the References tab is the Cross-reference button
Cross-referencing allows you to link back to other sections, tables, or figures in your body text.
Cross-referencing is useful not only for creating a hyperlink in the text for you to jump back and forth with, but also for keeping your referenced paragraph, table, and figure numbers up to date if you need to move them about. This saves you the trouble of going back and re-numbering every paragraph where you have mentioned a figure or table whose number has now changed – just make sure you update your fields (select all + F9) before you finalize your file.
*A small warning with this one, sometimes it doesn’t update immediately – if after saving and re-opening your document it has still not updated, you might need to insert or update the List of figures or tables for the document to recognize that things have been moved a little bit – so don’t panic too much!*
Thesis Writing Tips Wrapped Up
Using Word to automatically generate your table of contents, lists of figures or tables, and to ensure that your internal references stay up to date takes a little bit of planning and some practice; however, it will also hugely benefit you in the long run!
Thinking back to my silly undergraduate self, leafing through a printed copy of my thesis, typing out each heading, fretting that the numbers weren’t aligned properly and nearly having a nervous breakdown when my supervisor suggested moving things because I would have to redo it all, I shudder at the wasted hours that could have been spent doing something productive (like learning to use Word properly).
The bottom line is that writing a thesis is hard enough as it is, don’t give yourself extra work that the computer could be doing for you instead!
Hopefully, you’ve found these Word thesis writing tips helpful. If you’ve got any questions or thoughts, please leave a comment below.
Originally published October 22, 2014. Reviewed and updated on December 1, 2020
**Note: All screenshots taken from Word for Windows, 2019.
