What is one of the first things you do when you sit down at the flow cytometer and start looking at your cells?
You start drawing polygons and setting gates.
To the neophyte the gating process can look a little random – why do you exclude those dots but not these? But gating in flow cytometry experiments is one of the most important parts of the process.
Gating can be a scary process
Because of its importance, gating can also be a scary process, especially if you don’t know that much about the cells you are analyzing – What if you gate the wrong cells? What if that debris is not debris?
One of the reasons gating is scary is that it is subjective and relies a little on your/the cytometrist’s judgment. It also forms the beginning of any cytometry experiment, in that what you get out at the end relies on what you do at this stage.
Despite this, gating is extremely useful, and more often than not, necessary, in flow cytometry. Not only to discount cells or ‘events’ that you don’t want, or include those that you do, but also because quite often there are a few different sub-populations within one experiment that you want to analyze, and gating can help with this.
What is gating anyway?
Although it can be a complex process and involve multiple gates or regions of interest, the process of gating is simply selecting an area on the scatter plot generated during the flow experiment that decides which cells you continue to analyze and which cells you don’t.
What you need to know before gating your cells
One of the most important things to do before starting a flow cytometry experiment is to find out as much as possible about your cells. These parameters will help you set your gates.
For example, you should:
- Know the size of your cells
- Know whether the cells change size under different conditions
- Know any markers your cells express
- Identify a positive control to use
Forward scatter and side scatter
The most common first gating strategy is to use forward scatter (FSC) and side scatter (SSC) to find viable, single cell events. To find out more about FSC and SSC, see Ryan’s article on flow cytometer parameters.
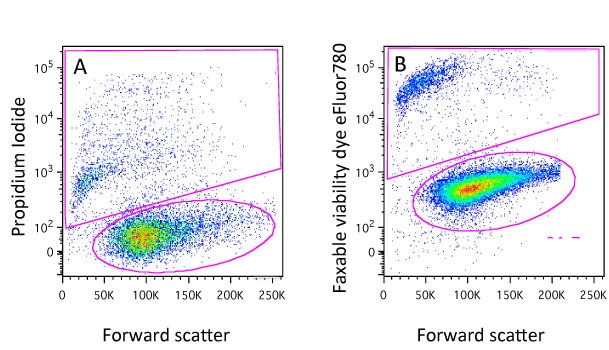
In your experiments you usually want to include only single, viable cells in the analysis and eliminate any debris, dead cells and clumps or doublets. To help with this, you can start with the negative selection of these unwanted events. As a general guide, this can often be done by size, which is estimated by forward scatter – cellular debris is usually FSC-low. And dead cells often have lower forward scatter and higher side scatter than live cells. By drawing a gate that excludes those events with low FSC and high SSC, you can exclude debris and dead cells from the analysis. An example is shown in Figure 1.
Gating a single parameter
Once you have identified the cells or ‘events’ that you want (and those that you don’t, e.g., the debris and doublets) using FSC and SSC, you can move forward and do further analysis with these cells.
If you are looking at a single parameter, such as one fluorescent marker that is tagged (e.g., with FITC), then you will see a univariate histogram (Figure 2).
Unless your cells have a clear bimodal expression, i.e. there is no overlap in the positive and negative populations of a specific marker, then you may need to use gating controls. By using a negative control and a positive control you can determine which events represent “real” signal and gate on those. Alternatively, you could also do the little more complex fluorescence minus one (FMO) control to set your gate.
Gating two or more parameters
When data for two parameters are being collected, you can produce a bivariate histogram (Figure 3), which divides the plot in four quadrants for the four possible combinations: double positive, single positive for each antibody/dye, and negative for both.
You will need to determine where the threshold for each lies – that’s the scary part.
You can further gate your cells of interest within each quadrant to select certain populations. For example, you may be interested in the high intensity double positive cells, so you may choose to further gate those events.

It is possible to analyze many more colors than this, even up to as many as 12 fluorophores at once (some have reported more). However, the complexity increases with number of variables and the overlapping emissions.
Your gates are set, now what?
Once you know the population you want and have set all of your gates, you can begin data and/or cell collection.
Save your settings for future experiments. Chances are you will be running the same sort some time again in the future, and it will give you a starting point.
And if you make a mistake, keep trying and don’t be afraid to ask a cytometrist for help. Gating is definitely one of those things that gets easier with experience.


