
Ultramicrotomy is the process by which a sample is cut into very thin slices or “sections”, usually for imaging by transmission electron microscopy (TEM) or relatively new techniques using scanning electron microscopy (See Array tomography in three-dimensional scanning electron microscopy for biology). This technique requires a bit of finesse, and this article will help you to become an Ultramicrotomy Master.
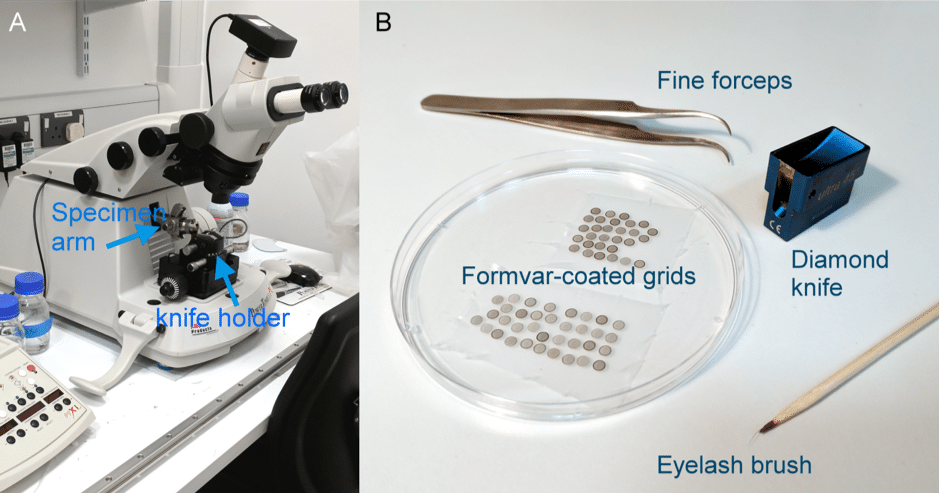
For ultramicrotomy, you will need an ultramicrotome, glass or diamond knives, fine forceps, an eyelash brush, a substrate to collect the sections onto (usually formvar coated grids), and a resin embedded sample (Fig. 1 and 2). Most biological specimens must be embedded in resin prior to sectioning.
Trimming the Block
Your specimen block needs to be trimmed to a shape and size that will get the best result for your specimen. The final block face is usually around 1-2mm in diameter for TEM.
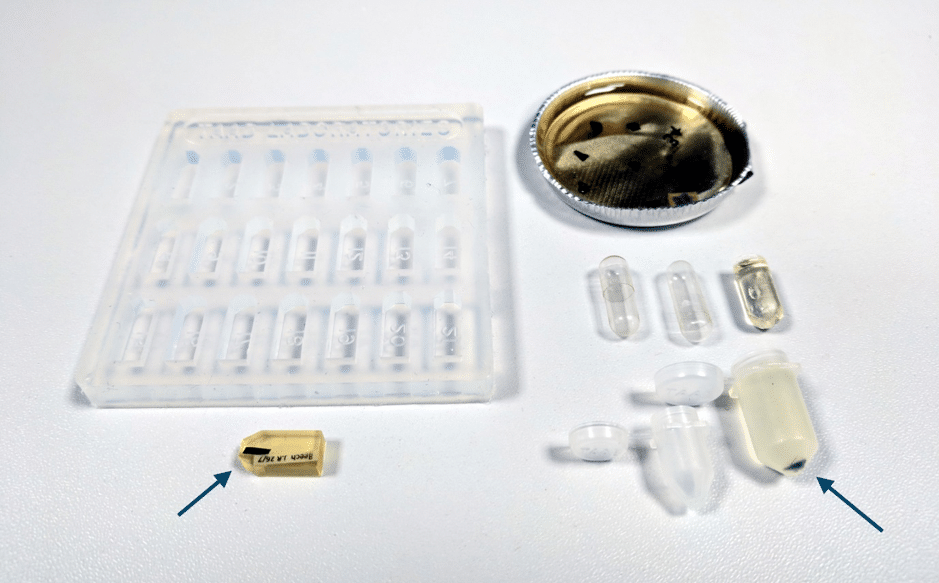
You will need to first remove the embedding mold and any excess resin (Fig. 2). A quick method to remove large amounts of resin is to use a benchtop clamp and jeweler’s saw (avoid breathing in the dust by wearing a face mask). If the sample has been orientated in a mold prior to polymerization of the resin (Fig. 2 arrows), you may be able to go directly to fine trimming.
Choose a free resource to help you move forward
POSTER
Immunofluorescence Troubleshooting Guide
DOWNLOAD
Culture Contaminants Reference Card
Place the sample into the specimen holder on an ultramicrotome. You can trim and shape the block two ways. A sharp and clean razor blade is effective and fast for trimming a sample by hand. First, remove resin from the surface of the sample and then pair away resin from the sides until you have the final shape (Fig. 3A). A trimming knife in the ultramicrotome can also be used to shape the block face for a more accurate finish (Fig. 3B). Block faces are usually trimmed to a square or trapezoidal shape. It is important that the top and bottom edges of the face are parallel to one another. When using a razor blade, always cut away from you and make sure that the sample is secured firmly in the holder.
The surface of the block face should be polished to a flat surface using a trimming diamond or glass knife before you start to section. This helps with the orientation of the block face to the knife edge and you could also collect semi-thin sections at this stage for use with a light microscope.

Preparing the Knife
You will need water to float the sections onto, which avoids excessive friction and specimen damage caused by a dry knife. Water is held onto the knife by a “boat”. Details for how to prepare glass knives can be found here (making glass knives and attaching boats).
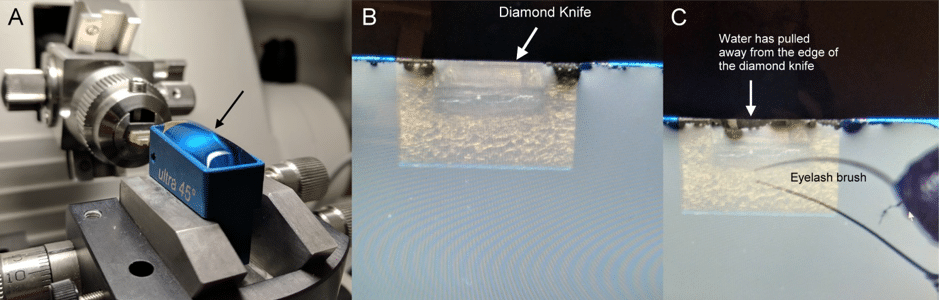
Diamond knives come pre-mounted with a boat (Fig. 1). Slowly fill the boat with water using a pipette until the water bulges over the sides of the boat (Fig. 4). Withdraw excess water until the surface is flat and has an even light reflection (Fig. 4). The water may draw away from the knife. You can use an eyelash brush to bring the water back to the knife edge. Make sure that this water level is maintained during sectioning.
Positioning Your Sample
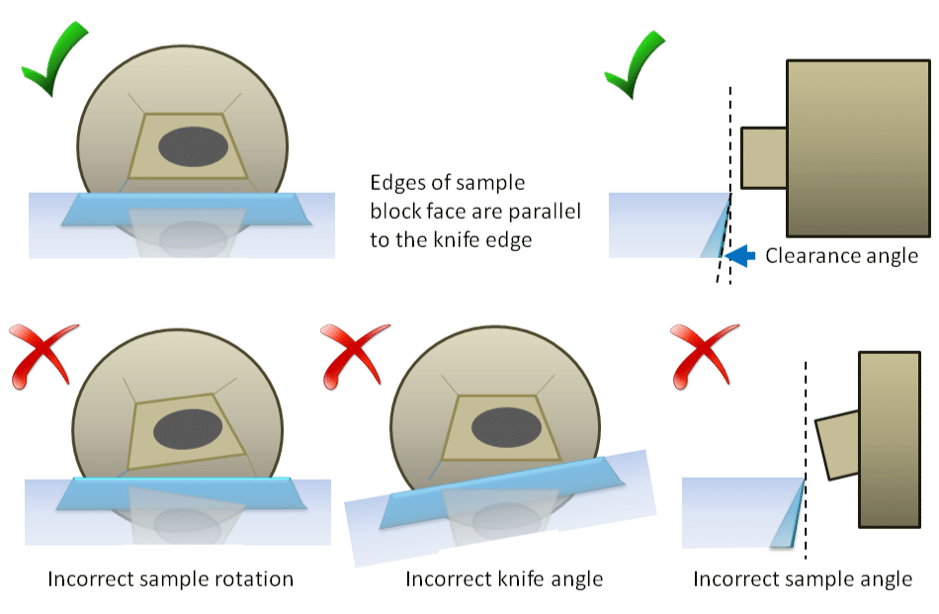
Your sample must be parallel to the knife edge in all directions (Fig. 5). Both the specimen holder and the knife holder can be rotated and tilted to get the best orientation. The best cutting results are when the knife has a clearance angle of 5-6° tilt (Fig. 5).
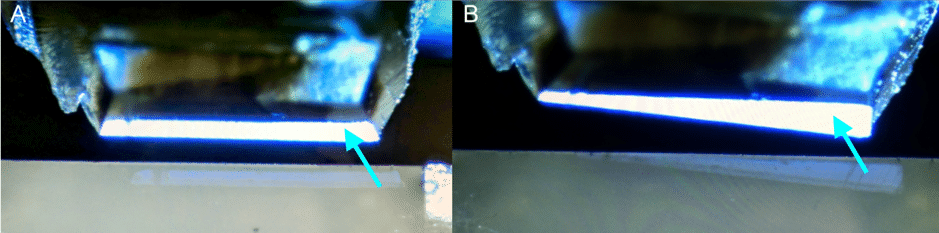
Use the reflection of the knife edge on the block face to achieve good alignment and adjust orientation accordingly (Fig. 6.). The knife has to be fairly close to the block face in order to achieve a reflection. Be careful not to touch the block face to the back of the knife as this can damage both the knife and specimen. Use the fine advance controls on the ultramicrotome to bring the knife close to the block while the specimen is in a cutting position (at the same height as the knife edge).
Ultramicrotomy
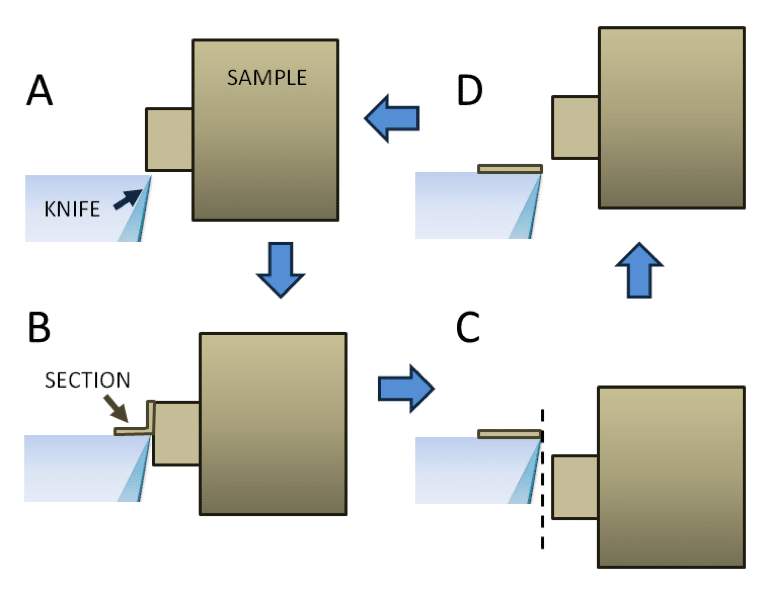
Sections are cut at a defined thickness (50-200nm) on the down stroke of the specimen arm. Either the knife or the sample is retracted slightly on the upstroke to avoid damaging the back of the knife (Fig. 7). You can vary the speed of the specimen arm when a section is being cut (usually 0.5 to 1.5 mm/s). You will need to experiment to find the optimum cutting speed for your samples.
Once cut, the section will float on the top of the water. Ultrathin sections display a thin film interference colour related to their thickness. A sample with good parallel edges will create a ribbon of sections on the surface of the water (Fig. 8), which is beneficial when collecting sections onto a grid.

Sections are compressed during the cutting process. You can reduce compression by using an oscillating diamond knife or stretching the sections with either a heat pen or chloroform vapor (please pay attention to relevant chemical health and safety information).
Collection of Sections
Once enough sections have been produced, stop the ultramicrotome. Use an eyelash brush to move and position sections. A grid can either be placed on top of the sections or submerged in the water bath and lifted (Fig. 8). Grids should be gently blotted on filter paper and left to dry before being stained or put into the microscope.
Common Artefacts in Sections
Chatter (lines across the section parallel to the knife edge) occurs when there is some form of external vibration or when the sample or knife is slightly too loose. It can also occur as a result of a resin block that is too hard, too soft or when the cutting speed is too fast.
Scratches (lines or breaks in the section in the direction of the cut, perpendicular to the knife edge) occur when the knife either has a defect or when it needs cleaning.
Wrinkles (folds in the section) can occur during section collection or when the block face is too large. Other causes can be the knife, knife holder, or block being loose, a dull knife (particularly when using glass knives) or poor embedding.
Ultramicrotomy is an incredibly useful tool that can be used for an array of microscopy applications. Once you’ve mastered the steps outlined here, you’ll be on your way to collecting the data of your dreams.
Do you have any additional tips for perfecting ultramicrotomy? Comment below!
Further Reading
- Hagler HK. Ultramicrotomy for biological electron microscopy. Methods Mol Biol. 2007; 369:67-96.
You made it to the end—nice work! If you’re the kind of scientist who likes figuring things out without wasting half a day on trial and error, you’ll love our newsletter. Get 3 quick reads a week, packed with hard-won lab wisdom. Join FREE here.


