Alkaline lysis for plasmid isolation? That's like the ABCs in a molecular biology lab. Read this detailed article to understand the process behind this common technique.
Listen to one of our scientific editorial team members read this article. Click here to access more audio articles or subscribe.
Alkaline lysis was first described by Birnboim and Doly in 1979 and has, with a few modifications, been the preferred method for plasmid DNA extraction from bacteria ever since.[1] The easiest way to describe how alkaline lysis works is to go through the procedure and explain each step, so here goes.
A Step-by-Step Guide to Alkaline Lysis
Step 1: Cell Growth and Harvesting
You start with the growth of the bacterial cell culture harboring your plasmid. When sufficient growth has been achieved, the cells are pelleted by centrifugation to remove them from the growth medium.
Step 2: Resuspension
The pellet is then resuspended in a solution (normally called solution 1, or similar in the kits) containing Tris, EDTA, glucose, and RNase A.
Divalent cations (Mg2+, Ca2+) are essential for DNase activity and the integrity of the bacterial cell wall.
EDTA chelates divalent cations in the solution preventing DNases from damaging the plasmid and also helps by destabilizing the cell wall.
Glucose maintains the osmotic pressure so the cells don’t burst and RNase A is included to degrade cellular RNA when the cells are lysed.
Step 3: Alkaline Lysis
The lysis buffer (aka solution 2) contains sodium hydroxide (NaOH) and the detergent Sodium Dodecyl (lauryl) Sulfate (SDS).
SDS solubilizes the cell membrane.
NaOH helps to break down the cell wall, but more importantly, it disrupts the hydrogen bonding between the DNA bases, converting the double-stranded DNA (dsDNA) in the cell, including the genomic DNA (gDNA) and your plasmid, to single-stranded DNA (ssDNA).
This process is called denaturation and is a central part of the procedure, which is why it is called alkaline lysis.
SDS also denatures most of the proteins in the cells, which helps with the separation of the proteins from the plasmid later in the process.
It is important during this step to make sure that the re-suspension and lysis buffers are well mixed, although not too vigorously (see below). Check out my related article on 5 tips on vector preparation for gene cloning for more information and tips. Also, remember that SDS and NaOH are pretty nasty so it’s advisable to wear gloves and eye protection when performing alkaline lysis.
Step 4: Neutralization
The addition of potassium acetate (solution 3) decreases the alkalinity of the mixture. Under these conditions the hydrogen bonding between the bases of the single-stranded DNA can be re-established, so the ssDNA can re-nature to dsDNA. This is the selective part.
While it is easy for the small circular plasmid DNA to re-nature, it is impossible to properly anneal those huge gDNA stretches. This is why it’s important to be gentle during the lysis step because vigorous mixing or vortexing will shear the gDNA producing shorter stretches that can re-anneal and contaminate your plasmid prep.
While the double-stranded plasmid can dissolve easily in solution, the single-stranded genomic DNA, the SDS, and the denatured cellular proteins stick together through hydrophobic interactions to form a white precipitate. The precipitate can easily be separated from the plasmid DNA solution by centrifugation.
Step 5: Cleaning and Concentration
Now your plasmid DNA has been separated from the majority of the cell debris but is in a solution containing lots of salt, EDTA, RNase, and residual cellular proteins and debris, so it’s not much use for downstream applications. The next step is to clean up the solution and concentrate the plasmid DNA.
There are several ways to do this, including phenol/chloroform extraction followed by ethanol precipitation and affinity chromatography-based methods using a support that preferentially binds to the plasmid DNA under certain conditions of salt or pH, but releases it under other conditions. The most common methods are detailed in the article on 5 ways to clean up a DNA sample.
So, how often do you use alkaline lysis for your plasmid preps? Let us know, in the comments section, any cool tips and tricks that you use to get better and faster results!
SDS-PAGE is the technique that unites life scientists. We all perform it during our research to separate protein analytes and, therefore, we all need a good SDS-PAGE gel recipe.
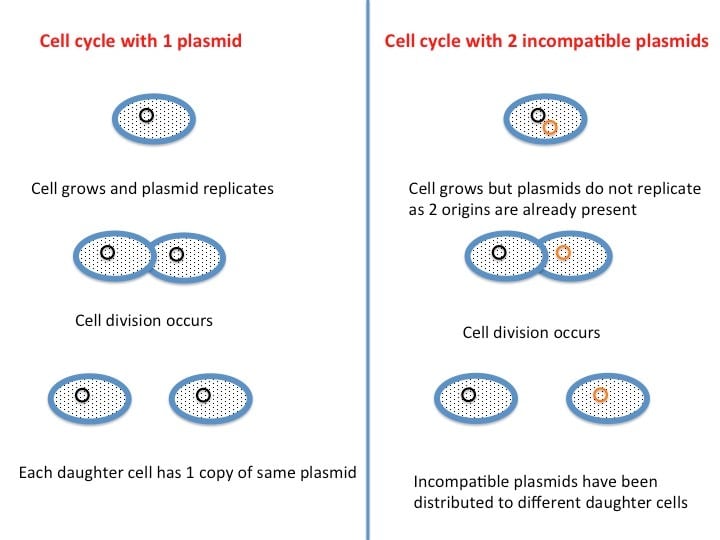
Plasmid incompatibility could ruin your experiments before you’ve even started. And if you don’t know what it is, you can’t troubleshoot it! This article explains plasmid incompatibility, so you can’t be caught out by it.
Plasmid mapping and DNA annotation software is pretty abundant these days. A quick Google search brings up dozens of hits – but how do you know which one to use? If you are like most molecular biologists, you probably use the same software your colleagues do—usually it is either the stuff that gets passed down…
We use fluorescent in situ hybridization (FISH) techniques routinely to detect DNA or RNA sequences in tissues, but what about micro RNAs (miRNAs)? No worries, FISH is now optimized to meet the challenge. To help you get going with the method, here’s what you need to know. The first thing that comes to mind when…
Thanks to Bitesize Bio reader, Muthu Arumugam for contacting us about some problems he has been having with restriction digestion and clean up of DNA. I have boiled his query down to four main questions that are pertinent for most molecular biologists, so I hope that Muthu and everyone else can learn something from my…
Bisulfite pyrosequencing is becoming a routine technique in molecular biology labs as a method to precisely measure DNA methylation levels right down to the single base. The technique allows for detailed and high resolution analysis of DNA methylation at specific genomic regions. How to detect the 5th base? Methylation of any of the four nucleotides…
10 Things Every Molecular Biologist Should Know
The eBook with top tips from our Researcher community.