Western blotting can often be a source of frustration in the lab. Getting a beautiful Western is hard work, and it’s even more difficult when trying to visualize large molecular weight (>150 kDa) proteins.
Here are five tips you can use to get a great blot:
1. Choose the right gel composition
With all of the gel choices out there, it can be overwhelming to determine which will work best for your experiment. The three most common gel types you will encounter are Tris-Glycine, Bis-Tris and Tris-Acetate. The name of the gel refers to the leading and trailing ions in the buffer system.
Tris-Glycine gels have a basic pH (8.6) and a short shelf life. The pH of the gel also tends to increase (up to pH 9.5) when running, causing protein degradation and low resolution blots.
Bis-Tris gels have a more acidic pH (6.4) increasing stability and shelf life. These gels require additional anti-oxidant in the buffer to maintain protein reduction as common reducing agents, such as DTT (dithiothreitol), do not travel with proteins in this system.
Tris-Acetate gels maintain a pH around 7, and separate out large molecular proteins with higher resolution than Bis-Tris or Tris-Glycine gels. Therefore, I recommend using Tris-Acetate gels when blotting for large proteins. Remember to use Tris-Acetate buffer with these gels – MOPS or MES buffer will not work!
2. Get the best separation
Now that you have chosen a Tris-Acetate gel, there are a couple more things to consider. The percentage listed on a gel inversely relates to the pore size: the smaller the percentage, the larger the pores. Larger proteins travel more easily through larger pores, so I suggest using a low percentage gel, such as 7%.
Gels are made with one continuous pore size (non-gradient), or have increasing pore size throughout the gel (gradient). Gradient gels are great for new samples or if you are looking at a range of protein sizes. If you are looking for one protein, use a non-gradient gel.
3. Increase SDS, decrease methanol
The composition of your transfer buffer is critical! Large proteins can precipitate out in the presence of methanol. Avoid this by decreasing the methanol percentage (10% or less) in your transfer buffer.
To further ensure your protein does not precipitate out, consider adding SDS to a final concentration of 0.1%. SDS adds uniform negative charge to proteins, making it easier for them to transfer from the gel and into the membrane.
4. Mind the membrane
Membranes are either made of PVDF or Nitrocellulose. This post does a great job of describing the property differences between the two types of membranes. The takeaway for large molecular weight proteins is to use PVDF. Because large proteins can precipitate out in the presence of methanol, and PVDF membranes do not require any methanol in the transfer buffer, you have a higher chance of successfully transferring your protein to the blot using these membranes.
Both types of membranes are available in a variety of pore sizes, but the two most common are 0.2um and 0.45um. Just like with the gel, larger proteins can navigate through large pores more easily than smaller pores. Most proteins (>20 kDa) can be transferred with 0.45um membranes. Avoid using 0.2um pore size membranes for large proteins.
5. Lengthen the transfer time
After carefully selecting your gel, membrane and transfer buffer components, you’re ready to rock! Semi-dry transfer is fast and convenient, but will not resolve larger proteins well. I advise using a wet tank transfer method. Because large proteins will transfer out of the gel very slowly, I recommend transferring for 90 minutes at 350-400 mA or overnight at 4°C at 40 mA.
If you follow these steps, you should have a beautiful blot showcasing your large molecular weight protein in no time!

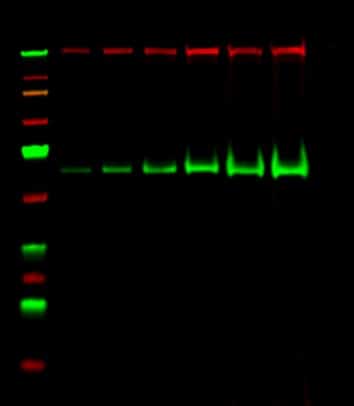
Figure 1.Western blot of a high molecular weight protein. Image courtesy of Victoria Brown.


