Western blotting is a commonly used lab technique to identify proteins within a sample. It separates proteins based on size and then uses antibodies to detect specific proteins within the sample.
While it can be used to simply show the presence or absence of a protein in a sample, it can tell you so much more if you take the next step and perform western blot quantification.
As scientists, we love nothing more than quantitative data! Here, we have pulled together the 4 key steps for you to perform western blot quantification.
Why Should You Perform Western Blot Quantification?
First, what do we actually mean by western blot quantification? Put simply, this refers to the measurement of the signal emitted by your target protein. The value you obtain is directly proportional to the concentration of your protein of interest.
A quantitative western blot will allow you to measure relative changes between different conditions, so rather than just saying a protein is present or absent in a sample, you can go further and say your target protein is present x-times higher in one sample compared to another for example. This means you can see how the levels of your protein of interest change between time points, conditions, and treatments.
Western Blots Are Semi-Quantitative
Before we take you through the necessary steps for quantifying your western blots, we need to clarify that western blots are only semi-quantitative. This is because they cannot tell you exactly how much of your protein of interest there is, only how much there is relative to another sample.
Even though western blot quantification is only semi-quantitative, you still need to be rigorous in how you quantify your blots to ensure your results are as accurate as possible. So on to the four critical steps for ensuring your (semi) quantification is accurate.
Four Simple Steps for Western Blot Quantification
1. Find the Linear Range
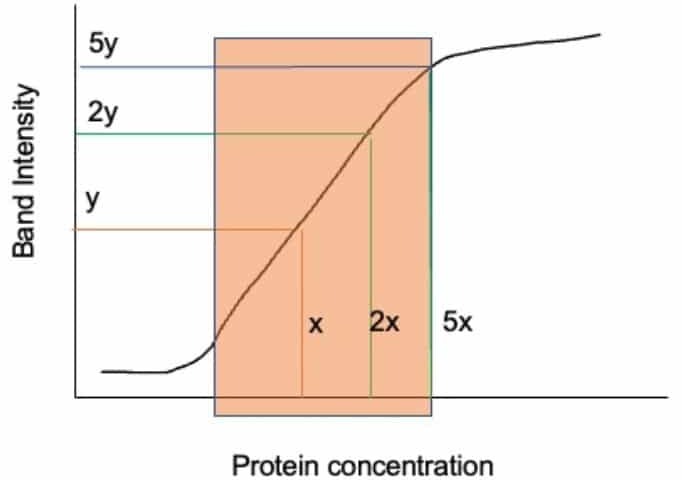
For western blot quantification, you must ensure your image was captured in a manner sensitive enough to detect a change in what we call the “linear range”. If you are not working within the linear range, (i.e., if your detector or film can no longer absorb photons, it is saturated and you have hit your limit of detection) you are losing data. You definitely don’t want this!
Luckily, many digital capturing systems come with software designed to detect saturation and automatically correct the exposure thereby ensuring your data analysis can be quantitative. So take the time to formally review your software and see if this is the case.
However, if your lab is a bit more old school and uses film to detect antibodies in a western blot, a more manual approach will be needed, as film can easily become saturated.
To prevent saturation on film, you must empirically determine your linear range as shown in Figure 1. To do this you need to serially dilute a known amount of your protein lysate, perform your Western, and plot the quantitated density of these Western blot bands (on the x-axis) against the amount you know you loaded (on the y-axis). You should then find a linear line indicating where data is captured quantitatively- indicated by the orange box in Figure 1. This is where you want to work!

To fix any saturation problems and ensure you’re working within this range, you can then:
- load less total protein;
- use a higher primary antibody dilution;
- reduce the film exposure length.
And yes, you do need to go through this process for each antibody separately!
2. Background Subtraction
Sadly, most western blots and image captures are infiltrated with random imperfections. For example, the left side of the blot may be a little darker (higher background) or your less abundant band might have more background or an annoying dark scratch. These differences can cause inconsistencies in your results.
Many software packages can calculate the background around your band of interest, using some variation of the “rolling ball” method (again, take time to understand your software).
The background should be subtracted from both your bands of interest and the bands you are normalizing to. Perfection here is challenging; just do your best and let statistics tell you the real answer when you are all done (Step 4).
3. Normalize Your Western Blots
Variability happens in western blotting. You may have transferred unevenly, loaded too little in one lane, or maybe no one believes your data and they just want to see that you controlled for everything you could. This is why normalization exists.
Normalizing Using Housekeeping Genes
To control for variability we often normalize to another band in the blot, typically an abundant protein that we don’t expect to change in our experiment. These control proteins are often produced from a housekeeping gene such as actin, beta-tubulin, or a chaperone protein like Hsp70
However, as many of us have discovered, these proteins can unexpectedly change in our experimental conditions. And, due to their high abundance, they can also be challenging to acquire in the linear range.
Normalizing Using Total Protein
The problems associated with housekeeping genes are why some people choose total protein as the loading control. Here the membrane is stained with a total protein stain such as Ponceau S and the entire lane is used for quantification.
Total protein measurements have two main advantages over housekeeping genes.
- They are less susceptible to changes in expression.
- They are less sensitive, meaning they have a good linear range.
4 Steps to Normalize Your Protein Band of Interest
Step 1: Determine the background-subtracted densities of your protein of interest (PI) and the normalizing control (NC).
Step 2: Identify the NC that has the highest density value.
Step 3: Divide all the NC values by the highest NC density value to get a relative NC value. If you do this correctly the highest density value will be 1, and the others a fraction of it (e.g., 0.97).
Step 4: Divide all of your PI values by the relative NC values in their respective lanes.
4. Graphs and Stats Are Needed for Western Blot Quantification
Once you have obtained normalized values you are ready to crunch the numbers and view your results. Typically for quantitative experiments, you should perform each condition in triplicate (preferably on the same blot).
After you have determined your normalized values for each replicate, you can determine averages, p-values, fold changes in protein levels and graph your results.
Then, you have to perform the entire experiment three biologically independent times to ensure that your results aren’t a fluke and are indeed repeatable.
Western Blot Quantification Roundup
Western blot quantification can give you the ability to study changes in protein levels. However, to get meaningful results quantification requires careful consideration of background, saturation, normalization, and statistical analysis.
We hope this guide has helped you understand what you need to perform western blot quantification. In the end, never underestimate the power of quantitative analysis. Your real results and the conclusions you can draw from them might just surprise you. Good luck!
Want all your Western blot buffer recipes, an ECL reagent recipe, and an easy protocol all in one place and on hand? Download our free Western blot cheat sheet.
Additional Resources
BioRad. Image Analysis and Quantitation for Western Blotting. Accessed 27 June 2022
Originally published March 2015. Reviewed and republished, July 2022.


