

A Nobel Prize-winning breakthrough
Superresolution microscopy has stepped into the limelight earlier this year when Eric Betzig, Stefan Hell and William Moerner were awarded the Nobel Prize in Chemistry for their work on breaking through the diffraction barrier of fluorescence microscopy.
The part Eric Betzig played in this ground-breaking achievement was the invention of Photoactivated Localization Microscopy (PALM) along with his colleague Harald Hess. PALM imaging involves pinpointing individual molecules in a sample and then reconstructing a superresolution image from hundreds of frames.
But how does PALM work? And what use can PALM microscopy be to you? In this introduction to PALM, we will explain the concept and technical side of PALM imaging.
Photoactivated Localization Microscopy Imaging: How Does it Work?
PALM achieves nanometre-scale resolution by exploiting the properties of photoswitchable fluorophores. Exposing the fluorophores to a certain wavelength results in a change in emission spectra – photoactivatable and reversible photoswitchable fluorophores become fluorescent, and reversible photoswitchable fluorophores change from one fluorescent state to another. There will be more about this in the second part of this article series when the different options available will be discussed in more detail!
The basic principle behind PALM is that a low-power activating laser beam will ‘stochastically’ convert the fluorophores so that only a few will be in their “active” or “on” state. These molecules are then imaged by a high-power illuminating laser beam to immediately convert them back to their “inactive” or “off” state, e. g. by photobleaching. This process of activation and inactivation is then repeated over thousands of frames to ensure all molecules have been imaged. Figure 1 shows the different steps involved in PALM imaging, and this is available as an interactive tutorial at ZEISS online campus.

Figure 1. How PALM works. An interactive tutorial is available at ZEISS online campus. Images reproduced with permission from ZEISS.
But how does this result in a superresolution image? The light emitted by each fluorophore in the image is subject to the diffraction limit of light microscopy, meaning that if many fluorophores fluoresce at the same time they cannot be resolved below 300 nm, and as a consequence, the image would appear ‘blurred’,. However, by only exciting the fluorophores stochastically in a controlled way, we can ensure that each dot of fluorescence only comes from one fluorophore.
Presuming that each signal stems from one molecule we are able to determine its center of mass, which can be accomplished with much higher precision than the diffraction-limited point spread function (PSF) allows. To this end, the center of each circle of fluorescence is determined by fitting the PSF intensity to a mathematical model such as a Gaussian distribution. This localizes the x,y position of the original molecule to within tens of nanometres. By processing the entire stack of images from a dataset, a co-ordinate map containing the location of every molecule that has been sampled can be compiled. If the precision is plotted at each localized site a superresolution image of your sample is reconstructed (Figure 2).
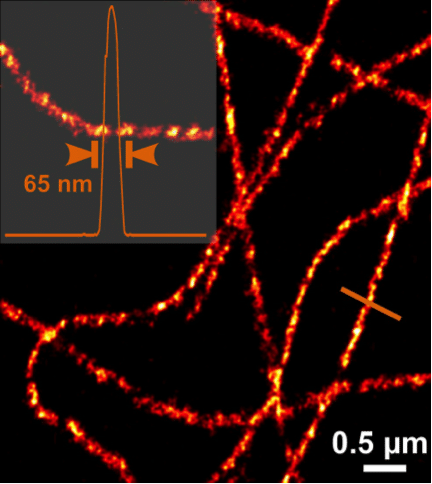
Figure 2. The super-resolving power of PALM microscopy: Image of the cytoskeleton taken on ZEISS Elyra. Image reproduced with permission from ZEISS.
How accurately the position of each molecule is able to be determined from its diffraction limited PSF depends on several different factors. The main one is the number of photons collected from each molecule: the more photons, the higher the precision will be. It is therefore important to select a fluorescent molecule with high photon emission rates.
How Small Can Photoactivated Localization Microscopy See?
So what can you look at with PALM microscopy? In theory, PALM can localize to infinite precision, if the number of photons was unlimited. Of course in a biological sample, this is not the case. But with high labeling efficiencies and samples with a good signal-to-noise ratio (SNR), localization precisions down to 10 nm laterally can be achieved.
Initially, PALM was used alongside total internal reflection fluorescence (TIRF) microscopy, which is ideally suited for imaging at the single-molecule level due to reduced background fluorescence and hence outstanding SNR. This only allowed, however, visualization of membrane proteins and structures close to the membrane.
Very excitingly, new technology has allowed the development of 3D PALM systems that have increased resolution in z and allow for a great level of detail to be determined about 3D structures within the cell (Figure 3).
Localization precisions in z of 80 nm can be routinely obtained. It should be noted that localization precision is not synonymous with resolution. To obtain a resolution equal to the localization precision, the labeling density has to be twice as fine according to the Nyquist criterion. To resolve proteins to 20 nm, their spacing must hence be around 10 nm.

Figure 3. Detailed 3D structure of alpha-tubulin captured on ZEISS Elyra 3D PALM system. Image reproduced with permission from ZEISS.
All of this technical information might seem overwhelming to start with, but it is important to understand the theory behind the imaging before embarking on a new technique. This can help prevent mistakes in both the experimental design and interpretation of the data.
In the next article, we will talk about how to choose which fluorescent protein to use and other tips and tricks for Photoactivated Localization Microscopy sample preparation.
Originally published January 22, 2015. Reviewed and updated on December 18, 2020.


