Polarising microscopy involves the use of polarised light to investigate the optical properties of various specimens. Although originally used predominantly in the field of geology, it has recently become more widely used in medical and biological research fields too.
Polarising light microscopy is a contrast-enhancing technique to allow you to evaluate the composition and three-dimensional structure of anisotropic specimens. It uses polarising filters to make use of polarised light, configuring the movement of light waves and forcing their vibration in a single direction.
What Is Polarised Light?
A regular light microscope uses unpolarised white light. This is the type of light that we see, and its waves vibrate in random directions. Polarised light, however, has waves that vibrate only in one direction, and cannot be seen by us normally.
This type of light is used in polarising microscopy to improve image quality when examining birefringent (doubly-refracting), anisotropic materials. Anisotropic substances are “direction-dependent” – that is, they do not behave the same way in all directions. One such example is wood, which breaks more easily in a direction along its grain than against it. Steel, on the other hand, is isotropic and behaves the same way in all directions.
How does this translate to optical terms? In general, most liquids and gases are isotropic and have the same optical properties in all directions: i.e., they have one refractive index. By contrast, most solid materials are anisotropic. Their optical properties vary depending on the orientation of incident light (light that falls on a surface), and they have numerous refractive indices.
The Key Components of Polarising Light Microscopy
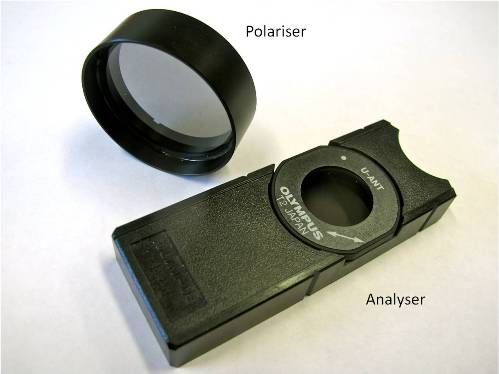
Although you can buy polarising microscopes ready for use, many scientists simply have their traditional light microscope modified in order to use them for examination with crossed-polarised light (where the polarisation directions of the polariser and analyser are 90 degrees apart to produce extinction: i.e., when the field of view becomes as dark as possible). Generally, you will need two additional for polarising microscopy:

- Polariser: This filter can be manually rotated and is placed somewhere in the light path beneath the specimen, usually below the stage. It is aligned horizontally (in an east-west position), and is composed of particles arranged in one direction only. Consequently, it only allows light waves vibrating along their polarising axis to completely pass through, while absorbing light waves that move in other directions.
- Analyser: This is another polariser aligned vertically (in a north-south position) between the objective lenses and eyepieces. Most student microscopes have an analyser that is fixed in place, usually mounted above the stage. This makes it easier to achieve crossed polariser alignment (where the polarisation directions of the polariser and analyser are 90 degrees apart). Depending on the microscope, however, you may be able to rotate the polarise, or push it in or out of the light path, according to your needs.

How Does Polarising Light Microscopy Work?
Light waves are omnidirectional and will vibrate out at an angle perpendicular from the direction in which the beam is transmitted. So when you turn on the microscope’s light source, light moves upwards and is polarised to move in one direction by the polariser. This causes all light passing through to be blocked, except for those light waves that vibrate in parallel with their privileged (light passing) directions.
Light waves then project through the specimen, and vibrate in an east-west position. They will continue upwards undisturbed if the analyser is not in use.
When the analyser is pushed in, only light moving in a north-south position can to move through. Placing a second polariser (in this case, the analyser) in the light path, rotated 90 degrees to the axis of the first, will subsequently block all light. Because all of the light was already polarised to move in an east-west position only, no light can pass. The polarisers are now “crossed,” and the viewer will only see darkness.
Uses of Polarised Light Microscopy
You can use this technique to highlight the features of various substances such as crystals, fibers, and minerals, which can aid in their identification. When both filters are aligned in the light path, they are at right angles to each other. When adjusted, however, light is able to pass through the filters at different angles, allowing you to see different aspects of the specimen.
Light will either travel through an isotropic specimen, making it appear dark, or be reflected by an anisotropic specimen, making it appear bright in contrast. Since the components of a birefringent, anisotropic sample are aligned at different angles, rotating the polariser (or the rotating stage, if your microscope has one) will cause different parts to “black out” at different times.
Some birefringent materials that are commonly evaluated by polarising light microscopy include:
- Bone
- Teeth
- Striated muscle
- Urine crystals
- Gout crystals
- Amyloid
How To Examine A Specimen Using Polarising Microscopy
- Set up Kohler illumination
- Rotate the 10x objective lens into position on the nosepiece.
- If necessary, push the analyser completely into place so that it is aligned in the light path.
- Before placing the specimen on the stage, gradually rotate the polariser until the field of view becomes as dark as possible (extinction).
- Rotate the polariser (or the rotating stage if your microscope has one) approximately 90, 180, and 270 degrees, and then back to the original 0 degree position. As you look through the oculars, the field will appear bright when the privileged directions of the polariser and analyser are parallel. It will become progressively darker as you rotate one of the filters to a 90 degree angle (crossed polarisation).
- Now place the specimen on the stage and repeat the above step. If your substance in question contains birefringent material, you will see it either black out or brighten as you rotate the polariser.
If you follow these steps, you can evaluate and characterise the features of the substance in your specimen, helping you to identify its nature.
Have you tried polarising microscopy before? What did you think?


