
If you want to see in real time what is going on inside your cell then you should be performing live-cell imaging. Live-cell imaging techniques allow real-time examination of almost every aspect of cellular function under normal and experimental conditions.
With all live-cell imaging experiments, the main challenges are to keep your cells alive and healthy over a period of time while they are on the stage of the microscope. Your cells must be kept in a temperature- and pH-stable environment, which is usually achieved by using a chamber where the cells are placed, or larger environmental chambers around the microscope itself. During relatively long-term experiments, the gaseous and nutrient requirements of your cells also have to be taken into consideration.
The growing number of live-cell imaging techniques means you can obtain greater amounts of information without stressing out your cells (or yourself). In order to make the choice of which technique is right for you, we have put together a brief guide to the three most common methods for live-cell imaging and have discussed their issues and advantages to help you choose the right one for your needs.
Widefield and Optical Sectioning Microscopy
Widefield Fluorescent Microscopy
One of the most basic techniques for live-cell imaging is widefield fluorescent microscopy. Standard inverted research grade microscopes can yield valuable results if you are imaging adherent cells, large regions of interest (such as organelles) or very thin tissue sections (less than 5 ?m). In widefield, a CCD camera is usually used to capture images and the epi-fluorescence illumination source can be a mercury lamp, xenon lamp, LED’s, etc. Each of the light sources require carefully matched interference filters for the specific excitation and emission wavelengths of your fluorophore of interest.
With widefield microscopy, your specimen is only exposed to excitation light for relatively short time periods as the full aperture of emission light is collected by the objectives.
Widefield and Contrast
Widefield fluorescence microscopy can be used in combination with other common contrast techniques such as phase contrast and differential interference contract (DIC) microscopy. This combination is useful when performing live-cell imaging to examine general cell morphology or viability while also imaging regions of interest within cells.
The combination of contrast and fluorescence microscopy is usually carried out in two separate image captures, using the transmitted light for contrast followed by epi-fluorescence imaging for detection of fluorophores. The two images are then combined in post-image-analysis. It is possible for you to capture both contrast and fluorescence simultaneously, but this requires an advanced setup of either two separate cameras or a split-view camera adapter. With confocal techniques, both contrast and fluorescence images can be acquired simultaneously.
Disadvantages
One of the main drawbacks of widefield fluorescence microscopy is that secondary fluorescence (or autofluorescence) outwith the region of interest is also captured by the camera. With this technique, the entire specimen is illuminated, and light that is above and below the focal plane will be seen and captured. This background fluorescence can interfere with and mask the emission signal from your target. This problem is compounded if you are interested in viewing specimens with a thickness greater than 2 ?m. The resolution and detail in the axial (Z) dimension can be somewhat obscured by this background.
Widefield microscopy has its uses if you wish to perform live-cell imaging to examine cell movement, organelles or thin tissue sections, however, if you are interested in spatial and temporal resolution of specific proteins or molecules within cells, then it is recommended to use one of the confocal techniques highlighted below or consider optical sectioning.
Optical Sectioning
Optical sectioning can alleviate blurring since only information from the region that corresponds to the objective depth of field is extracted. This technique also enables volume rendering of stacks to generate three-dimensional images, Aside from using confocal techniques, optical sections can also be obtained in widefield fluorescence microscopy using structured illumination. Learn more about optical sectioning over at the ZEISS Campus, where you can find an interactive tutorial describing the principles behind this technique.
Confocal Laser Scanning Microscopy
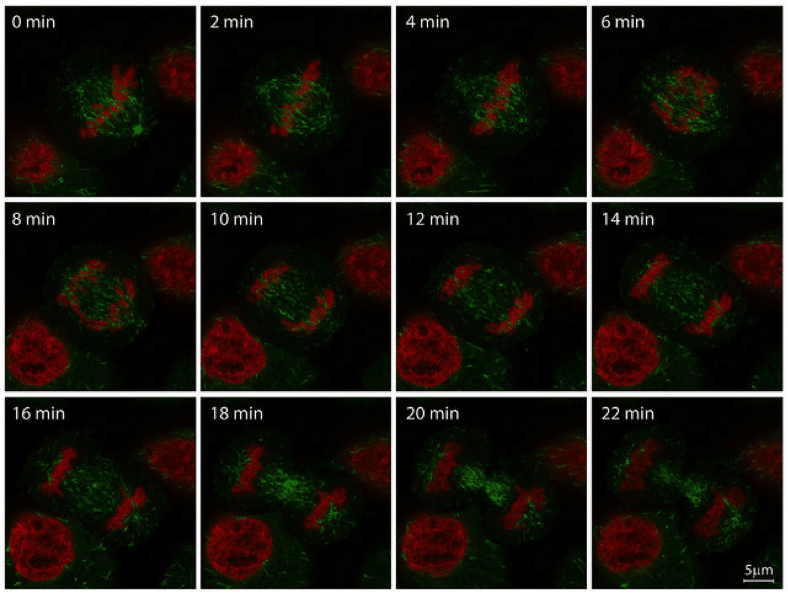
Figure 1: Mitosis in HeLa-Kyoto cell line, imaged with ZEISS LSM 880 with Airyscan. Histone 2B (H2B, red, mCherry) and microtubule end binding protein 3 (EB3, green, EGFP). Image reproduced with permission from ZEISS flickr page.
One of the main advantages of confocal laser scanning microscopy (CLSM) is the ability to eliminate out-of-focus light and information. It is also possible to obtain optical serial sections from thicker specimens. A conjugate pinhole in the optical path of the confocal microscope prevents fluorescence from outside of the focal plane from being collected by the photomultiplier detector or imaged by the camera. In CLSM, a single pinhole (and single focused laser spot) is scanned across the specimen by the scanning system. This spot forms a reflected epi-fluorescence image back on the original pinhole. When the specimen is in focus, the fluorescent light from it passes through the pinhole to the detector. Any out-of-focus light is defocused at the pinhole and very little of this signal passes through to the detector meaning that background fluorescence is greatly reduced. The pinhole acts as a spatial filter for the emission light from the specimen.
If your specimen still has a high background or auto-fluorescence you can decrease the size of the pinhole to block out this unwanted light and can increase the signal-to-noise ratio of the fluorophores from the target. However, this comes at a cost as it will also decrease the signal from your region of interest, so is something to bear in mind for weak signals.
Get up close and personal
Another advantage with CLSM is that the magnification of your region of interest can be adjusted electronically without having to change the objective. You can alter the image spatial resolution by adjusting the sampling time of the scanning laser. This is known as the ‘zoom factor’. An increase in the zoom factor reduces the scanning rate of the laser and the area of the specimen which is being scanned. This results in an increased number of image samples across the scan which, in turn, increases the spatial resolution and magnification as captured by the detector and display. When low magnification (and low numerical aperture) objectives are used to image your specimen, then the zoom factor matches the resolution of the digital image with the optical resolution of the microscope.
Disadvantages
As the CLSM uses a line-by-line sweep to build up the image (known as ‘raster-scanning’), this can be a relatively slow process, sometimes taking a few seconds or longer for each image capture. The intense laser light used in CLSM can induce phototoxicity in living cells. The time that the laser light is focused on any one section of the specimen (known as the ‘dwell-time’) is usually only a few microseconds. Therefore, the intensity of the laser must be of sufficient power to excite the fluorophores, but this can sometimes lead to complete saturation (or photobleaching). For live-cell imaging over relatively long periods, the power of the laser should be reduced as much as possible to prevent this phototoxicity. There is a fine balance between producing a useful image and data, while ensuring that your cells (and fluorophores) remain protected as much as possible from these toxic and bleaching effects.
The zoom factor of a CLSM should also be used with caution in live-cell imaging as the increase in excitation laser light being focused on a smaller region of interest can lead to phototoxicity and photobleaching of a region.
Many of these disadvantages of CLSM have been eased or overcome with new technology, such as with ZEISS Airyscan detector. You can find out more about the principles behind Airyscan over at ZEISS.
Spinning Disc Confocal Microscopy
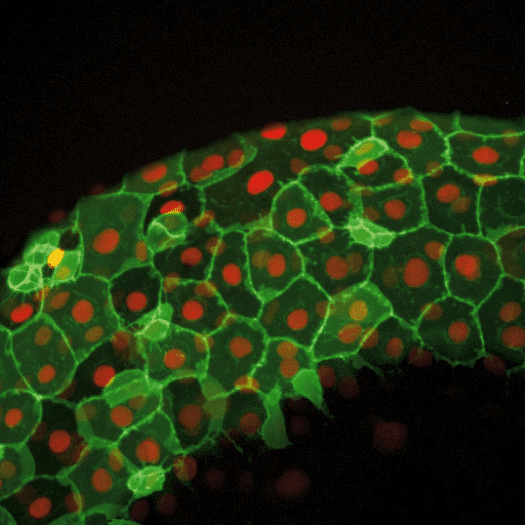
Figure 2: Image from a Zebrafish embryo development time-lapse. Image captured with ZEISS Cell Observer SD. Image republished from ZEISS Flickr page.
Spinning disc confocal microscopy (SDCM) utilises a ‘Nipkow Disc’ which is a mechanical opaque disc which has a series of thousands of drilled or etched pinholes arranged in a spiral pattern. Each illuminated pinhole on the disc is imaged by the microscope objective to a diffraction-limited spot on the region of interest on the specimen. The emission from the fluorophores passes back though the Nipkow disc pinholes and can be observed and captured by a CCD camera. The effect of the spinning disc is that many thousands of points on the specimen are simultaneously illuminated. Using SDCM to examine a specimen means that real-time imaging (30-frames-per-second or faster) can be achieved, which is extremely useful if you are looking at dynamic changes within living cells over a wide spectrum of time-scales.
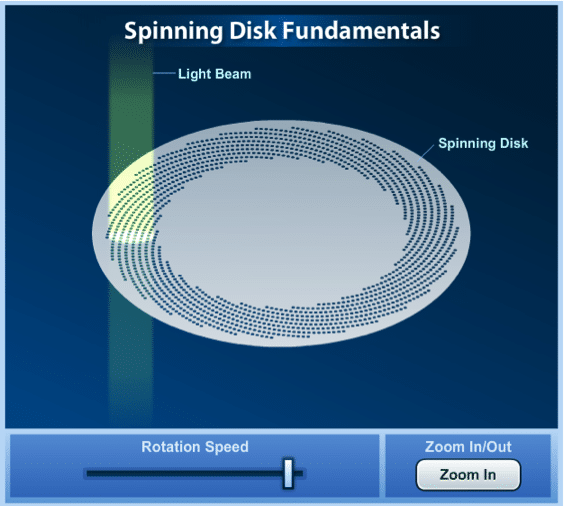
Figure 3: The Nipkow disk in a spinning disc confocal microscope. For an interactive version and more details on the spinning disc visit ZEISS Campus.
More recently, modified Nipkow discs have been developed whereby the pinholes are replaced by slits, resulting in a greater transmission of light. These slit discs have varying slit widths which match the numerical aperture and magnification of the objectives as well as taking into account the thickness of a sample. A high-resolution image can be viewed and captured using objectives ranging from 10X to 100X magnification.
The main advantage of SDCM is that you can perform real-time or high-speed live-cell imaging without a loss in resolution.
Disadvantages
One of the main disadvantages with SDCM is that light scattered or emitted from out with the focal plane can still reach the CCD camera by travelling back through adjacent pinholes (this is known as ‘pinhole crosstalk’). With thicker specimens, there is a consequent increase in the background signal.
There is also a relatively low level of light which is transmitted though the disc; this can be a problem if imaging low fluorescence-intensity specimens and fluorophores. You can overcome this to some degree by reducing the speed of the disc to increase the exposure time, but this negates the real-time advantage of using SDCM.
Most discs will have an anti-reflective coating and even taking into account the thousands of pinholes in a disc, over 90% of the illuminating light does not pass through a disc. Even with anti-reflection, light can still be reflected from the surface of the disc which results in a high background.
Cutting-edge and Emerging Live-Cell Imaging Technologies
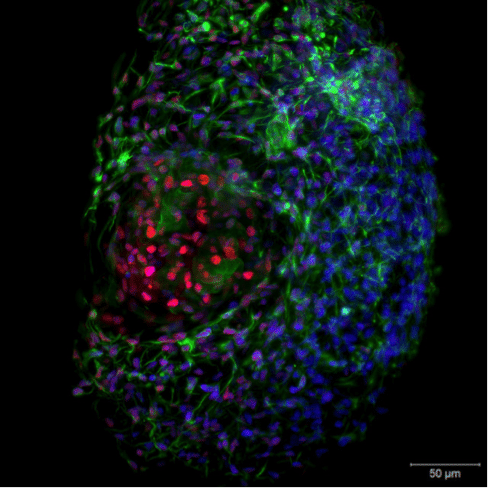
Figure 4. Live-cell imaging of a 3D Hepatocyte spheroid. Image captured with ZEISS Lightsheet Z.1. Image republished from ZEISS Flickr page.
With light-sheet fluorescence microscopy (LSFM, or SPIM) it is already possible to perform live-cell imaging on whole embryos, tissues and cell spheroids in vivo in a gentle manner with high temporal resolution and in three dimensions (Figure 4.). You are able to track cell movement over extended periods of time and follow the development of organs and tissues on a cellular level. The next evolution of light-sheet fluorescence microscopy, termed lattice light-sheet microscopy as developed by Eric Betzig (Nobel Prize Laureate 2014 for PALM super-resolution microscopy) will even allow live-cell imaging with super-resolved in vivo cellular localization capabilities.
You can find more information on live-cell imaging, please see this page on ZEISS Campus for a general overview of imaging systems, techniques and digital imaging considerations for live-cell imaging.
Or if you want to find out more about the different live-cell imaging techniques highlighted above, please see this page on ZEISS Campus. Also check out the upcoming webinars from ZEISS on ZEISS LSM 800 with Airyscan – Your Compact Confocal Power Pack and In Vivo and Cleared Tissue Imaging for Light-sheet Microscopy.