
How many items in your lab could kill you? Probably more than you think!
Labs are dangerous places, and even the most careful workers can have accidents. To help prevent workplace accidents, you should conduct a yearly Hazard Identification and Risk Assessment (HIRA).
You probably don’t want to conduct these risk assessments, but you need to. We’ve made it simple by breaking it down into six essential steps to carry out a HIRA assessment.
How to Conduct a Risk Assessment
1. Assemble a Team and Tour the Labs
Before you even begin, assemble a team to conduct the risk assessment and gather relevant information.
Choose a free resource to help you move forward
POSTER
Fire Diamond Poster
EBOOK
Guide to Lab Safety
They should represent the people in the lab and make informed decisions about the overall safety of the lab on their behalf.
This team can also help provide valuable feedback when particular concerns have been raised by lab personnel and ensure problems are addressed.
The risk assessment team will:
- Tour the lab with their eyes peeled for potential hazards.
- Assess whether safety measures are followed by observing people’s work.
- Ensure all safety equipment is in place, in date, and accessible.
- Meet regularly to evaluate lab safety concerns.
- Organize safety training sessions.
- Maintain training records.
- Ensure everyone has access to all safety protocols and chemical documentation.
They are also entrusted with the traumatizing task of making a detailed list of accidents and near misses that occur.
Is something bothering you in the lab? Does a piece of equipment look faulty, but you aren’t sure?
Talk to a member of the risk assessment team. They’re always more than happy to talk to you about your safety concerns in the lab.
2. Hazard Identification
Identify hazards or potential incidents. There are a thousand things that could go wrong in a lab—and you must anticipate and list them all.
Because of their abundance, it’s best to organize these by categories such as:
- Procedures.
- Instruments.
- Areas.
- Chemicals.
- Hazard type.
Here’s an example for each of these classes:
- Flash-cooling competent cells.
- Using the UV transilluminator.
- The gel area.
- Handling formaldehyde.
- Tip hazards.
And it’s also good practice to label items with appropriate hazard pictograms to make any potential threats immediately obvious. You can do this on your lab door as well, like in Figure 1.

Plus, you can label individual items like lasers, transilluminators, chromatographs, and reagents.
Remember, hazard identification and risk assessments (HIRA) are ongoing processes, and it will take time to generate and collate all this safety documentation. Baby steps.
3. Risk Assess These Hazards
Deduce the risk level of each of the hazards you’ve listed and prioritize them according to which is more dangerous and/or more likely to happen.
You can use a table known as a risk matrix to help determine the risk level (Figure 2).
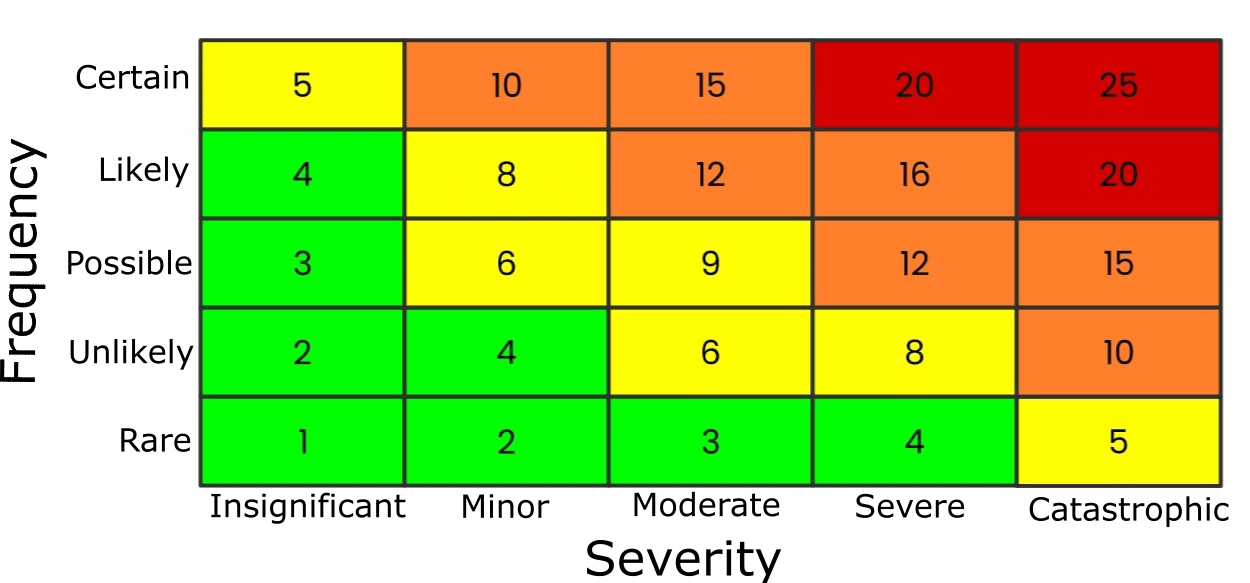
It tabulates two things:
- The likelihood of an accident.
- The severity of the consequences.
Both factors are given a rating from 1–5, and the subsequent result, the product of the frequency and severity scores, places the risk in one of the following categories:
- Extreme risk (20+ | red).
- High risk (10-19 | amber).
- Medium risk (5-9 | yellow).
- Low risk (<5 | green).
Risks that fall in the extreme category are a high priority. Make plans to eliminate the risk immediately. This is usually achieved by eliminating the offending item, procedure, chemical, etc., from the lab altogether.
Note that the scale is arbitrary, but use the same scale for all risk assessments in your lab. The boundaries between the categories are also arbitrary but can be informed by common sense and past incidents and accidents.
And when it comes to hazard identification, think worst-case scenario. For example, the laser “could cause blindness,” faulty electrics “could cause electrocution,” etc. Such hazards are possible and severe but extremely unlikely.
Low-risk items pose no significant problem. So no mitigation procedures are required.
For everything in between, there’s step 4.
4. Plan Control Measures
Now that you’ve identified the risks and likelihood of each hazard occurring, set appropriate control measures to prevent, or reduce, the chance of an incident or accident.
There are five control measure categories. In decreasing order of effectiveness, these are.
- Elimination control.
- Substitution control.
- Engineering control.
- Administrative control.
- Personal Protective Equipment (PPE) control.
Let’s look at these controls in more detail and provide examples.
Elimination Controls
When the risk is extreme, eliminate the hazard from the lab, as mentioned. For example, no lab users are permitted to use hydrofluoric acid.
Substitution Controls
Find a safer alternative to the hazardous item, procedure, chemical, etc., you have identified. For example, using SYBR™ Safe instead of ethidium bromide.
Engineering Controls
Physically limit work to a specific area. For example, intercalating dyes may only be handled in the gel room.
Other good examples are biosafety cabinets—enclosed ventilated laboratory workspaces designed to protect users from exposure to infectious biological agents.
Administrative Controls
Establish rules and authority that govern specific procedures and equipment. For example, keeping the key to turn on a laser in a locked box and nominating a responsible person to take charge of it.
Note that your lab access card keeps you and others safe by preventing unauthorized access to your potentially hazardous work area.
Note also that training can also serve as an administrative control.
PPE Controls
Standard PPE items, lab coats, gloves, and goggles, should be worn at all times.
However, certain risks can be reduced or eliminated by wearing additional PPE items. For example, wearing ear defenders when using a sonicator. Or wearing a face shield when using liquid nitrogen.
5. Record Keeping
Now you have identified all the hazards, assessed their risk, and introduced controls to mitigate them, write up the risk assessments.
Remember earlier when we recommended organizing risks into procedures, chemicals, instruments, etc.?
Write them up like that.
Tabulate Hazards, Their Consequences, and Controls
At this point, you have a lot of information to collate. The best way to organize them is in a simple 3-column table containing columns for hazards, consequences, and controls.
For example, for using a liquid chromatograph, you could write something like Table 1.
Table 1. Example risk assessment for using a liquid chromatograph.
Hazard | Consequence | Control |
Electrical appliance | Potential for electrocution | Ensure equipment is visibly free of defects before use. Ensure equipment has undergone PAT. Do not service the instrument or attempt unsanctioned procedures or modifications |
Sample | Potential for chemical and apparatus-induced injuries. E.g., burns and cuts | Complete risk assessment for sample work-up procedures and read/generate COSHH forms for all reagents used |
Chemical | Samples could contain potentially hazardous chemicals | PPE worn at all times and check COSHH forms of sample chemicals for any necessary precautions |
Helium cylinder | Potential for blunt-object trauma in case of cylinder falling. Potential for a compressed gas explosion | Ensure the cylinder is secured in place with a chain. Ensure the cylinder regulator is in date. Do not go above specified instrument pressures (5 – 8 PSI) |
COSHH, Control of Substances Hazardous to Health; PAT, portable appliance testing; PSI, pound per square inch. | ||
Write Up the Risk Assessment
Make a risk assessment template to save time, and share this responsibility with your team. In the template, include:
- A title.
- The author.
- The date the risk assessment was written.
- A short description of the procedure, instrument, chemical, etc.
- The risk matrix and score.
- A table of hazards, consequences, and controls.
- A person who is responsible for training.
- A place for lab users to sign and date the form.
Make all the risk assessment reports easily accessible to all lab members. It’s a good idea to:
- Store hard copies in a ring binder in the lab.
- Store soft copies online.
Before anyone works with something above the low-risk category, get them to read and sign the risk assessment.
Note that where instruments are concerned, you can combine the risk assessment with its Standard Operating Procedure (SOP) if there is one.
And be sure to update records when new information is available. The best way to keep the records up to date is to set up a staggered annual review for all of them. Check if anything has changed regarding a given risk in the lab and update the risk assessment accordingly.
Other documentation can include:
- Photographs of bad safety practices.
- Training records.
- Chemical and Equipment Inventories.
- Lab inspection reports.
Having all this on hand to review will enable the risk assessment team to gradually uplift the lab.
6. Implementation and Review
Now that you have completed all these steps, it’s time to implement them!
New preventative measures should be implemented only once the risk assessment team obtains approval from the principal investigator or lab manager.
Conduct regular meetings after implementing any safety measures to review their efficacy. Also, seek feedback from people in the lab to see if the procedures work for them. They are the people we seek to protect, after all.
I admit, there’s a lot of paperwork when conducting a HIRA assessment, but it’s better to drown in paperwork than for one of your team members to be hurt—or worse—involved in a nasty lab accident.
In the UK, paperwork is made a bit simpler because there is a standardized system called COSHH. It stands for Control Of Substances Hazardous to Health. Check out the Health and Safety Executive website for further details.
In other countries, please adhere to local roles and paperwork. Or check out your government’s relevant health and safety agency for further information.
KABOOM! Risk Assessments in Summary
And that’s how to conduct a risk assessment. This short article belies a lot of work. We’ve covered identifying risks, how to organize them, and setting up appropriate controls.
Plus, we now know how to write up a risk assessment. Not bad, eh?
We’ve also taken a look at what types of controls are available.
That’s plenty to be getting on with.
And remember—risk assessments are continuous processes.
Want to make hazard symbols clear to everyone to keep your lab and buddies safe? Download our free lab safety poster and pin it up in your lab. Or download our lab safety eBook for more comprehensive guidance.
Found this article useful? Got anything you want to add? Let us know in the comments section below.
Originally written by Zack Hades and published in October 2016. Revised and updated December 2022.
You made it to the end—nice work! If you’re the kind of scientist who likes figuring things out without wasting half a day on trial and error, you’ll love our newsletter. Get 3 quick reads a week, packed with hard-won lab wisdom. Join FREE here.


