Hope you had a heavy breakfast, because the first qPCR is going to take time. Did you remember to fill your coffee cup? There are a lot of intricacies in qPCR that will need your neural networks to be brisk.
How qPCR differs from traditional PCR
Unlike traditional PCR, qPCR measures the amplification of DNA in real-time. As the reaction proceeds, a graph is plotted by the software with cycle number vs fluorescence from the dye (e.g. SYBR Green). Expression fold changes can be measured accurately with qPCR. In contrast, traditional PCR does not produce a plot of expression changes as the DNA is amplified. Instead, the output of traditional PCR is amplified DNA that you run on a gel. On the gel, the intensity of the band provides information about the expression of DNA.
For accurate quantitation, qPCR requires more controls than traditional PCR. To generate accurate data, you need to measure the expression of a housekeeping gene (e.g. GAPDH), and the gene being tested in both control and experimental conditions. This requires more DNA and more controls. Addtionally, good pipetting skills are critical to get proper qPCR results. To account for pipetting errors, test DNA samples in triplicate.
Steps to get Ready
Planning is key
Plan out your qPCR-well setup based on how much DNA you have (e.g. 100 mL). You should identify how many plates you need, and make an arrangement of different types of wells. Differentiate the different types of based on:
Enjoying this article? Get hard-won lab wisdom like this delivered to your inbox 3x a week.

Join over 65,000 fellow researchers saving time, reducing stress, and seeing their experiments succeed. Unsubscribe anytime.
Next issue goes out tomorrow; don’t miss it.
- The presence or absence of DNA
- Housekeeping gene or gene being tested
- Control condition or experimental condition.
Plate Design
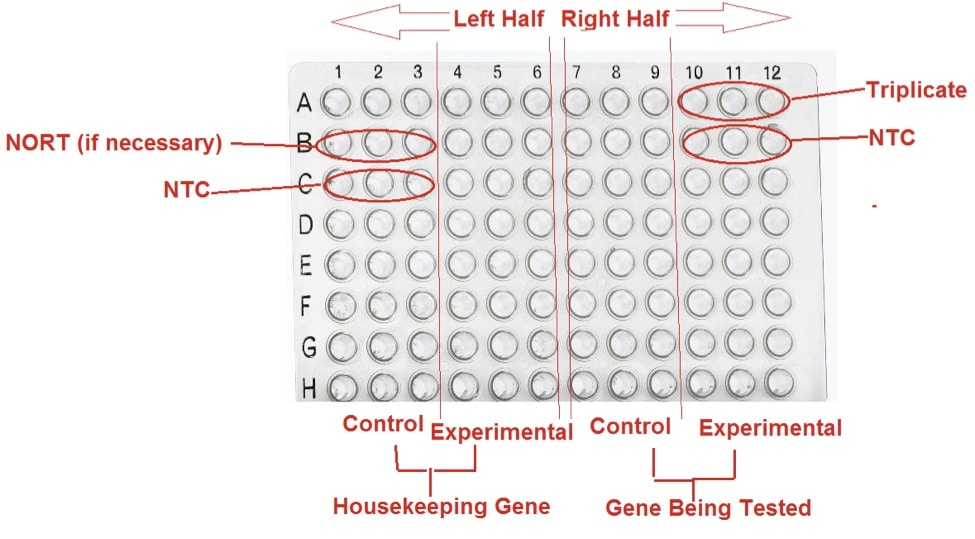
Run all your samples in triplicate (e.g. A10-A12) to ensure maximum reliability. Most qPCR plates have wells arranged in a 12×8 format (1-12, A-H). A good set up is to place triplicates for the housekeeping gene (Control and Experimental Conditions) on the left half (1-6) of the plate and triplicates for the gene being tested on the right half (7-12) of the plate.
If testing mRNA expression, add the NO-Reverse Transcriptase controls (NO-RT, e.g. B1-B3). There should be 1 triplicate of NO-RT with the housekeeping gene as the target.
To complete the design of your plate, you need to add the No Template Control (NTC, e.g. C1-C3, B10-B12). There should be 2 triplicates, one for the housekeeping gene and one for the gene being tested.
Prior to starting your first qPCR, design plates for multiple tests so you can group wells concisely. This will reduce the number of tests you will have to conduct.
Have your DNA ready
All of these controls mean you are going to need a lot of DNA! Once you have planned out your plates, you can decide how much DNA you need. Then make sure you dilute it to have enough DNA to conduct multiple tests.
Dilution
Dilution can be based on either a 1:5 or any other ratio. If you have different concentrations of DNA, dilute them all to the same concentration to keep your tests consistent and valid. The important thing is the Ct values should be less than 35; otherwise your results will be invalid. My recommendation is to run a sample test with the diluted DNA, observe the range in which the Ct values lie and adjust the dilution ratio accordingly. For reference, if your DNA’s concentration is halved (ratio = 1:2), your Ct values will increase by 1.
Be ready to retrieve your data
Once you have your data, you are going to want to move it to your own computer. You need to export the data in excel format and save it on a flash drive. Back it up to Google Drive, One Drive, or any other cloud based storage to be able to access it from anywhere in the world with an Internet connection.
qPCR set up takes time, but planning your experiment will make it smoother. The time you spend in planning will be made up in the end.
Want to know other time-saving tricks for qPCR? Stay tuned for my next article on how to easily calculate expression fold changes from qPCR Ct values using Excel.
You made it to the end—nice work! If you’re the kind of scientist who likes figuring things out without wasting half a day on trial and error, you’ll love our newsletter. Get 3 quick reads a week, packed with hard-won lab wisdom. Join FREE here.


