
There are many reasons you may want to study circulating, cell-free DNA (cfDNA) such as non-invasive prenatal testing to generate a molecular karyotype of an unborn fetus or for use in cancer to detect, diagnose and monitor the disease. Qiagen’s QIAamp circulating nucleic acids extraction kit is consistently cited in the scientific literature as the preferred method for purification of cfDNA. We concur, and our laboratory uses this kit exclusively for purification of cfDNA. The drawback of this method is that it requires a vacuum system that is cumbersome, messy, slow, and requires space and capital resources that conflict with the single use of the apparatus. For these reasons we created an alternative, centrifugation-based method that utilizes a benchtop clinical centrifuge.
Equipment Required for DIY Purification of cfDNA
The do-it-yourself system described here for purification of circulating, cell-free DNA requires three major components:
- A swing-out clinical centrifuge that can hold 50 mL conical tubes. We use an ELMI CM-7S, light-duty benchtop centrifuge that has a CM-6MT rotor. This unit is widely available at reasonable cost, easy to use, reliable, and a versatile lab tool given the broad selection of interchangeable rotors available with the instrument. We have not tested other centrifuges with the system described here.
- The QIAamp Circulating Nucleic Acids Kit that has been optimized for cfDNA extraction.
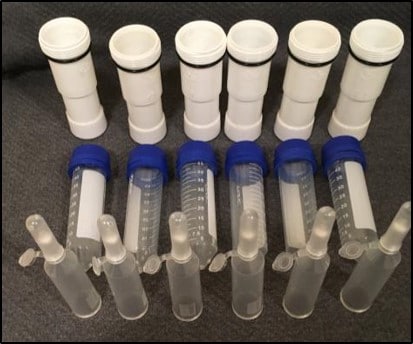
- A set of the reusable centrifuge adaptors pictured in Fig. 1.
What You Need for the Make-It-Yourself Bit
- a 1-1/4” PVC tailpiece commonly used in bathroom sink drains
- a find blade hacksaw
- a miter box
- 200 grit sandpaper
- a 1-1/4” plastic leg tip
- 5-minute epoxy
- Nunc 50-ml conical centrifuge tube
- a 7/8” hole saw
- 1/8” drill bit
- two 1-1/2” rubber slip-joint washers (3/16” thick)
Making the Outer Bucket
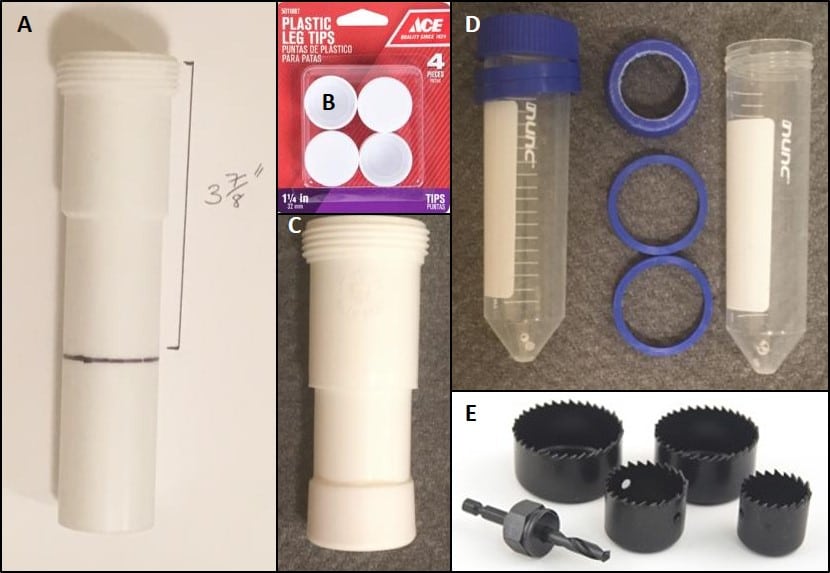
Fig. 2 provides a basic outline for construction of the outer and inner adaptor apparatus. Using a fine blade hacksaw and a miter box make a perpendicular cut that trims the PVC tailpiece to 3-7/8” (Fig. 2A). To make the bottom of the bucket, use the sandpaper to rough up the bottom of the tailpiece and then use a liberal coating of 5-minute epoxy to glue the leg tip to the bottom of the tailpiece. It is essential to clamp the piece securely while the epoxy sets. The finished outer bucket is shown in Fig. 2C.
Making the Inner Tube
The “inner tube” portion of the adaptor is made from a 50 mL conical centrifuge tube (Fig. 2D). We have had the best results with NUNC-brand tubes that have a very slight, but important, taper from the top to the bottom of the tube. Use a 7/8” hole saw to create an opening in the screw cap of the tube [Hole saws are modified drill bits (Fig. 2E)]. Then using a conventional 1/8” drill bit, create two drainage holes in the conical portion of the tube. These holes should be offset from the bottom of the tube to allow drainage of flow-through liquids. Lastly, place the two rubber slip-joint washers on the inner vessel. These provide cushioning at the start of a spin and they elevate the inner unit relative to the waste bucket to facilitate drainage of the flow through liquids into the waste container.
Choose a free resource to help you move forward
CHEAT SHEET
Guide to Pipette Cleaning
POSTER
Top 10 Tips for Proper Pipette Care
Assembling the Kit
Next you need to assemble the kit (Fig. 3.):
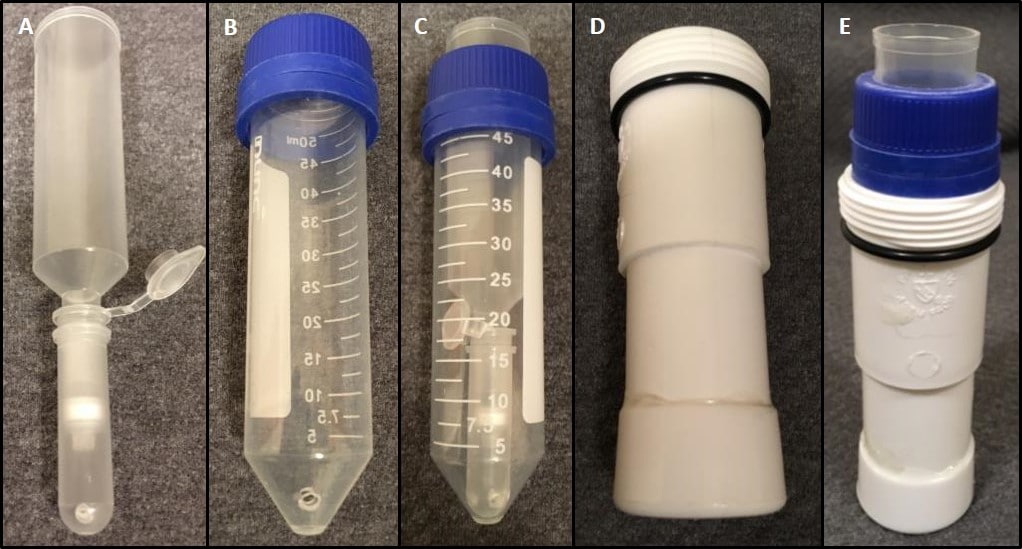
- Insert the disposable funnel and column supplied with the QIAamp kit into a collection tube that has two drainage holes (we used an ice pick/awl to perforate collection tubes) (Fig. 3A).
- These are then inserted into the inner tube created previously (Fig. 3C).
- Finally, insert the inner tube into the outer tube and waste collection container (Fig. 3E).
How It Works
During centrifugation, the funnel and column are supported by the collection tube and the force generated holds the assembly together and “pushes” the processed plasma through the collection column. The perforations in the collection and inner tube allow the flow-through to pass into the outer waste container. The column assembly is held securely upright by a modified 50-mL centrifuge tube that also has drainage holes for flow-through liquid (Fig. 2B & 2C). The outer adaptor unit provides a secure swing-out “bucket” for the column assembly and serves as the waste container for flow-through liquid.
Performing your DIY Purification of cfDNA
- Transfer processed plasma into the funnel.
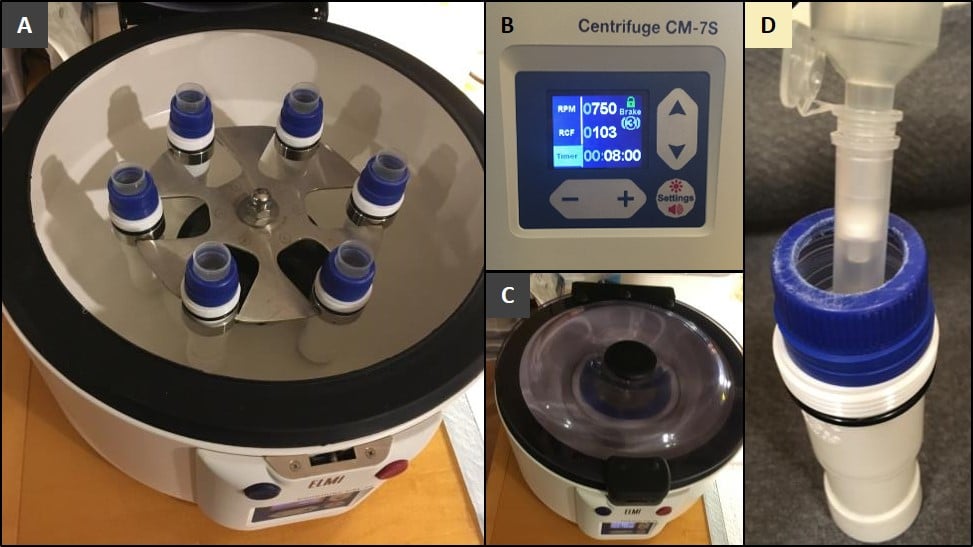
- Place the spin units into the centrifuge (Fig. 4A).
- Centrifuge your samples at 750 RPM for 8 min (Fig. 4B &C). The centrifuge may vibrate but should essentially be silent. If there is a lot of noise you should check to ensure your tubes are balanced correctly (you should weigh the entire tube together– outer, inner and with sample). If your tubes are balanced, you can reduce the speed to 500 RPM, but you may be required to spin for longer.
- Once centrifugation is complete, lift out the inner assembly of funnel and collection tube.
- Transfer and the column with bound cfDNA can be transferred to a fresh collection tube for further processing.
Some Tips and Tricks for Purification of cfDNA
- We have used our initial, prototype apparatus for 50+ extractions and they are still in perfect condition.
- We have found that plasma preps equilibrated to room-temperature pass through the column more quickly than preparations chilled at 4o C. It should only require about 5 minutes to equilibrate your preps to room temperature, but they can be left for several hours before spinning without having a detrimental effect on yield.
- We have found that the OXO-brand Good Grips Compact Dish Rack (Model # 1440480) is perfect for drying the cleaned tubes after a purification run.
- Most importantly, we have verified that the cfDNA collected by this procedure has the 165-bp fragment size that is characteristic of circulating DNA and that the DNA purified by this method is suitable for downstream next-generation sequencing applications. [1]
Note
Please always check that the owner of the centrifuge is happy for you to use your DIY apparatus in their centrifuge and speak to your lab safety officer to ensure they are happy that your DIY apparatus is safe before using.
For more tips, tricks, and hacks for getting your experiments done, check out the Bitesize Bio DIY in the Lab Hub.
References:
- Raymond CK. (2019) Focused size selection of cell-free DNA samples for liquid biopsy applications that rely on next-generation sequencing. BioTechniques, 67(4):188-91. doi: 10.2144/btn-2019-0071
You made it to the end—nice work! If you’re the kind of scientist who likes figuring things out without wasting half a day on trial and error, you’ll love our newsletter. Get 3 quick reads a week, packed with hard-won lab wisdom. Join FREE here.


