
Good organization is essential for keeping a lab in good running order. Databases of strains, plasmids, primers, and stocks are useful for keeping track of your materials, and allow your work to be continued easily after you’ve left the lab. In this article, I’ll talk about a few tools in Microsoft Excel that will make your databases easier to use and more efficient to navigate.
1. Drag and fill function
When setting up your database for the first time, chances are you’ll want to number each entry (or assign some other kind of identifying code). Instead of individually entering the log number, use the drag and fill function to auto fill these fields for you. To set up the pattern, enter two sequential values in adjacent cells.

Enjoying this article? Get hard-won lab wisdom like this delivered to your inbox 3x a week.

Join over 65,000 fellow researchers saving time, reducing stress, and seeing their experiments succeed. Unsubscribe anytime.
Next issue goes out tomorrow; don’t miss it.
Then, select these two cells, click on the little black box on the lower right hand corner of the selected area, and drag the box down to auto fill values for as many cells as you like. Unclick only when you have selected all of the cells you want filled. This function works for series’ of numbers, dates…basically any logical numerical sequence you can think of.

2. Format dates
One problem that can arise from having many people using one database is inconsistency in notation. You can avoid this to a large extent by pre-formatting cells so that their content automatically snaps to the correct form when entered. This works especially well for dates. To format cells for your desired date notation, select the cells you want to format (hint: you can also select the entire column).

From the Home menu, open the Number dialog box and select Date. Choose the format you like best from the list of options.

Then hit okay to apply this format to the selected cells.

3. Drop-down lists
For databases including information like antibiotic resistance, storage location, sources, or any other field that has a limited number of choices, consider adding a drop-down list to some of your fields. This simplifies information entry, and has the added benefit of standardizing the information that multiple users input. To set up a drop-down option, you’ll first need to define a list of options. This list can be anywhere within the document – in the same sheet, or a separate sheet. In this example, I’ve made a list of antibiotic resistance markers for plasmids.

When you’ve made your list, select the cells (or column) that you want to apply this list to. Then, under the Data menu, select Data validation. Under the Allow menu, choose List, and define the Source data as your list of options, then hit okay to apply.

Now when you click in a cell with a list, an arrow appears to the right-hand side; clicking the arrow cause the list to drop down so you can select from your list of options.

4. Sorting
Many times you will want to sort a database by a particular parameters in order to find a specific entry or group of entries (for example, every plasmid that one lab member made). It’s important to select all of the data for each “record” (i.e. all of the columns with data in them), so that data in individual columns doesn’t get mixed up and associated with the wrong record. The safest way to do this is to select rows by clicking and dragging down the far left of the Excel spreadsheet (be sure to include your “title” row).

On the Data menu, select Sort. When the Sort window opens, you will see a variety of options: the drop-down menus allow you to choose which column you want to sort by, and what order you want the records to be sorted into.

Choose your parameters, and hit okay to apply.

5. Conditional formatting
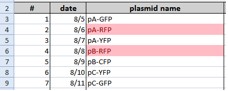
Finally, a useful tool for identifying records of interest is using conditional formatting to highlight specific values. This can come in handy when scanning a list for values above a certain threshold, an item entered on a particular date, plasmids containing the same fluorescent tag…almost anything can be identified by this search function. To highlight a class of entries, first select the cells you want to search (it’s often simplest to just select the whole sheet).

On the Home menu, select Conditional formatting and the Highlight cells rule. In this case, I’ve chosen the “text that contains” option to search for plasmids encoding RFP. Enter the item you want to search for – you can also choose which highlighting option suits you best, or just use the default settings.

Hit okay to apply. Now every entry that matches your search parameters is highlighted and easy to find.
What are your favorite tips for organizing lab databases?
You made it to the end—nice work! If you’re the kind of scientist who likes figuring things out without wasting half a day on trial and error, you’ll love our newsletter. Get 3 quick reads a week, packed with hard-won lab wisdom. Join FREE here.


