In the first part of this series, we discussed the differences between a color and a monochrome microscope camera and when one is advantageous over the other. We also touched on the subject of optimal camera resolution for a given imaging system.
In this part, we will tackle a few additional camera specifications and how they should factor into choosing the best camera for your application. Keep reading to find out how to think about camera sensitivity, signal-to-noise ratio, frame rate and the software choice.
1. Sensitivity
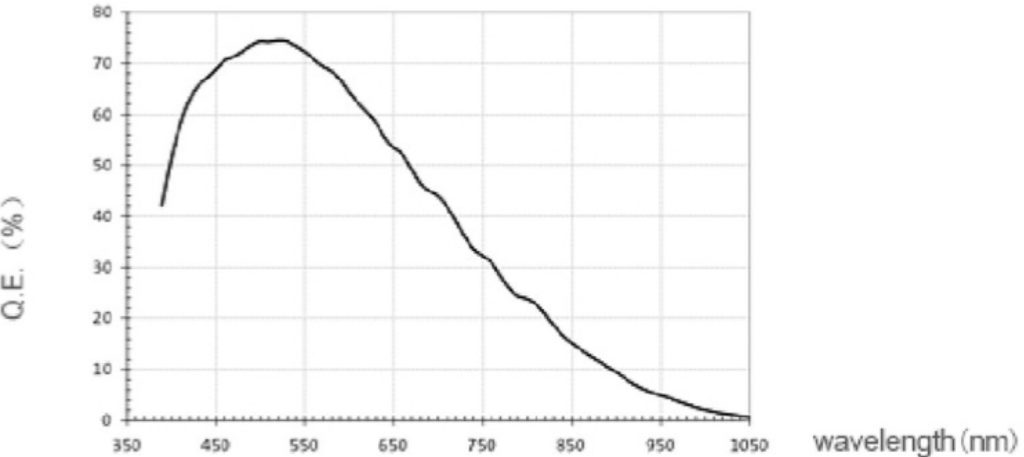
One of the ways to judge the sensitivity of a camera is to look at the Quantum Efficiency (QE) curve (Figure 1). QE is the fraction of photon flux that contributes to the photocurrent in a photodetector. In other words, QE is a measure of how many of the photons emitted by the sample contribute to the final image. The curve allows the comparison of the QE of the camera for different wavelengths and facilitates the comparison of different cameras in terms of the QE for each wavelength.
Another major contributor to the sensitivity of the camera is the pixel size. In the first part of the article, we talked about the need to match the pixel size of the camera with the resolution of your imaging system to achieve maximum resolution. For some applications, however, sensitivity is more important than resolution and for such applications a camera with larger pixel size might be necessary. Larger pixels collect more light and become advantageous for low light applications in which you might need to sacrifice some resolution for the sake of sensitivity.

2. Signal Detection and Signal-to-Noise Ratio
Acquiring a high-quality image requires that the signal from the sample is distinguished from the background noise. The signal-to-noise ratio (SNR) is a metric of the image quality, and it becomes crucial when low light samples are imaged.
Type and Sources of Noise During Imaging
There are three main types of noise to consider during an imaging experiment: shot noise, dark noise, and read noise.
Shot Noise
Shot noise is the fluctuation in the photon number coming from the sample itself. This type of noise is due to the probabilistic nature of the photons that form the light reaching the detector and follows a Poisson distribution. This form of noise is inherent to the nature of light and is described by the square root of the signal, so even though the noise increases with the signal the proportion of noise relative to the signal decreases. Shot noise becomes an issue only in very low-light imaging conditions.
Dark Noise
Also known as dark current, dark noise is the signal generated in the sensor due to thermal excitation instead of photoexcitation. Dark noise increases with longer exposures and is higher in larger pixels. Dealing with dark noise is relatively easy because it requires the temperature of the chip to stay low. A large selection of cameras are available that come with embedded cooling, which can keep the sensor at temperatures as low as -100°C! So, if you know that your application will require long exposure times, it is worth testing cooled cameras. The downside of the deep-cooled cameras is the cost, because they are among the highest priced cameras on the market.
Read Noise
Read noise is due to the process that transforms the analog signal from the camera sensor (electrons generated by photoexcitation) to digital signal. It depends on the electronics of the camera and is the main source of noise during low-light imaging. Unfortunately, not much that can be done to address it. For light applications, the user will have to review the specs of a cameras where the manufacturer discloses the read noise. Most cameras available today operate at ~6e–, but this limit can be as low as 1-2e– for high-end cameras.
Different camera technologies (CCD, EM-CCD, CMOS) have different SNR, but a comparison is not as straightforward as some of their other specifications (i.e., speed , sensitivity etc.). SNR can be affected by a number of imaging conditions (NA of the lens, specimen, etc.) and even though you can work out a theoretical calculation of the SNR (something that is beyond the scope of this article), the best way to judge which will work better for a challenging, low-light sample is to try the camera under the conditions you are planning to use it.
3. Frame Rate
When high temporal resolution is required, for example, during imaging of highly dynamic events in live cells, the frame rate of a camera becomes an important factor for the camera selection. Frame rate is the inverse of the time needed for the camera to acquire an image and completely read that image out. Frame rate depends on a number of factors, such as the read-out technology of the camera, number of pixels, bit depth, whether binning is used or not, and the exposure time. Both the number of pixels and the bit depth correlate with the amount of data read; more pixels and higher bit depth mean more data acquired per frame and hence longer read out times and in turn lower frame rates.
Acquisition Speeds in Different Scientific Cameras
Scientific-grade CMOS cameras have the ability to read by rows rather by pixel and can reach much higher frame rates (~45–100 fps) compared to the CCD cameras in which the read out happens pixel by pixel (~3–11fps). Nowadays, some EMCCD cameras are designed for fast imaging that can reach frame rates up to ~530fps. CMOS cameras have the capacity to operate either in global shutter capture mode, which means that the entire sensor is exposed at once and then it is read out row by row, or in rolling shutter capture mode, where the previously exposed row is read out while a new row is exposed. The rolling shutter mode allows for higher speeds and lower noise compared to the global shutter. However, because of to the staggered row exposures, it can cause distortions in the highly dynamic particle tracking.
It is important to note that you should not always expect to image at the maximum frame rate advertised by the manufacturer. Often that maximum frame rate is calculated under specific modes of operation (i.e., binning, not full frame read out, etc.). Also keep in mind that other factors that affect the frame rate such as exposure time, shutters response times, and so on, can slow down image capturing and, therefore, reduce the frame rate that you can achieve with a certain camera.
4. Software Considerations for a Microscope Camera
One more thing to consider while choosing a camera is how you are going to control it in your imaging set up. If you are already using software that you are comfortable with to run your microscope, and you wish to control your camera through that software. So, you need to make sure that your software supports the camera and can be seamlessly run that way.
If the camera is not currently supported by your imaging software, check with the software provider to see if they provide drivers for the camera of your choice. Alternatively, you will have to operate the camera with the software provided by the camera manufacturer. If you do that, then you will have to make sure that it has all the features and utilities that your experimental set up requires.
Finally, if you want to use your camera in triggering mode, then you have to make sure that you can do that with the software you are currently using.
Even though there are more things that can influence your choice of a scientific camera (e.g., manufacturer, cost, etc.) we hope that this two-part series provides a good starting point for your search. What you need to remember throughout your quest for the right camera is that compromise (favor a spec over another) is nearly inevitable and that, whenever possible, you should test the camera you are considering using with the sample(s) you are planning to image.
Because this is a fairly broad and complex subject, we would love to hear from you. Please comment below and share your thoughts and experience on selecting a new microscope camera.


