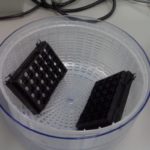
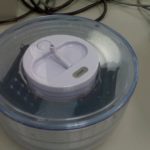
I recently visited a lab that had a salad spinner on their lab bench and at first, I wondered if they were putting together a salad lunch there but when I took a peek I got a nice surprise. It turns out that the salad spinner was actually a benchtop, “minifuge” version of a plate centrifuge.
What a great idea I thought. A cheap, quick-to-build plate centrifuge that also worked pretty well for a quick spin just before PCR. So, we tried to build one in my lab and we loved it so much that we now have one sitting near almost EVERY PCR plate instrument, and have even gifted a couple to others!
Want to know how to build a plate centrifuge for your lab? It’s simple, here is how…
You will need:
Enjoying this article? Get hard-won lab wisdom like this delivered to your inbox 3x a week.

Join over 65,000 fellow researchers saving time, reducing stress, and seeing their experiments succeed. Unsubscribe anytime.
Next issue goes out tomorrow; don’t miss it.
1. A salad spinner – We use the Zyliss brand pull-cord salad spinner.
2. Multi-purpose cable ties found at any hardware store.
3. 96-well plate inserts – We use the ones from ABI


Gathering the components is as complicated as it gets! All you need to do now is use those cable ties to secure the 96-well plate inserts to the inner bowl of the spinner as shown above. Then start using the new mini-plate-fuge!
For more tips, tricks, and hacks for getting your experiments done, check out the Bitesize Bio DIY in the Lab Hub.
You made it to the end—nice work! If you’re the kind of scientist who likes figuring things out without wasting half a day on trial and error, you’ll love our newsletter. Get 3 quick reads a week, packed with hard-won lab wisdom. Join FREE here.


