
Fluorescence microscopy images not only look great, but also allow us to get a better understanding of cells, structures, and tissues. It’s a tool for discovery.
And with confocal laser scanning microscopy, we can discover even more.
It combines high-resolution optical imaging with depth selectivity, which allows us to do optical sectioning. This means that we can view visual sections of tiny structures that would be difficult to physically section (like embryos, for example) and construct 3D structures from the 2D micrographs.
In this article, we’ll explain how confocal laser microscopy (CLSM) works and delve into its history and componentry.
Choose a free resource to help you move forward
DOWNLOAD
Culture Contaminants Reference Card
POSTER
Fluorescent Proteins Guide
The Origins of CLSM
The principle of confocal microscopy was patented by Marvin Minsky in 1957, but it took a good few years before it was fully developed to incorporate a laser scanning process.
The technique essentially scans an object point-by-point using a focused laser beam to allow 3D reconstruction of the micrographs. In a conventional microscope, you can only see as far as the light can penetrate, whereas a confocal microscope images one depth level at a time.
Applications of CLSM
So what can you use confocal laser scanning microscopy for? It’s useful across most of the sciences. Here are some examples of specimens you can study using CLSM:
- Organelles, cytoskeletons, and cell membranes in cell biology.
- Neurons, synapses, and dendrons in neuroscience.
- Embryos and organoids in developmental biology.
- Immune cells and pathogens in immunology.
- Cancerous tissue and tumor-drug interactions in cancer research.
- Polymers, metals, and ceramics in materials science.
- Pollutant distribution in environmental samples.
As you can see, it’s useful beyond biology!
How CLSM Works: Brief Explanation
A confocal laser scanning microscope works by passing a laser beam through a light source aperture which is then focused by an objective lens into a small area on the surface of a sample.
An image is built up pixel-by-pixel by collecting the emitted photons from the fluorophores in the sample.
How CLSM Works: Thorough Explanation
CLSM is unlike most other types of microscopy and is conceptually quite complex. So let’s break it down into three steps.
1. Photon Production
Confocal laser scanning microscopes are based on conventional optical microscopes, but instead of a lamp, a laser beam is focused on the sample.
The intensity of the laser light is adjusted by neutral density filters and brought to a set of scanning mirrors that can move very precisely and quickly.
One mirror tilts the beam in the X direction, the other in the Y direction.
Together, they tilt the beam in a raster fashion.
The beam is then brought to the back focal plane of the objective lens, which focuses it onto your sample. If your sample is fluorescent, part of the light will pass back into the objective lens.
This light travels back through the same path that the laser travels. The effect of the scanning mirrors on this light produces a spot of light that is not scanning, but standing still.
2. Sample Scanning
This light then passes through a semi-transparent mirror that reflects it away from the laser and toward the detection system.
The first object in the detection system is the pinhole aperture, which is in the intermediate image plane of the microscope. This allows only a small central portion of the light through to the light detectors.
If this light originates from sample fluorescence, it will be a different color from the laser light and emission filters are used to separate it from the laser light that has been reflected from your sample.
If reflected light is being examined, it will be passed through a polarizer that will allow only laser light with a different polarization angle from the initial laser light to pass.
Thus, fluorescence and reflected laser light are separated.
3. Photomultiplication
Any light that emerges from the CLSM’s optical system (Figure 1) may have a very low intensity, and so the photomultiplier tube (PMT) is used to detect and amplify this light signal.
Photomultipliers are capable of amplifying a faint signal around one million times without introducing noise. The output from the PMT is an electrical signal with an amplitude that is proportional to the initial light intensity.
This analog electrical signal is converted to a series of digital numbers by an analog-to-digital converter in the computer. As the laser beam moves along the specimen, the detection system constantly samples and converts the PMT output and displays them on the computer monitor in the correct order.
All of these complicated steps occur so fast that the display seems like it is showing a real-time image of the sample!
The Components of CLSM
Now we know how confocal laser scanning microscopy works, what components make the magic happen? Check out Figure 1 for a basic schematic of a CLSM.
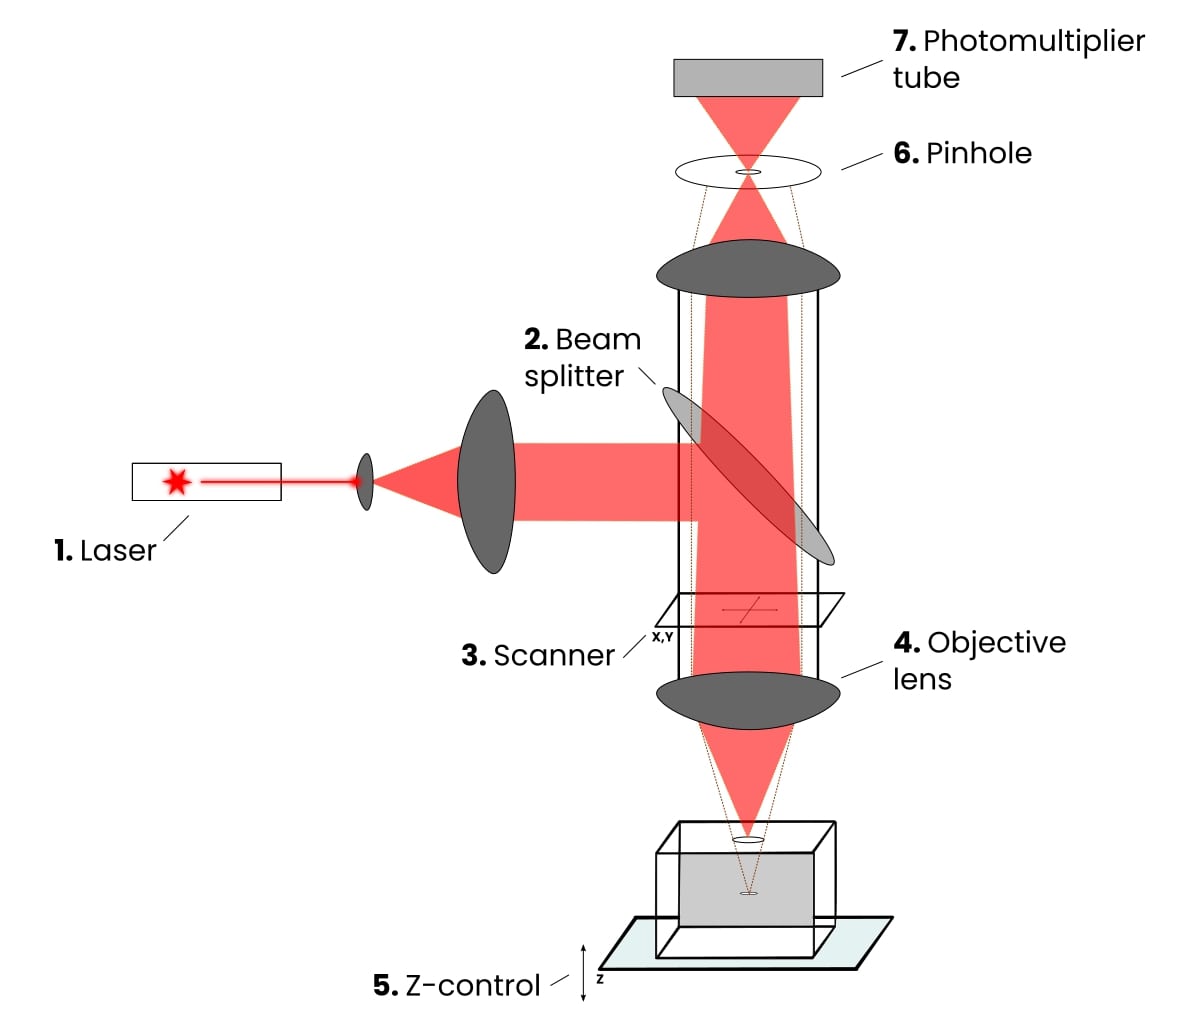
1. The Laser
Laser photons are used to illuminate fluorophores in CLSM experiments. Laser lines can be chosen via a selection device and matched with the fluorophores found in your sample and used in your experiments.
2. Beam Splitter
This filter separates the excitation laser light from the light emitted from sample fluorescence, ensuring you see/detect light from your sample.
3. Scanner
This unit is based on two or more mirrors, which guide the focused laser beam across the sample specimen, pixel-by-pixel, and line-by-line, left-to-right (raster scanning).
4. Objective Lens
These are the heart of the microscope and primarily determine the optical image formation and the resolution limits of the microscope.
5. Z-control
This is one of the key components of CLSMs that enable you to construct 3D images. It allows you to focus on any focal plane within your sample, and the motorized Z-stepper allows precise (>10 nm) step movements in the axial direction of the sample (normal to the horizontal plane).
6. Pinhole
This is an adjustable iris in the intermediate image plane. It excludes most of the out-of-focus light from the acquired image and thus provides optical sectioning capacity.
It defines the thickness of the optical slice and is dependent on the properties of the objective lens. The pinhole size can be set via the software on your computer, and the best trade-off between the efficiency of light collection and optical sectioning is if it is set to 1 Airy unit.
7. Photomultiplier Tube
These highly sensitive detectors collect the photons emitted by your sample. They basically transform the light signal into an electrical one that is recorded by a computer. And in doing so, they multiply the current produced by the incident photos by several orders of magnitude, hence the name.
Confocal Laser Scanning Microscopy In Summary
As we can see, confocal laser scanning microscopy is a complicated technology with a lot going on underneath the surface. Many different processes are happening quickly to give you the image you see on your screens.
But now we know how samples are induced to fluoresce using laser light, how 3D images are built from 2D micrographs—and the componentry that makes it all happen.
But once you learn how to use all the different functions, there’s no end to the images and data you can create.
Have we missed anything crucial? Let us know in the comments section below.
Happy confocal-ing. (It’s not a word, but it should be!)
While you’re here and on a microscopy deep dive, check out the latest episode of The Microscopists podcast:
Originally published April 2014. Revised and updated April 2023.
You made it to the end—nice work! If you’re the kind of scientist who likes figuring things out without wasting half a day on trial and error, you’ll love our newsletter. Get 3 quick reads a week, packed with hard-won lab wisdom. Join FREE here.


