
An efficient cloning system that is in vogue at present is the Gateway® Cloning Technology from Invitrogen. Gateway cloning gives researchers the opportunity to easily transfer DNA fragments into plasmids using proprietary recombination sites called Gateway att sites and either the LR clonase or BP clonase enzyme mixes.
Gateway cloning is efficient and allows you to clone without using restriction enzymes or ligation reactions, but it still has multiple steps that can be optimized. I have described below an overview of the Gateway cloning system and some factors that will increase the cloning efficiency.
How Gateway Cloning Works
Before we provide you some top tips for successful cloning with Gateway vectors, let’s review how this technology works.
This cloning method uses site-specific recombination. These specific sites are known as att sites, which are targeted by the integrase enzyme. There are four different att sites: attB, attP, attL, and attR.
Choose a free resource to help you move forward
download
The Molecular Cloning Cheat Sheet
CHEAT SHEET
Nuclear Extraction Protocol
These sites work together in pairs to allow your gene of interest to be moved between plasmids by using particular enzyme mixes:
- attB and attP pair together and when combined with the BP Clonase Enzyme Mix will recombine into attL and attR sites.
- attL and attR sites when paried together and combined with the LR Clonase Enzyme Mix will recombine into attB and attP sites.
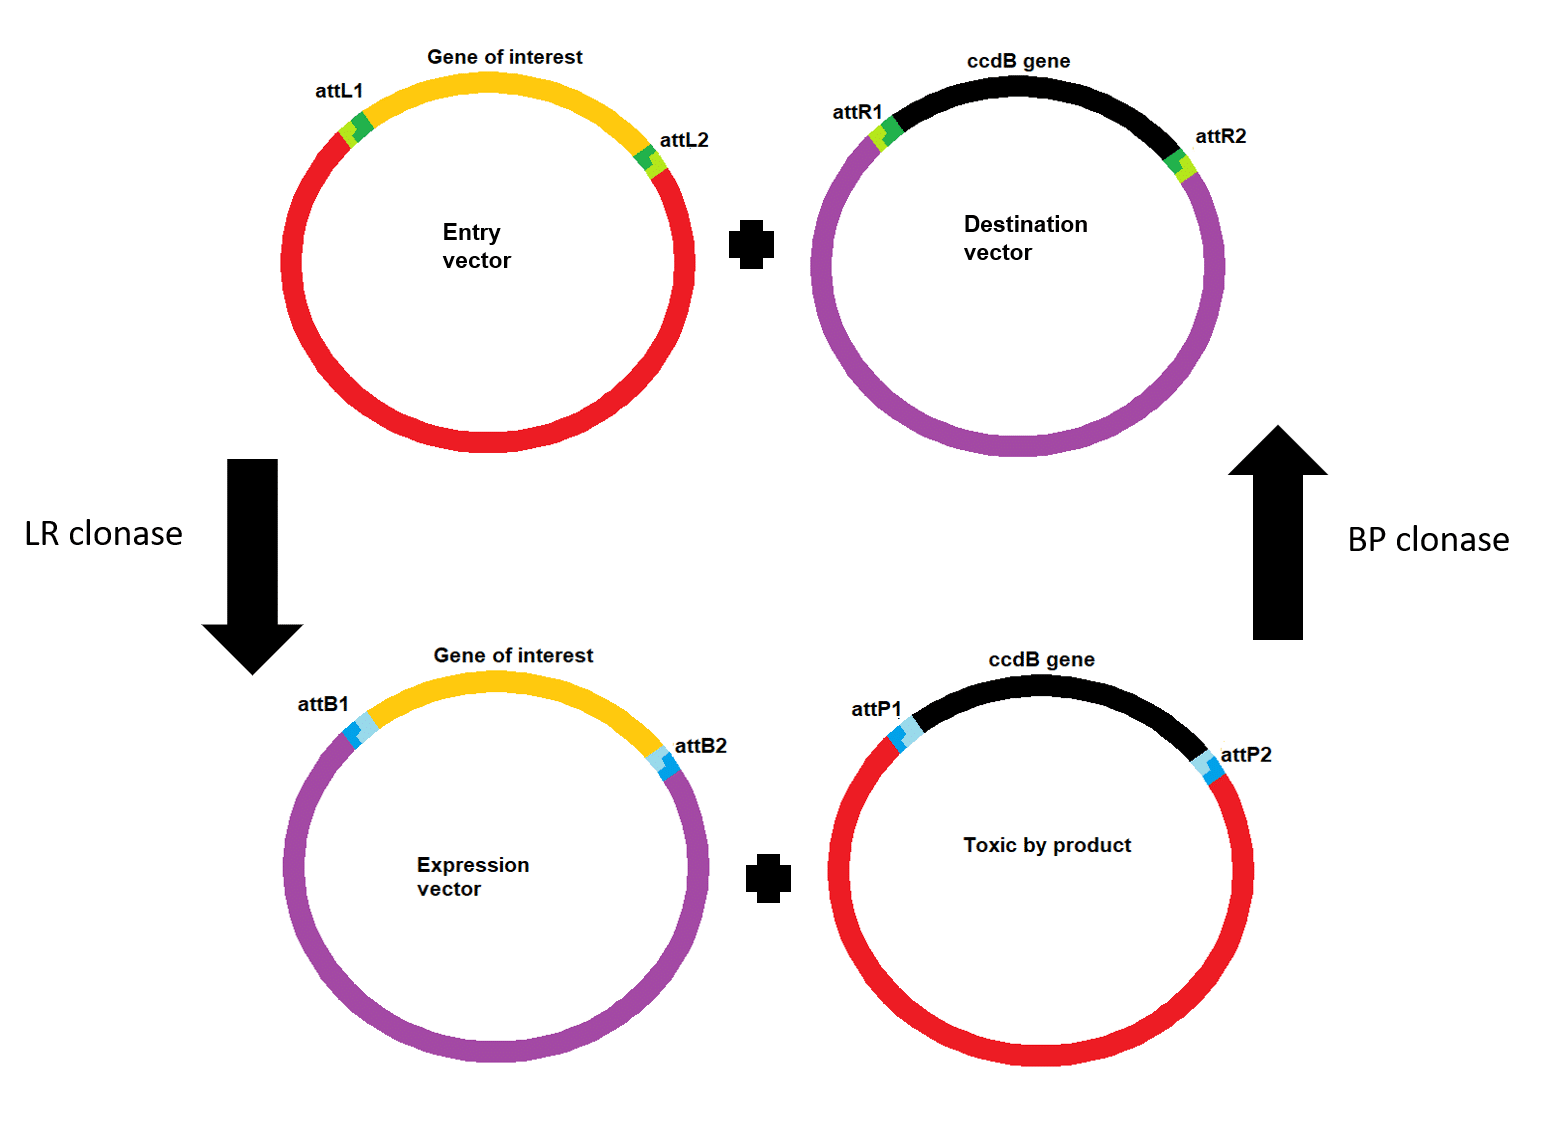
Initially, you create your PCR product with attB sites and then combine it with a donor vector containing attP sites plus BP clonase. The recombination results in the formation of an entry vector containing your gene of interest (Figure 1). The donor vector contains the toxic ccdB gene, which is replaced by your gene of interest upon successful recombination meaning all clones that result following transformation contain the entry vector with your gene of interest.

Using your entry vector you can move your gene of interest into a destination vector (e.g. to create an expression vector for use in your experiments). This uses a similar reaction but as the initial att sites are now attL and attR sites, LR Clonase Enzyme Mix is used (Figure 2).
Understanding the Enzyme Reactions
The BP Clonase Enzyme Mix contains both the integrase enzyme and a co-factor protein, Integration Host Factor (IHF) that catalyzes the recombination of attB and attP sites.
The LR Clonase Enzyme Mix contains both intergrase and IHF, but also Excisionase (Xis). The Xis enzyme drives the reaction in the opposite direction, resulting in the recombination of attL and attR sites.
Advantages of Cloning Using Gateway Technology
There are many advantages to using this technology over traditional cloning methods:
- The att sequences are not palendromic, meaning the insert is directional.
- Entry vectors can be used to place the gene of interest into a range of different expression systems without having to make any design changes.
- There are a range of Gateway expression vectors that allow expression in different systems (e.g. E. Coli, mammalian cells, yeast) or for specific applications (e.g. antibody production, protein expression).
- Vectors that do not contain gene of interest instead contain ccdb gene, which allows for negative selection of ’empty’ vectors.
A Step-by-step Guide to Cloning with the Gateway system
Step 1: Insert Your DNA of Interest into the Gateway Entry Vector
There are two different ways you can insert your DNA fragment, which you isolated using your DNA extraction protocol, into the entry clone.
1. D-TOPO Cloning
DNA of interest + entry vector (pENTR) with attL sites = Entry Clone
In this method, you use PCR to amplify your fragment of interest and add some bases to directionally clone the fragment into the entry vector. Simply design your forward primer to introduce a CACC sequence before your DNA sequence of interest. The GTGG overhang in the Entry Vector complements the 5’ CACC sequence and ensures the insertion of the PCR product in the correct orientation to produce the entry clone.
To perform the ligation, incubate your PCR product with the entry vector and salt solution at room temperature before transforming the reaction into competent E.coli cells.
2. BP Clonase Reaction
PCR Product with attB Sites + pDONR Vector with attP Sites + BP Clonase Enzyme Mix = Entry Clone with attL sites
In this alternative, you design primers to amplify your fragment of interest and add att B sites on either side of your PCR product. Then, you incubate your PCR product (your DNA of interest flanked by the att B sites) with the pDONR Vector and BP Clonase Enzyme Mix at room temperature for an hour. Finally, you terminate the reaction by adding proteinase at 37°C for 10 minutes before transforming into competent cells.
The choice of whether to use D-TOPO or the BP Clonase reaction depends purely on your personal preference or the preference of your lab. Both procedures take almost the same amount of time.
Step 2: Clone Your Gene in to the Gateway Destination Vector
Entry Clone + Destination Vector (pDEST) with attR sites + LR Clonase Enzyme Mix = Expression Clone
The second step is very similar to the BP reaction: you incubate your Entry Clone and the Destination Vector (pDEST) with the LR Clonase Enzyme Mix for one hour at room temperature. Then, you terminate the reaction by adding proteinase and incubating at 37°C for 10 min before transforming into competent E.coli cells.
Factors to Increase Cloning Efficiency
The following factors will help enhance the efficiency of your cloning reaction:
- Always use a purified PCR product. You can gel extract your DNA or use direct PCR cleanup.
- You can lengthen the incubation time of the D-TOPO cloning reaction from 5 minutes to 25-30 minutes to achieve the best results.
- The LR Clonase protocol asks you to add anywhere between 50-150 ng of entry clone to 150 ng of pDEST. But, it always helps to use a 1:1 ratio of entry clone to destination vector. For example, for 150 ng of pDEST, use 150 ng of entry clone. If you do not have enough after DNA extraction, use 100 ng of both.
- To be cost efficient, you can use 1 µl of the clonase enzyme mix instead of 2 µl as stated in the protocol. Less is enough, if not more, in this case!
- Make sure you do not mix up the BP and LR clonase enzyme mixes. While the former should be used to generate the entry clone, the latter is always used to construct the expression clone.
- If your resultant expression clone is going to be more than 10 kb, it helps to increase the LR clonase reaction time to 2-3 hours instead of one hour; you can also stretch it to overnight, although it is not always necessary.
- Make sure to check twice that you are using the vectors with the correct att sites for your reactions.
I have better success when I add these steps to my cloning protocol. Hopefully, you will find them useful too.
Happy Gateway cloning!
Originally published September 20, 2016. Reviewed and updated September 2021.
You made it to the end—nice work! If you’re the kind of scientist who likes figuring things out without wasting half a day on trial and error, you’ll love our newsletter. Get 3 quick reads a week, packed with hard-won lab wisdom. Join FREE here.


 5")


