Against the advice of journals and printers, many scientists use Microsoft Powerpoint to assemble posters and figures. You should consider upgrading to Adobe Illustrator! For generating scientific figures, Illustrator is more powerful and flexible than Powerpoint and is designed to produce print documents at high quality resolution. This means that journals will stop sending your figures back to be tweaked. You will create amazing diagrams! You will have the most beautiful poster at every meeting!
Once you’ve made the decision to move to Illustrator, you should be able to get started right away using the skills you’ve learned in Powerpoint. But let’s say you leap into creating a new document and you paste in a microscope image. Now you need an arrow. Wait, why are there no arrows? Can you draw one with the pen tool? No, only tangled string. Maybe you can use a rectangle with a triangle stuck to the end. But where are the triangles? How do you crop? You give up and go back to Powerpoint.
Like many brilliant scientists, you have been thwarted by Illustrator’s “activation energy barrier”. But actually, this barrier is smaller than it seems and I can help you get over it quickly. Once you’ve made a few basic figures, you’ll start to discover all the extra things you can do in Illustrator and you’ll never look back.
This is not meant to be a detailed guide to Illustrator, I just want you to pass on some simple solutions to some common complaints I hear from experienced Powerpoint users:
I can’t make arrows.
Make a straight line. Click Window>Stroke. The Stroke panel will appear, and different arrowhead options for each end of the line will be available. In earlier versions of Illustrator, arrowheads were inexplicably accessed from Effect > Stylize.
I can’t draw anything in Illustrator. Powerpoint gives me lots of pre-drawn shapes.
Yes, the autoshapes in Powerpoint are handy. Illustrator only gives you the basics, like ellipses and rectangles, when sometimes you want the perfect thought bubble, love heart, or smiley face. But there are two extremely easy solutions to this problem.
1) Just paste in the shape directly from Powerpoint. That’s it.
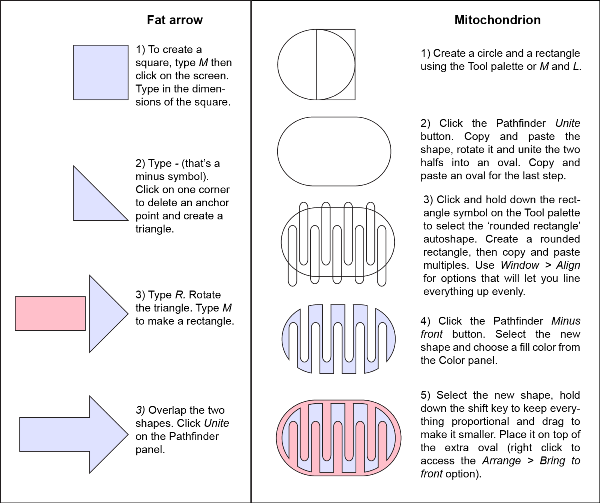
2) Combine basic shapes into compound shapes using the Pathfinder.
Make the Pathfinder panel appear by clicking:
Window > Pathfinder
You will see a collection of buttons that let you do useful things like combine, delete, and outline simple shapes to create compound shapes. You can create many more shapes using this method than Powerpoint could ever provide you (Figure 1).

Figure 1: Examples of compound shapes made in Illustrator
The shapes you create using either method can be further manipulated by adding, deleting and dragging the ‘anchor points’ at the corners. Here’s how you do that:
Press the minus symbol (-) or plus symbol (+) on your keyboard.
The cursor will now look like a pen nib with either a minus or a plus symbol.
Click on the corners of a shape with the minus cursor to ‘delete’ that corner.
or
Click on a line with the plus cursor to add a new anchor point, then press ‘A’. Now the cursor will let you move that anchor point around to change the shape.
My text is all different font sizes.
There are two ways to paste text.
1) Copy the text then hit Paste within Illustrator
Don’t do it this way. You will get text that is treated as an object, which means that if you try to change the size of the text box, the text itself will get bigger. You will end up with text at random font sizes.
2) Hit ‘T’ on the keyboard (or click on the text tool on your tool palette). Click on the document and drag to create a text box. Paste the text into the text box. Now, if you change the size of the text box the font size will stay fixed.
I can’t crop or change the contrast on my images.
Whether you use Illustrator or Powerpoint, you shouldn’t be manipulating your images anyway. Neither program is designed for sophisticated treatment of pixel-based images like gels, photographs and micrographs. The difference is that Powerpoint will let you do a bad job of it anyway, but Illustrator won’t. Either way, you should re-size, crop and adjust the contrast of all your images in a graphics program (like Photoshop or ImageJ) before you insert them into your figure. (Note: in Illustrator Insert is called Place and is in the File menu).
My graphs are pixelated or the labels are gibberish.
Pixelation can happen to vector images like graphs if you accidentally convert them to pixel-based images before you Place them into your Illustrator document. Don’t output a graph or Powerpoint diagram in JPEG, BMP or TIFF format unless you don’t have any other options. If you can save them in SVG, PDF, EPS or other vector-compatible format, do so. If not, try copy and paste. The problem of labels turning into gibberish can happen if you do manage to insert a graph as a vector image. If you use an obscure font that Illustrator doesn’t recognize (like the Calibri default font from the Microsoft Office programs!), it will substitute in gibberish. If that happens, go back to your graphing program and change the font to something universal, like Arial or Times, before exporting the graph.
Navigating Illustrator is too slow, because there are too many different tools to click on.
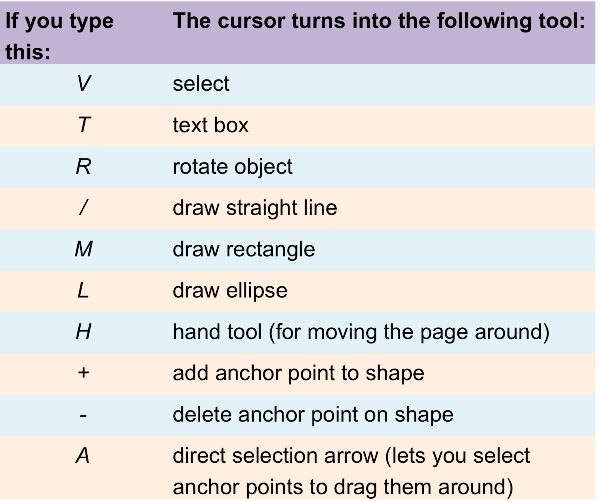
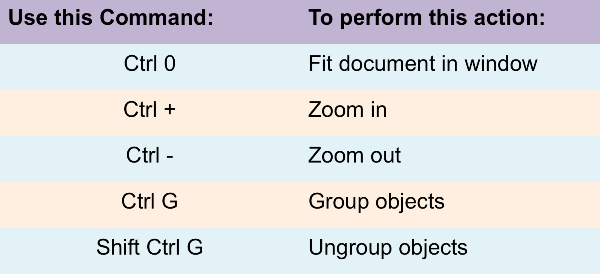
Navigating Illustrator is not slow – you just aren’t using the keyboard enough. Illustrator is designed so that you simultaneously use the mouse (to draw and arrange things) and the keyboard (to toggle the cursor into different tools). In Tables 1 and 2 I’ve compiled the tools and keyboard commands you will use the most (beyond the universal cut, paste, copy, and of course, undo).

Table 1: Switching the cursor between different tools

Table 2: Useful keyboard shortcuts
Where are those helpful blue guide lines that mark the center in Powerpoint?
Draw a line, a box or any other helpful shape that you want to turn into a guide (i.e. a reference point that won’t be part of the final document). Select the shape then click View>Guides>Make Guides. Then View>Guides>Lock Guides. I like to start every figure by making a rectangle guide that marks the maximum figure dimensions allowed by the journal.
I can’t use the pen tool.
OK, I’ll admit the pen tool defies written description. It’s honestly not that difficult to use, it just doesn’t function anything remotely like an actual pen. My advice is to spend five minutes watching this instructional video and then mess around practicing for another five minutes. You’ll have the hang of it after that, although you’re unlikely to need this skill for assembling a simple figure anyway.
It’s too expensive.
That is true. If you don’t have access to Illustrator through an institutional or lab license, you should try the open source, free alternative called Inkscape.
If you’d like a detailed guide to using Illustrator for scientific figures the following sites might be useful:
Let us know if you have any other quick tips for using Illustrator, or if there’s something that really bugs you about it. You never know, maybe there’s a simple solution!


