New Channels on Bitesize Bio

To help you find information on exactly what you need we're implementing channels, a new way to browse content

Each channel is focused on a specific technique or area and authored/presented by hand-picked authors who are experts in their field. Make sure you don't miss a thing by checking the box below for each channel that interests you.

In return we'll send you one email per month that brings you the latest from your chosen channel(s), along with free members-only content.

Check out our upcoming new channels; Flow Cytometry and Cell Culture, we'll be launching them very soon!

I would like to receive the newsletters for the following channels

Cell Culture
Flow Cytomery
Microscopy & Imaging
Next Generation Sequencing
Writing, Publishing and Presenting
Cloning & Expression


My email address is:

cf

Pimp your Microcentrifuge

by in Lab Equipment, Lab Hacks
From the Bitesize Bio channel

Microcentrifuges are pretty much the epitome of efficiency, but I have a couple of suggestions that may make using this instrument even easier.

Divide by Three
Not only is the number of tubes a microcentrifuge can hold divisible by two, but almost always by three as well. How does this help you? If you have an odd number of tubes, you can now spin them without a balance tube. Here is the rotor from my microcentrifuge:

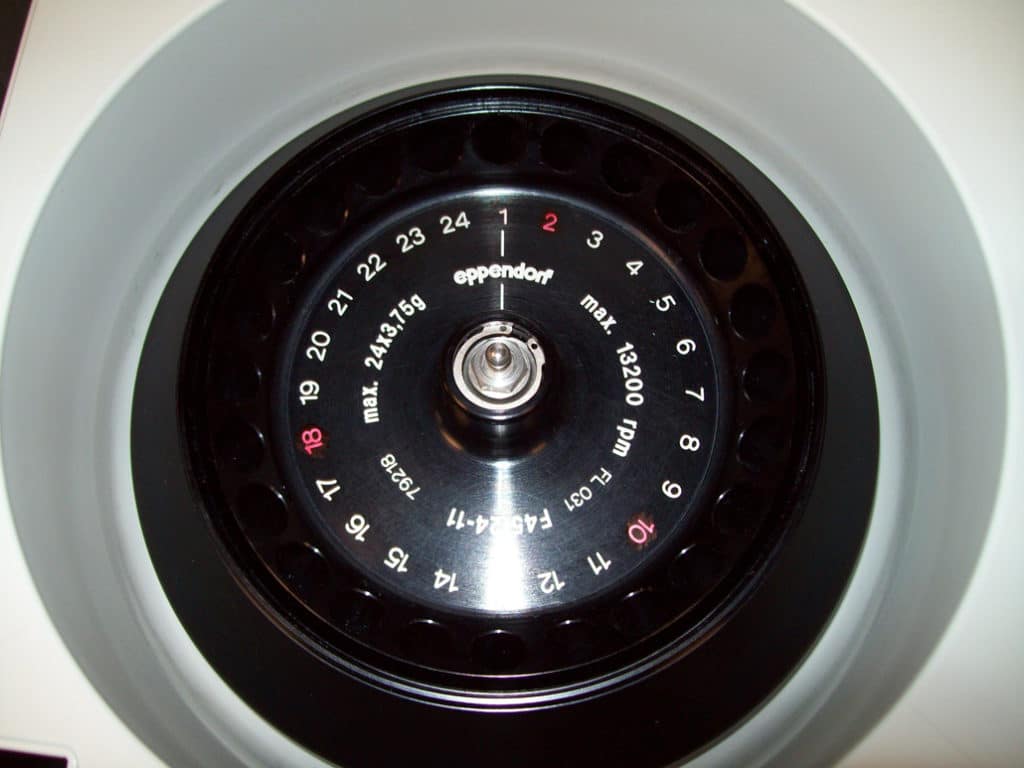
I have taken a red marker and colored the white numbers that divide the rotor into thirds, allowing me to quickly place three tubes into the microcentrifuge while maintaining balance in the rotor. On other microcentrifuges that did not have a paired position indicator (a white line on this rotor), I have used a different color marker to divide the rotor in half. Now what if you have five tubes?

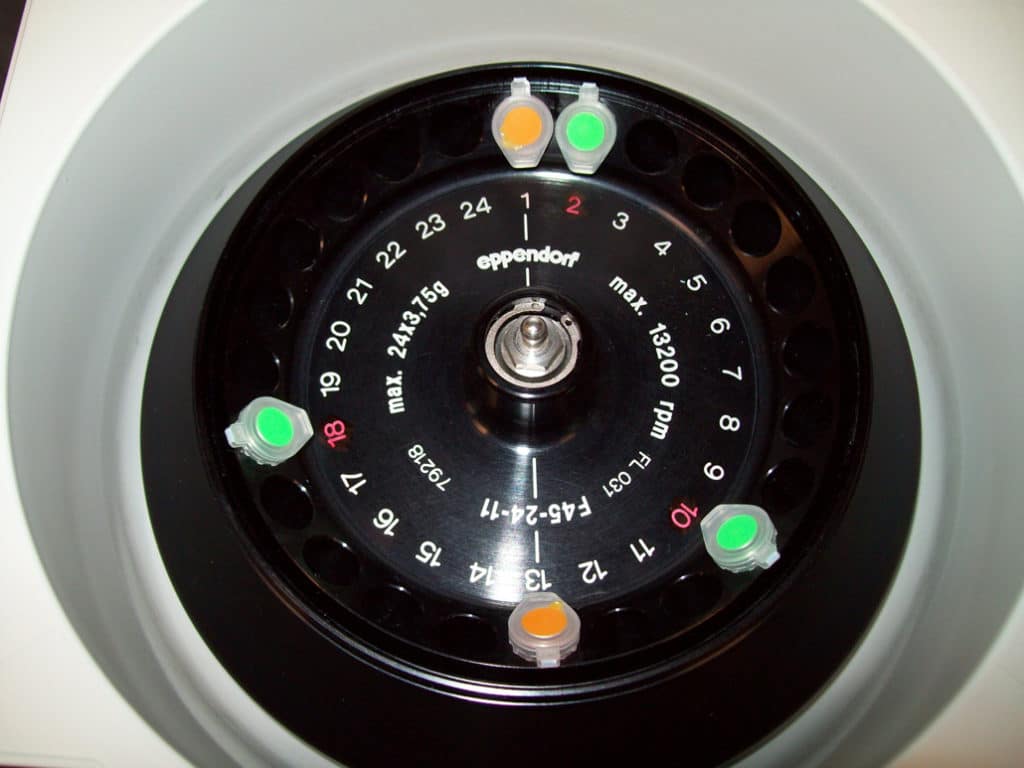
The orange tubes balance each other, and the green tubes balance themselves. Of course you don’t need to break out the markers to do this, but premarking the rotor helps avoid mistakes when you are working quickly.

Nested Tubes
Some centrifuges come with multiple rotors that fit 2/1.5 ml, 0.5 ml, and 0.2 ml Eppendorf tubes, and it is best to use these when you are going to be spinning your samples hard for an extended period of time. However, changing rotors can be a pain and most of the time we aren’t trying to pellet our samples, but just trying to bring any condensation on the lid or the sides of the tubes down into the bottom. For these short spins, we can spin our smaller tubes in the 2/1.5 ml rotor by using some home-made adapters.

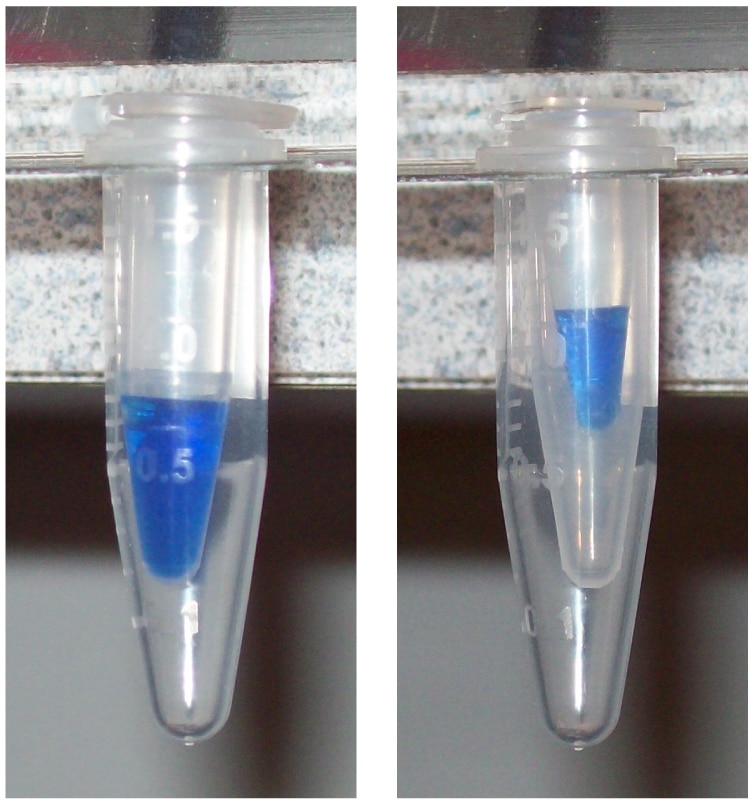
By cutting the top off a 1.5 ml Eppendorf tube, we can nest a 0.5ml tube inside it (left). And if we also cut the top off the 0.5 ml tube, a 0.2 tube can nest inside that as well (right). Depending on the particular tubes you are using, these nested configurations can tolerate quite a bit of force. However, if the samples are particularly precious, radioactive (or otherwise dangerous), or if you are going to be spinning them hard and long, you should probably go to the effort of changing the rotor rather than using these adapters.

Stock Balance Tubes
For those times when you just need a balance tube, you can save some time by preparing a selection of tubes with the volume written on the top and keeping them in a rack next to the microcentrifuge.  I know this seems really obvious, but most of the people I’ve worked with simply never thought to do this. I can almost always just grab one from this selection rather than having to make up a new one for each occasion. In addition, I find that it saves me from having the collection of unmarked tubes with clear, colorless liquid in them sitting next to the centrifuge that seems to disturb my lab safety officer so much.

If you have any other tips, let us know in the comments!

Nested Tubes

Some centrifuges come with multiple rotors that fit 2/1.5 ml, 0.5 ml, or 0.2 ml Eppendorf tubes, and it is best to use these when you are going to be spinning your samples hard for an extended period of time. However, changing rotors can be a pain and most of the time we aren’t trying to pellet our samples, but just trying to bring any condensation on the lid or the sides of the tubes down into the bottom. For these short spins, we can spin our smaller tubes in the 2/1.5 ml rotor by using some home-made adapters.

By cutting the top off a 1.5 ml Eppendorf tube, we can nest a 0.5ml tube inside it. And if we also cut the top off the 0.5 ml tube, a 0.2 tube can nest inside that as well. Depending on the particular tubes you are using, these nested configurations can tolerate quite a bit of force. However, if the samples are particularly precious, radioactive (or otherwise dangerous), or if you are going to be spinning them hard and long, you should probably go to the effort of changing the rotor rather than using these adapters.

Articles in your inbox

Enter your email to be informed when we publish more articles like this on BsB, and also get access to all of these goodies:

  • Free ebooks and audiobooks on the topics that matter to you
  • Access to Member’s-only articles and Videos
  • Advance notice of new webinars and eBooks
  • Access to make comments and ask questions on BsB


What to read next

Lab Hacks: Lab equipment from the hardware store

While almost every lab has a small toolbox with some screwdrivers, pliers, and such, here are some tools that may not have obvious utility at the bench, but could make your life easier. A Butane Torch If your OCD is as bad as mine, then watching a bubble flow out of the flask onto the [...]

Are You Armored?

Are you tired of having to clean dingy, moldy waterbaths? Or tired of babysitting the heat block to make sure the temperature stayed where you set it? Well there is a new solution to this problem. I just recently discovered something called Bath Armor by a company called Lab Armor. I was walking by my [...]

10 Tips for Pipetting Perfection

Several years ago as a freshman in a research lab, the very first project I received was to pipette incremental micro-volumes of H2O onto a piece of parafilm. Boring! Weighing the liquid on parafilm and comparing the weight between 10 replicates for each micro-volume continued for a week before I touched anything else in that [...]

About the author

Jode Plank

I earned my PhD in Biochemistry from Duke University, then did a postdoc at the University of California at Davis. I am now the Scientific Illustration Manager at American Journal Experts, where I continue to pursue my interests in visual...

What do you think?

6 comments

  1. from on

    Good idea on marking the rotor for 3 tubes Jode. One of those tiny (perhaps tragic) pleasures is when you drop the 3 tubes in quickly and get in spaced perfectly first time. Because usually its drop them in and then move one tube 1 space over and then 1 other tube 1 space back. Marking the rotor – smart (timesaving) move.

  2. from on

    A good way to spin small tubes without adapters is to cut a p-200 tip and put it inside a 1,5ml eppendorf tube. Cut the tip the right size, and the 0,2ml or 0,5ml tube will sit comfortably on the broader part of the tip, leaving its cap (plus 1-2 mm of length of tube) outside the eppendorf. It’s fairly easy to do, and the tip should stand quite a good deal of force. I routinely centrifuge PCR tubes at 12,000g with such adapters.

  3. from on

    Note also that this applies to balancing the empty spaces in the rotor as well. e.g.If I have 19 tubes in the rotor above, positioning the 5 empty spaces where the tubes are yields a balanced rotor.

  4. from on

    Love the “Divide By Three” suggestion, Jode. Thanks!

Subscribe to Channels

To receive information about any of our new channels click on the button below.
subscribe to the channel newsletter »

Write for us

Have a short tip, a written
article or a video you'd like
to see published?
write for us »