DNA Shuffling Like a Pro
DNA shuffling uses PCR technology in a very creative way. It allows you modify your protein to make a new protein you want. You can evolve proteins in microcentrifuge tubes on your very own lab bench.
Isn’t that fantastic?
DNA shuffling is also a very powerful technique for directed molecular evolution. W. Stemmer first used this technique in 1994. Since then, researchers have used this method in several different ways, like generating antibody libraries, manipulating microorganisms for production of pharmaceutical products and vaccine development.
How is it Done?
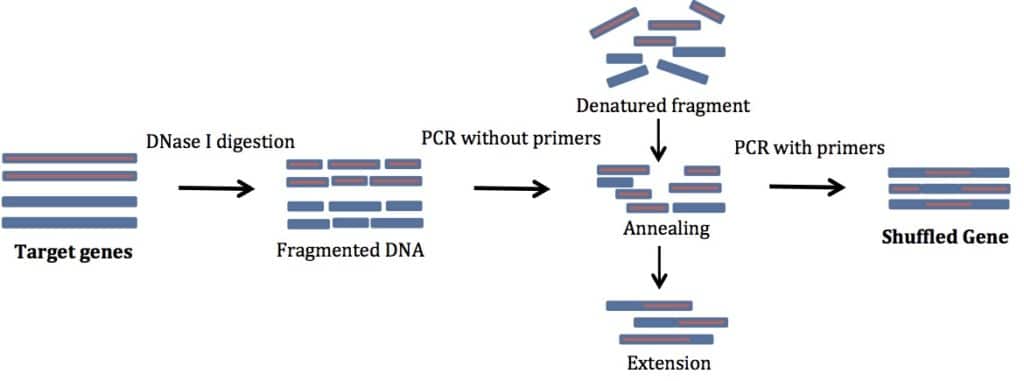
For successful DNA shuffling, follow these instructions. See Figure 1 for a schematic representation of the process.
1. Preparation of Initial Template to be Shuffled
To begin, perform a normal PCR amplification of the genes you are shuffling. Use primers specific to your gene of interest. No additions are needed to these primers. This step gives you enough material to start with. In my experience, genes smaller than 1 kb are easiest to shuffle. The products you get are usually of the same size as your starting template.
2. Digestion by DNase I
In this step, cleave the products of the PCR with DNase I. If you can, use DNase I buffer. It will make your life much simpler. In a pinch you can also use restriction enzyme buffers (supplemented with MgCl2 and CaCl2).
Standardize the reaction carefully to select the fragment size. To do this, you can play with:
- the timescale
- the temperature of the reaction and/or
- the concentration of DNase I
For example, I have stopped the reaction in dry ice to check the fragment size and restarted it by warming and adding more DNase I. You can also stop the reaction by transferring the tube to 90°C for 10 minutes.
Then, run the reaction on an agarose gel, cut out the fragment size you want, and gel purify.
3. Reassembly Reaction (PCR without Primers)
In the reassembly step, heat your product to a high temperature to promote denaturation of the DNase I-digested fragments. Then lower the temperature to allow the fragments to randomly anneal to other fragments. The annealing leads to recombination of different templates. Then, use a DNA polymerase to extend the newly formed fragment. The denatured fragments act as self-primers and you do not need any external primers. Isn’t that cool?!
4. PCR Amplification of Reassembled Products
Finally, use primers specific for the gene you want to mutate to PCR amplify the full-length sequences. Several cycles of PCR amplification are needed. Use a high fidelity DNA polymerase for error free amplification. The product of this PCR reaction should be a band the same size as your starting sample. Clone the product into an expression vector to test for your desired properties.
Troubleshooting and Tips
- Instead of using PCR amplification to prepare the initial template to be shuffled, you can do a quick plasmid prep if the gene is cloned in to a plasmid. Then, you can use restriction enzymes to cut out the sequence you want to shuffle. You will avoid the initial PCR amplification step and any mutations this might introduce.
- Although Taq polymerase is the most common polymerase used in DNA shuffling, I have used several high fidelity DNA polymerases like Pfu or Deep Vent with better results.
- You can make a mix of Taq polymerase with Pfu polymerase in different ratios (1:1, 1:2) to control the mutagenesis rate in PCR amplification. Check the buffer compatibility before mixing the enzymes!
- Use an error prone polymerase to prepare the initial template to be shuffled if you want extra mutations.
- I have used MnCl2 in the DNase I fragmentation step to improve the fidelity of DNA shuffling.
- Make small aliquots of DNase I and store it at -20°C. Discard each aliquot after use. This will reduce the variability of enzyme activity.
- Incubation time with DNase I is very important for getting DNA pieces of desired size. Start with enough DNA to digest small aliquots with differing incubation times (30 sec–12 min). You may then scale up as needed.
- Keep in mind that you can play with the annealing temperature during reassembly. I have used temperatures ranging from 42°C to 60°C. In my experience, the lower the annealing temperature, the greater the recombination.
- The amount of assembly reaction and the number of cycles are important too. 20-25 cycles gives me the best result and the yield decreases when 28-32 cycles are used. And a large volume of reassembly reaction yields a smear when I run it on an agarose gel.
- You can use DMSO to improve the reassembly PCR reaction.
- You can buy a commercially available kit for DNA shuffling experiments to make your life simpler.
There are also several variants of DNA shuffling, like family shuffling, block shuffling, exon shuffling, and whole genome shuffling. These techniques use similar principles as DNA shuffling reaction.
So, start evolving a new protein in the lab.
Happy Shuffling!