
As a global market leader Lumenera provides an extensive range of high quality digital cameras with unique combinations of speed, resolution and sensitivity to satisfy the demands of today's imaging applications.
Importance of Color Reproduction in Microscopy Images
Content sponsored by Lumenera

Through our eyes, seeing is not always believing. Under different lighting conditions, we tend to see the same objects as having the same color. For example, an apple will appear red whether it is lit by daylight or candlelight and a white sheet of paper will be perceived as being white regardless of the light source. This is something that we do subconsciously and is known as ‘color constancy’ or ‘chromatic adaptation’. Our eyes receive light via two photoreceptors: cones and rods. The visual cortex processes this information and color constancy allows our brains to recognise objects regardless of lighting conditions.
This is all very well when we are interacting with the ever-changing contrast of the world around us. However, when it comes to viewing microscopic specimens with a monitor or capturing microscopy images with a camera, the colors we perceive down the eyepieces will differ to those viewed on the screen or captured by the camera.
Importance of Color Reproduction
Does it matter if the images we see down the microscope don’t match those captured by the camera? Well, for samples involving color, such as histology slides stained with hematoxylin and eosin, it is very important. This is to ensure the image can be correctly analyzed and can also be compared with previous samples. With poor color reproduction there is a chance that important information may be missed because the contrast between colors isn’t clear. Therefore, we need to adjust images taken on the microscope to account for the light source.
In image processing, this chromatic adaptation is referred to as ‘white balance’ or ‘color balance’. Data are collected by image sensors (such as photomultiplier tubes or camera sensors) and processed for color reproduction on computer screens or camera displays. Obviously, electronic image sensors and processors don’t match our cones and rods, and those sensors and processors can’t always tell that an apple is red in candlelight. Therefore, it’s important to take color correction into account when viewing and capturing images from microscopes.
Color Correction by Camera Sensors
The human eye and the image sensors employed in microscopy differ in perception of light and color. It’s important to match, as closely as possible, the colors we view down the eyepieces to the colors displayed on a monitor or camera.
Two of the most common image sensors in microscope camera are the Charge Couple Devices (CCD) and Complementary Metal Oxide Semiconductors (CMOS). You can read more about these in this article.
Cameras with CCD sensors are sensitive to infrared (IR) light, which can have the effect of reducing image contrast. Some cameras incorporate IR filters that can compensate for this sensitivity, or filters can be used in the microscope set-up.
Color reproduction will also vary between microscopes, room set-ups, and lighting conditions. Furthermore, colors will also vary depending on the samples, stains or fluorophores that are used. If possible, always use the same microscope system and ensure it is correctly aligned for Koehler Illumination (read more about Koehler Illumination in this article).
Factors Affecting Color Reproduction
Light Source
You’ve probably heard colors being referred to as ‘warm’ or ‘cool’ referring to ‘color temperature’. Color temperature is measured in Kelvin (symbol ‘K’). A bit counter-intuitively, higher temperature colors are called ‘cool colors’ (such as blue or white) and the lower temperature colors are known as ‘warm colors’ (such as red and yellow).
Figure 1. Color temperature chart. Source: Wikicommons.
Microscope light sources vary with color temperature. For example, daylight is regarded as 5000 K and a tungsten halogen lamp has a temperature of around 3200 K. Filters can be used in microscope systems to raise or lower the temperature of the light source. Color temperature isn’t everything, though. A variety of light sources may have the same color temperature, but have different spectral properties. Also, color temperature isn’t a reliable prediction of how specimens will be viewed and processed by the microscope imaging system.
Camera Type
CCD and CMOS cameras can be adjusted electronically for white balance. However, the light sensing elements of these sensors are monochromatic and color balance is achieved by either passing the light through red, green and blue (RGB) filters covering the whole sensor, or by individual sensors which cover each pixel in the sensor array. Different cameras have different color correction systems. The software alone controls some systems and others require both software and hardware adjustments. Some settings cannot be altered by the user, meaning it is important to select a camera that has good color reproduction and color correction.
Lumenera designed one such system for use in their cameras and specific applications called ‘Color Correction Matrices’ (CCM), which uses a color reference matrix to compare each color component of the image.
It should also be noted that image sensors are not perfect. CMOS and CCD sensors can have pixels that do not have the full dynamic range. This can lead to ‘hot’ or ‘dead’ pixels. These can be corrected through pixel correction in the camera software.
Improper White Balance
White balance is the process of removing unrealistic color cast in an image. Because light sources vary in color temperature, this will have an effect on the white balance of an image on screen or captured by a camera. Figure 2 shows images before and after white balance has been applied, you can see how the colors differ greatly before and after adjustment.
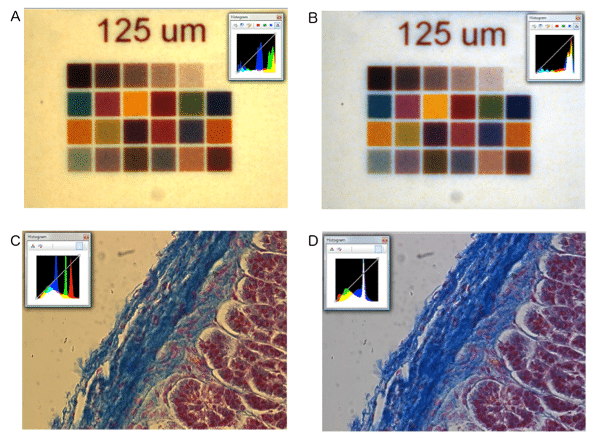
Figure 2. Effect of white balance on color reproduction. A) Microscope Slide color chart; B) Microscope Slide color chart after white balance. C) Feline Adrenal gland stained with hematoxylin and eosin stain D) Feline Adrenal gland stained with hematoxylin and eosin stain after white balance. Images were taken using Olympus BX51, Halogen lamp, with daylight filter and a INFINITY3-3URC.
One way of dealing with white balance is through Lumenera’s ‘Infinity Analyze White Balance’ application, which provides several methods for adjusting the color balance of a camera. White balance adjustments should be performed at the start of every new imaging session. More information on how to perform white balance adjustments is below.
How to Perform White Balance Adjustments
White balance adjustments for most specimens are best made using a neutral grey area (remember: exposure time will affect the white balance). Make the white balance adjustments with no slide (or a blank slide) in place. Then, place a specimen slide on the stage. Without changing exposure or any other microscope adjustments, perform a white balance on the specimen to ensure that the image seen through the eyepieces matches what is viewed on the monitor or captured by the camera. View the rest of your specimens keeping any further adjustments to an absolute minimum.
If you feel the automatic white balance adjustment has not correctly white balanced your sample you can also manually adjust white balance by examining the histograms for the field of view. Figure 3A shows a histogram with poor white balance – each of the channel outputs has distinct peaks. You can manually adjust each channel output so that the outputs overlap as see in Figure 3B. For a detailed guide for white balance adjustments using the INFINITY ANALYZE view this video tutorial.

Figure 3. Using histograms to aid in white balance adjustments. Left) Histogram showing poor white balance – each of the channels are visible separately. Right) Histogram following white balance – the channels are now overlapping.
Choice of Monitor
Color reproduction will vary between monitors. Monitors must be calibrated when first installed. Calibration should be performed at regular intervals over the lifetime of the display. Additionally, if correct color balance is important for imaging of your samples, then several companies offer medical display monitors. These specialized monitors offer a more accurate reproduction of color than standard monitors.
Medical RGB
Even with specialized medical display monitors, there is still a concern over standardized color reproduction. There is currently no standardization of color management across platforms. In order to address this issue, The International Color Consortium (ICC) was set up in 1993. Within the ICC there is a Medical Imaging Working Group that promotes the correct use of color management across a variety of medical and research areas. The group is currently addressing the fact that there is no suitable color display calibration objective for medical imaging displays designed to show color images. The working group is also examining the production of a suitable calibration slide for use in histopathology to enable consistent color reproduction between different imaging systems.