Using Word to Write your Thesis: Creating a Master Document

Wow – your thesis is really coming along. First, you created an outline to help you organize your chapters. Second, you made a Table of Contents and learned how to insert captions and how to cross-reference within the document.
Now it’s time to combine your chapters into a single thesis master document; this allows you either to work on the whole thesis at once or to concentrate on individual chapters.
Separate or Together?
When putting together a thesis, it is useful to keep the chapters in separate documents because it keeps the files smaller. This means they will open and close faster, and if something goes wrong (which hopefully it won’t, but it’s better to plan for the worst) there’s less to lose.
You also won’t have to scroll through pages and pages of introduction when you only want to make a slight amendment to a method! With a thesis master document, you can work on each of the chapters separately, or have them all open together in the same document depending on what you need to do.
But eventually, you will have to put it all together.
Before you start…
Beware: Once you have linked files to the master document, you can’t change the file’s name or the file’s location or the master document won’t be able to find it! I stored all my thesis files in a folder in my dropbox account – this saved me having to update backup copies every other week and meant I wasn’t moving the documents around.
Make sure you have an up-to-date backup of the individual files, as sometimes creating the master document can go a bit wrong, and you don’t want to lose a chapter or two.
Thesis master documents can be a little tricky to get used to and take some playing around with to get the hang of. Before you get started setting up your thesis master document, try linking a few smaller files together and get used to manipulating them in Word – think of it like an artist doing a rough sketch before a masterpiece!
Making Your Thesis Master Document
To create the master document:
1. Open a new word file
2. Go to the Outlining tool
3. In the master document options, select “Show document”
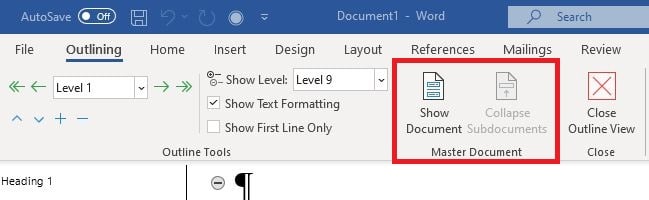
This will create the option to “Create” or “Insert” files into the master document.
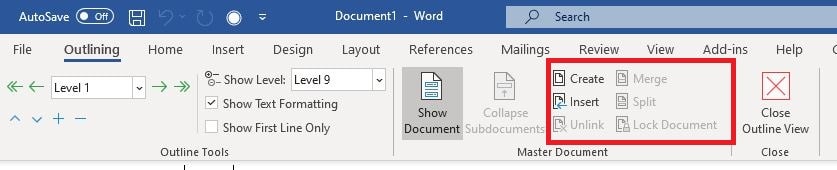
4. Click on “Insert” and add in your chapter files, which will appear as file path links with the normal format (depending on where you saved them) “C:\Users\…” followed by the name of the computer you’re saving on, the location, the folder, etc.
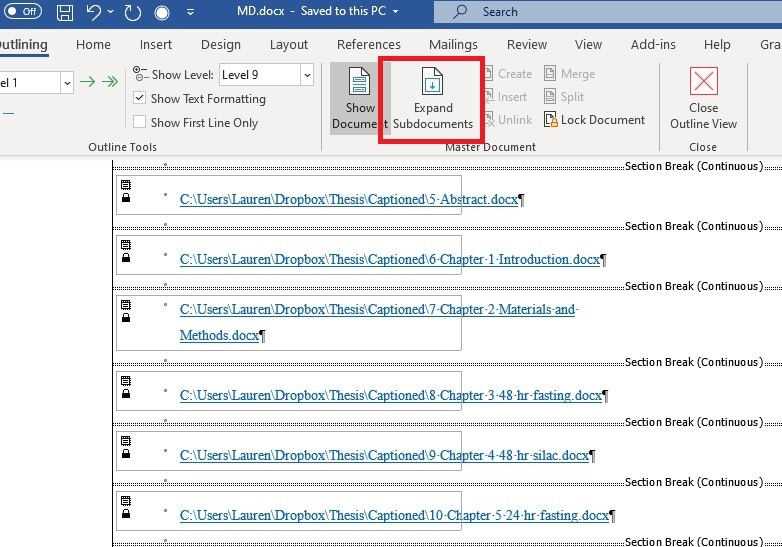
5. Hit “Expand Subdocuments” to get a look at the content of the chapters rather than just the file paths. This gives you a look at the thesis as a whole and a chance to update your table of contents, list of figures, etc.
You Have a Thesis Master Document – What Next?
Don’t forget to update your table of contents, list of figures, and list of tables when you create your thesis master document. At this point, it’s important to do a snag check. We’ve all had that document where it ends up saved as “final-v5-final_update_v2” because we kept noticing minor errors after we thought it was final and had to keep going back to it.
Remember that this document is HUGE, and while you’re probably up against a deadline, you need to take that half an hour to scroll through the whole document and find the bits that have gone rogue:
- actual figures appearing in the list of figures – usually because they’ve been styled as a caption.
- masses of white space before or after a figure, or titles/legends on separate pages from the figure/table they are describing – ticking or unticking “Keep with next” in the paragraph options can help keep things together, or if it’s a large paragraph that won’t fit together, can allow it to break over a page.
- incorrect cross-references – select all the text and update the fields (F9 or right-click).
Once you have your final thesis ready to go, you can add the cover page and page numbering, then expand your subdocuments, save the entire file as a PDF (to stop things moving about) and print!
Come back for the final article in this series in which I discuss cover pages, page numbering, and some time-saving tips for using Word for thesis writing.
Originally published October 29, 2014. Reviewed and updated on December 2, 2020
**Note: All screenshots taken from Word for Windows, 2019.
Be very careful with Dropbox or similar online storage systems. These are technically no backups. The reason is simple: The moment you do a change on the folder which has been linked to the Dropbox, it will be propagated to the Dropboxsystem. So if you manage to produce a corrupt version of one of your thesis files, this will be in your online storage before you will be able to prevent it and replace your last working version there. I have seen dramas here…
To avoid this, create an independent backup (not something you work on) which is on a USB stick, or a different folder which syncs with Dropbox. This way you are relatively safe of this work errors. It is more work by hand though, but you have to know how much your thesis means to you.
This is not true anymore. Dropbox has file version history that goes back to 30 days where you can recover an uncorrupted version .
https://www.dropbox.com/en/help/11