
Innova Biosciences specialises in providing highly effective bioconjugation solutions. Problems such as poor yield, batch to batch variation and low sensitivity are all overcome by using Innova’s core labelling technologies of Lightning-Link®, InnovaCoat® and Thunder-Link®. These technologies simplify labelling of antibodies and other proteins to enzymes, fluorescent dyes, gold nanoparticles and oligonucleotides, and are suitable for both small scale R&D and large scale manufacturing. In addition to their extensive range of conjugation kits, Innova offer bespoke solutions for custom manufacturing of your conjugate needs.
Getting Started with Immunohistochemistry
Content sponsored by Innova Biosciences

What Is Immunohistochemistry?
Immunohistochemistry is a favorite tool among clinicians to help diagnose a range of diseases by identifying abnormal cells, such as those in cancer.
In a nutshell, immunohistochemistry uses antibodies to detect proteins (antigens) that are specific to, or have altered expression in, abnormal cells within a tissue section (e.g. the liver, pancreas, or the heart). It can also be used as a predictor for treatment outcome (e.g. by demonstrating the expression of a target molecule for a particular drug).
In this article, we’ll outline the immunohistochemistry basics to get you off to a flying start with this technique.
Why Would You Want To Use Immunohistochemistry?
Immunohistochemistry isn’t just a useful clinical tool, it also has great applications as a basic research tool. It can provide you with a wealth of information on the expression of specific proteins within the context of tissue structure (rather than isolated individual cells).
This means that you can look at the location and colocalization of proteins within a cell, for instance in the nucleus, cytoplasm, or membrane, while the cell is still in its “natural” environment.
Got your attention? Great! It only gets better from here on in—not only is this a useful technique, but it is also pretty simple to perform!
Immunohistochemistry Basics: The 4 Main Steps
Ready for a rundown of the immunohistochemistry basics? A general immunohistochemistry protocol consists of four main steps:
- Fixation—to keep everything in its place.
- Antigen retrieval—to increase the availability of proteins for detection.
- Blocking—to minimize pesky background signals.
- Antibody labeling and visualization—to get the pretty pictures.
1. Tissue Fixation
This step is pretty important as it maintains tissue structure and retains antigenicity (the availability of the antigens/proteins to be detected by antibodies). The fixation method you use depends on the tissue type you are using and your individual experimental requirements.
For instance, if you want good antigen expression but aren’t too fussed about the “look” (morphology) of your cells, opt for snap-frozen and acetone-fixed. However, if morphology is really important for you, go for the formalin-fixed and paraffin-embedded (FFPE) method.
2. Antigen Retrieval
If looks are what you are going for and you opt for the FFPE method, then you should consider pre-treatment with antigen retrieval agents. These improve antigen expression of your samples by breaking down formalin-induced antigen cross-linking, re-exposing epitopes on the antigen to antibody binding.
Heat and enzyme retrieval are both employed, with heat-induced epitope retrieval (HIER) now being the most commonly used. In simple terms, HIER involves heating your slides in buffer at pH6 or pH9 (depending on your antibody) using a microwave or a pressure cooker.
You can make your own buffers, but commercial reagents are also widely available for this purpose. Enzyme retrieval might be considered by some to be old hat, but still has its place.
You can use proteolytic enzymes such as pepsin or pronase to break down that cross-linking and expose the epitopes that your antibody needs to see; again, some antibodies are better suited to one method over the other.
3. Blocking
If you’ve ever performed a Western Blot you know that blocking endogenous materials before staining is crucial to minimize false-positive staining. For immunohistochemistry, there are two main factors to consider when blocking.
Block Endogenous Enzymes
First, you want to block or inactivate endogenous enzymes in the tissue that can activate substrates that might be used later in visualizing antibody binding (e.g. endogenous peroxidase and alkaline phosphatase).
Peroxidase is often an issue in tissues such as kidney or liver, and in those in which blood cells are present (arguably that means everything to some extent).
Alkaline phosphatase is particularly problematic in intestine and placenta (but much less so in FFPE material).
Be Aware of Endogenous Antibodies
Second, be aware of endogenous antibodies, for example, those on the surface of B lymphocytes in immune tissue; secondary antibodies may cross-react with these, leading to high background staining in your sample.
Choosing your secondary antibodies carefully may help here, but, in most cases, more general, non-specific binding arising from secondary antibodies needs to be reduced by a blocking step. Don’t fear, though, specific blocking approaches are available in each of these situations to improve results.
4. Antibody Labeling and Visualization
Now that you’ve done all the preparation, it’s time to get the pretty pictures. With immunohistochemistry, staining can be set up in one of two ways: as an indirect assay or using direct labeling.
Indirect Detection
With indirect detection, you use a secondary antibody with a covalently attached label. This secondary antibody binds to the primary antibody during the staining process.
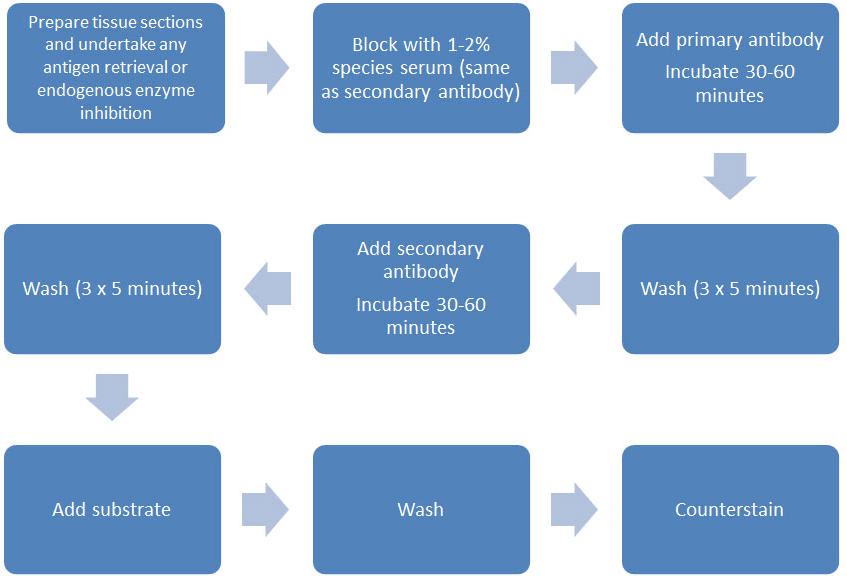
Figure 1. Indirect staining methodology.
The standard indirect detection methodology can be seen in Figure 1 but, in essence, there are two main steps to detect your antigen in this manner:
- Incubate your primary antibody (usually for 1 hour, but sometimes an overnight incubation may be necessary) on your tissue sample. This allows the antibody to bind to the antigen (assuming of course that the antigen is present). Once it is bound, you need to wash away any excess unbound primary antibody before incubating with a labeled secondary antibody.
- After another period of incubation (again 1 hour), excess secondary antibody is washed away and the amount of label associated with the primary antibody (i.e. indirectly via the secondary reagent) is quantified.
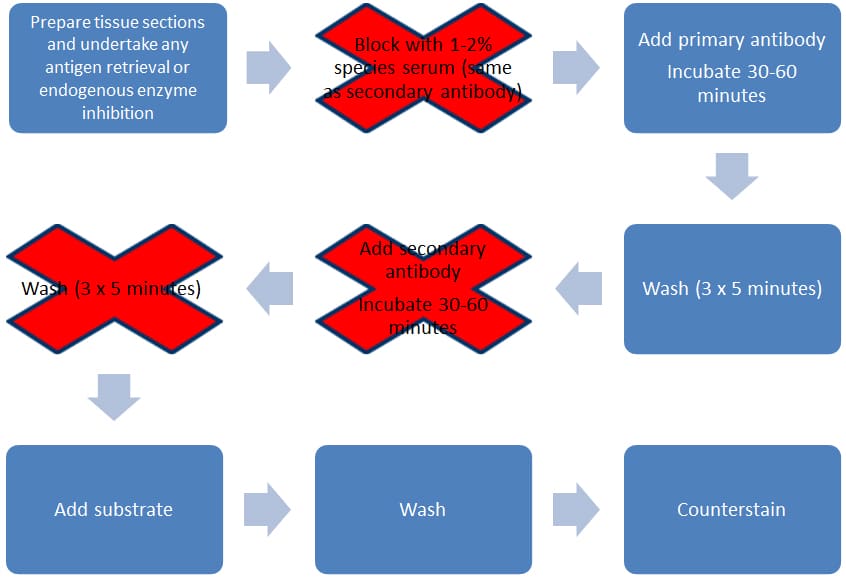
Direct Detection
This method is quicker and simpler than indirect detection, as the label is attached via a covalent bond directly to the primary antibody. This means you need only one incubation step and one round of washes (see Figure 2). This method has several advantages over indirect detection, including decreased assay variability, reduced cost (by eliminating the need for secondary antibodies), and reduced time (as the second round of incubation and wash steps are removed).
Figure 2. Direct staining methodology.
Once you’ve labeled your samples, it’s time to visualize!
If you’ve gone for fluorescent labels, you need to view your samples directly under a fluorescence microscope—remember to use the appropriate excitation wavelengths and filter sets based on the fluorophore you’ve used.
However, if you’ve opted for an enzyme label such as horseradish peroxidase, further incubation is required with the appropriate substrate. In these cases, the enzyme acts on the substrate to produce an insoluble colored component that is deposited at the site of antibody binding.
So Which Method is Best for Me?
Despite the obvious benefits of direct staining, the preparation of the directly labeled antibodies is often considered time-consuming and technically difficult. In addition, it is often thought that indirect staining is more sensitive than direct staining as multiple secondary antibodies are able to bind to one primary antibody, thus increasing the sensitivity of the target antigens.
However, during the binding of the secondary antibody and any wash steps, a proportion of the primary antibody will be dissociating from the antigen and, therefore, any amplification offered by the presence of the secondary antibody will be significantly reduced.
Essentially, you need to decide what is more beneficial for you. If time is of the essence and non-specific binding has been a problem in your immunohistochemistry experiments, then there are options available that allow you to directly label your primary antibodies quickly without any technical expertise required.
This handy table will help you decide which method is best for you:
| Method | Pros | Cons |
|---|---|---|
| Direct | Quick methodology Fewer reagents, cheaper Non-specific binding eliminated No cross-species reactivity Dual staining is straightforward | Little signal amplification Availability of directly conjugated antibodies for IHC staining is restricted |
| Indirect | A small number of standard conjugated secondary antibodies is required Commonly used technique | Non-specific binding may occur Extra incubation and wash steps required Dual staining difficult to achieve |
We hope that this article has helped you with the immunohistochemistry basics! We’d love to hear how you get on with the techniques described; get in touch in the comments.
Struggling with unreliable results from your immunofluorescence? Download Bitesize Bio’s immunofluorescence troubleshooting guide poster—it explains the controls you need.
Want to know more about histology? Visit the Bitesize Bio Histology Hub for tips and tricks for all your histology experiments.
Originally published July 16, 2014. Reviewed and republished July 2021.
Check out the latest episode of The Microscopists podcast:
Great overview!
Whats the mean of HER 2 neu Negative 1+,KI 67 20% and PR-Internal control Positive
Fantastic. Thank you!
[…] allows deeper analysis of the spheres after invasion assay completion with immunofluorescence or immunohistochemical analysis. Degradation of the gels can also allow processing of samples for flow analysis or Western […]