Chasing the Pot of Gold at the End of the Rainbow: Choosing the Right Fluorochromes for Your Flow Cytometry
With the current proliferation of new dyes and instruments that can detect many colors simultaneously, it seems like an entire rainbow is at your disposal for your flow cytometry experiments.
And we know that when designing a polychromatic flow cytometry panel, more is often better – right? The more antigens you can detect, the more subsets you can identify. Don’t forget to add a viability dye and a dump (to remove unwanted populations). The possibilities can leave you giddy with excitement.
But you many need to restrain yourself. Because of course, if you use more fluorochromes, you increase issues with spectral compatibility; most notably a loss of resolution due to propagation of spreading error.
What is a cytometrist to do? How does one evaluate which fluorochromes to use?
Luckily, there are several simple steps you can consider to aid in making your fluorochrome choice.
What are the capabilities of the instrument?
Knowing which lasers are installed in your instrument is critical in determining which fluorochromes can be used. If an instrument doesn’t have a 405 laser, measuring the new Brilliant Violet dyes and Q-dots becomes moot.
Likewise, knowing which filters are available, and how easy it is to change the filter configuration can be important. On an instrument like a FACSCalibur, the filters are fixed, so changing the filter configuration between experiments is not possible. With newer instruments, filter swaps are easier.
One thing to consider with filter swaps is the other lasers in the system. Make sure that it doesn’t disrupt the light path or catch unintended photons from the lasers.
Know what is available
Not all fluorchromes are available for all antigens. Use online tools like Fluorish or Chromocyte to help you determine which fluorochromes are available for your application. This is a lot easier than working through a host of vendor catalogues and websites. If the fluorochrome isn’t available, your decision has been made for you!
Understand brightness
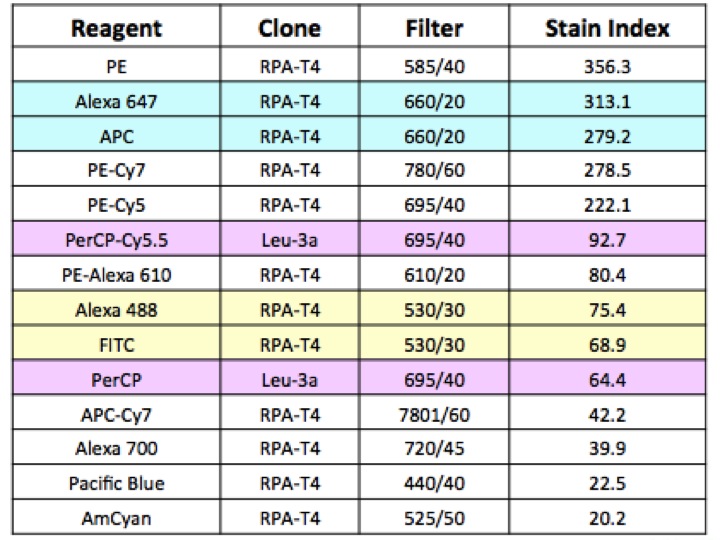
In 2004, the idea of the Staining Index (SI) was published (Maecker et al., (2004) Cytometry A 62A:169-173). This calculation allows you to order the brightness of a given fluorochrome in relation to other fluorochromes and helps you choose the fluorochromes that will work best together in your experiment.
Of course, there are some caveats to using the staining index outright: notably changes to laser excitation power and laser wavelength in individual machines will affect the brightness of the fluorochromes. But what is important is to understand the relative brightness among fluorochromes.
The chart below is from that early work, and has not been updated for new fluorochromes, but the relative order helps you in planning proper fluorochrome choice.
Figure 1: Staining Index, courtesy of Holden Maecker
Understand expression level of the targets
Before choosing a fluorochrome, know the relative expression of the target antigen. If you have a highly expressed antigen, use a less bright fluorochrome – trading off the brightness with the fact that the antigen is highly expressed. You can then save the brightest fluorochromes for targets with lower expression levels, or for those targets for which the expression level is unknown
Prioritize what you want to detect
Make sure the targets that are most critical for your experiment receive the best fluorochrome choice. You can reserve the brightest fluorochromes for the most important antigens – those that are poorly expressed, emerging during biology (i.e. activation markers) or unknown. Don’t design the panel around viability or dump channels, but do not forget them when it comes to the end of the panel.
Minimize spillover
Loss of resolution in a given channel is caused by the error that other fluorochromes contribute to that detector. You can identify the problematic detectors and fluorochromes, as shown by this paper (Perfetto et al (2004) Nature Reviews Immunology 4:648-655) in which the error for multiple fluorochromes was calculated.
Instrument specific charts like those shown in Figures 2 and 3 identify the detectors that will be the most trouble (i.e. receiving a lot of error) and the fluorochromes that cause that trouble (i.e. spill over into multiple detectors).

Figure 2: From Perfetto et al. (2004).

Figure 3: Overlap chart from 12-color, 3-laser instrument (405, 488, 633 nm).
Validate and optimize
After all the theoretical work has been done in choosing your fluorochromes you still need to take the time to validate and optimize your reagents with the instrument. Include the proper negative and positive controls and assess the staining for each antigen.
By following these simple steps, you can design experiments that will let all your colors shine.