For identifying positive clones from a plasmid cloning procedure, the routine of performing a mini-prep and then checking the putative clones by restriction digestion is most commonly used.
Of course, if you need to screen a large number of clones, another option is a colony PCR to identify positives, followed by restriction digests to confirm.
However, there is a quick & dirty screening method that is even faster than colony PCR.
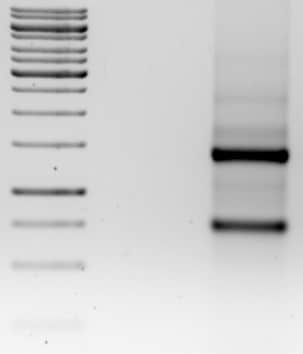
Called colony cracking, it involves picking a colony straight into lysis buffer, running the extract straight onto an agarose gel, and then identifying positive clones based the electrophoretic mobility difference between the super coiled DNA with and without insert – plasmids with inserts will travel slower than plasmids without them (no-insert control).
Choose a free resource to help you move forward
CHEAT SHEET
Nuclear Extraction Protocol
DOWNLOAD
Nanodrop Results Interpretation Card
Obviously, the larger the insert, the easier it will be to distinguish between positive and negative clones, but researchers claim to be able to detect inserts of only 200bp (see the alternate protocol links at the bottom of the page).
If you’d like to try this method, read further.
Reagents:
2x Lysis Buffer:
20% w/v Sucrose
200mM NaOH
120mM KCl
10mM EDTA
0.5% SDS
a pinch of Bromophenol blue
store at -20 degC
Procedure:
There are two ways of performing this screen. If the chances of you having a clones depend on the number of colonies you screen i.e. your “luckiness” factor is abysmal, then obviously you would have a screen a large number of colonies. Then go ahead with the 96 well plate method. If you are the type who usually strikes on the clone in a screen of say 10 to 20 colonies then you could use Eppendorf tubes.
1. Dilute lysis buffer to 1x, at room temperature.
2. Pick the colonies from the transformant plate “patch” to a master plate and transfer remaining to 30 microL of lysis buffer (in Eppendorfs or a 96 well plate)
3. Incubate at 37 degC for 5 to 7 minutes
4. Chill on ice for 5min
5. Spin at maximum speed for 10 minutes ( you would need a compatible centrifuge to spin 96 well plates – which should be sealed with parafilm)
6. Load 10 to 15 microL on the gel (Caution: When trying to load from the lysate make sure you only pick up the supernatant. The gooey mass below (caused by genomic DNA) will stick to your piptte causing pipetting difficulties as well cause the sample to jump out of the agarose lanes. If this happens spin down again for a few minutes and load)
7. Difference in electrophoretic mobility will help you narrow down your clones for mini preps.
Have you tried this? If so, let us know how it works! Or if you decide to try it, please be sure to let us know your results! :)
Further reading
An alternate protocol, which differs only in the composition of the lysis buffer.
Yet another version of this protocol.
Primary References:
Plasmid detection and sizing in single colony lysates
WM Barnes. Science 28 January 1977: Vol. 195. no. 4276, pp. 393 – 394
DOI: 10.1126/science.318764
Preparation of Plasmid DNA: Toothpick Minipreparation.
J. Sambrook and D. W. Russell (2006). CSH Protocols 2006, pdb.prot3905
Photo: skeem2005
You made it to the end—nice work! If you’re the kind of scientist who likes figuring things out without wasting half a day on trial and error, you’ll love our newsletter. Get 3 quick reads a week, packed with hard-won lab wisdom. Join FREE here.